Table of Contents 1.1 1.2 1.3 1.4 1.5 10 General Description Cooktop Control panel Other parts Available accessories 2 Use 2.1 2.2 2.3 2.4 2.5 2.6 2.7 2.8 10 11 11 12 13 15 Instructions Using the accessories Using the cooktop Using the storage compartment Using the main oven Using the auxiliary oven Cooking advice Programming clock 3 Cleaning and maintenance 3.1 3.2 3.3 3.4 3.
Important Safety Instructions TIP OVER HAZARD WARNING • A child or adult can tip the range and be killed. • Make sure that the anti-tip device has been properly installed and attached. The wall-mounted brackets should anchor the sides of the range (primary system) or, in case of floormounted brackets, they should anchor the rear of the range to the ground. • Make sure that the anti-tip device is re-attached when the range is moved.
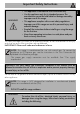
Important Safety Instructions WARNING EN • This appliance is intended for use in the home only. • Use this appliance only for its intended purpose. The manufacturer cannot be held liable for damage caused by improper use of this range. • This appliance complies with current safety regulations. Improper use of this range can result in personal injury and material damage. • Read all the instructions before installing or using the range for the first time.
Important Safety Instructions WARNING PRIMARY FASTENING SYSTEM: Visually check that the wall-mounted brackets are inserted into the appropriate lateral hooks (on both sides). SECONDARY FASTENING SYSTEM: Visually check from the inside of the drawer that the floor-mounted bracket is inserted into the appropriate lateral hooks (left or right). • Proper installation is your responsibility. Make sure your appliance is properly installed and grounded by a qualified installer.
• DO NOT TOUCH SURFACE BURNERS OR THE INSIDE OF THE APPLIANCE: Heating elements may be hot even though they are dark in color. The oven cavity can be hot enough to cause burns. During and after use, do not touch areas near burners or the inside of the oven until they have had sufficient time to cool. Do not allow garments or any flammable material to come into contact with hot surfaces. If personal clothing or hair catches on fire, drop and roll immediately to extinguish the flames.
Important Safety Instructions • DO NOT USE ALUMINUM FOIL TO LINE ANY PART OF THE OVEN OR RANGETOP. Use of a foil liner can result in an electrical shock or fire hazard or obstruct the flow of heat and air. Foil is an excellent heat insulator, allowing heat to be trapped under it. This can interfere with cooking and can damage the enamel of the oven. • Prevent aluminum foil from contacting the heating elements. • Never leave the range unattended when using high heat settings.
• Make sure that your range is properly secured and the anti-tip device is correctly installed. Refer to the instructions inside the installation manual. • Do not stand or sit on the oven door or drawer. • Remove all packing materials and temporary labels from the oven and rangetop. • Record the Model and Serial number on Page 2 of this booklet. The Model and Serial numbers are on the Range ID plate. The ID Plates are visibly located on the back of the appliance and on the oven door frame.
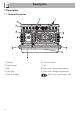
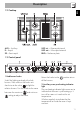
Description 1 Description 1.
Description EN 1.2 Cooktop UR2 int. = Ultra-rapid internal UR2 ext. = Ultra-rapid external BBQ = Barbecue plate AUX = Auxiliary R = Rapid SR = Semi-rapid 1.3 Control panel 1 Hob burner knobs Useful for lighting and adjust the hob burners. Press and turn the knobs anticlockwise to the value to light the relative burners. Turn the knobs to the zone between the maximum and minimum setting to adjust the flame. Return the knobs to the off the burners.
Description 3 Auxiliary oven function/temperature knob The oven’s various function are suitable for different cooking models. The cooking temperature is selected by turning the knob clockwise to the required setting, between 120°F and 450°F 8 Barbecue knob Adjusts the power of the barbecue element on the hob. Turn the knob to any position from 1 to 9 to activate the heating element. 9 Barbecue indicator light Useful for displaying the current time, set programmed cooking operations and program the timer.
Description Griddle EN Cooling fan The fan cools the oven and comes into operation during cooking. The fan causes a steady outflow of air that exits from the rear of the appliance and which may continue for a brief period of time even after the appliance has been turned off. Do not obstruct ventilation openings and heat dispersal slots.
Description Rack Tray rack Useful for supporting containers with food during cooking. Rotisserie This is placed above the oven tray, and is used for cooking foods that might drip. Useful for cooking chicken and all foods which require uniform cooking over their entire surface. Some models are not provided with all accessories. The accessories intended to come into contact with food are made of materials that comply with the provisions of current legislation.
Use 2.1 Instructions High temperature inside the oven during use Danger of burns • Keep the oven door closed during cooking. • Protect your hands by wearing oven gloves when moving food inside the oven. • Do not touch the heating elements inside the oven. • Do not pour water directly onto very hot trays. • Keep children under the age of 8 away from the appliance when it is in use.
Use High temperature inside the oven during use Danger of fire or explosion • Do not spray any spray products near the appliance. • Do not use or leave flammable materials near the appliance or the storage compartment. • Do not use plastic cookware or containers when cooking food. • Do not put sealed tins or containers in the oven. • Do not leave the appliance unattended during cooking operations where fats or oils could be released. • Remove all trays and racks which are not required during cooking.
2.2 Using the accessories Barbecue griddle High temperature Burn hazard • After extended use the cooking plate will stay hot even after the heater element has switched off. Keep children at a distance. • Remove the griddle only when it is cold. 3. In the tray under the heater element you can place: • Water to gather fat and oil coming from cooking. • Molten rock to keep heat longer and improving cooking times and quality. 4.
Use Ring reducers Rotisserie The ring reducers must be placed on the hob grids. Make sure they are placed properly. 1. Insert the 4 supplied bushings in the 4 corner holes of the deep tray and screw them onto the ring nuts with a suitable tool (such as a screwdriver). Racks and trays Racks and trays have to be inserted into the side guides until they come to a complete stop.
3. Prepare the rotisserie rod with the food using the clip forks provided. The clip forks can be tightened using the fastening screws. 5. Place the tray on the first runner (see “General Description”). 6. Insert the tip of the rod in the rotisserie motor housing on the left of the rear wall of the oven. 4. Once you have prepared the rotisserie rod, place it on the supports. Insert the tip of the rod in the housing of the mechanism on the left-hand support until it stops.
Use 7. To activate the rotisserie, turn the function knob to select the function and use the temperature knob to set a cooking temperature. Pour a little water into the tray to prevent smoke from forming. 8. When cooking is complete, remove the tray with the rotisserie. 9. Screw on the handle provided so that you can handle the rotisserie rod more easily. 2.3 Using the cooktop WARNING FIRE HAZARD • For your safety: do not allow the burner flame to extend beyond the edge of the pan.
Simmer function This function is extremely useful for melting food like butter, chocolate or similar and for simmering small quantities of food. 1. Switch on the DUAL burner internal cup. 2. Set the flame to the minimum. 3. Leave the external cup off. If the external cup switches on at full power, set half power at least for the internal cup.
Use Refer to the following chart as a guide to the physical properties of cookware. Aluminum • Heats quickly and evenly. • Suitable for all types of cooking. • Medium or heavy thickness is best for most cooking tasks. Cast iron • Heats slowly and evenly. • Good for browning and frying. • Maintains heat for slow cooking. Ceramic or glass-ceramic • Follow the manufacturer’s instructions. • Heats slowly but unevenly. • Best results with low to medium heat settings. Copper • Heats very quickly and evenly.
2.4 Using the storage compartment 2.5 Using the main oven There is a storage compartment located at the bottom of the cooker; this can be used to store pans or metal objects required for its use. 1. To open the storage compartment, pull lightly the door. Switching on the main oven EN Use To switch the oven on: 1. Select the cooking function using the function knob. 2. Select the temperature using the temperature knob.
Use Fan-assisted bottom The combination of the fan with only the bottom heating element allows cooking to be completed more rapidly. This system is recommended for sterilizing or for finishing off the cooking of foods already well-cooked on the surface, but not inside, which therefore need a little more heat. Perfect for any type of food. Rotisserie grill The rotisserie works in combination with the grill element allowing food to be perfectly browned.
Rapid defrost Rapid defrost is helped by switching on the fan provided and the top heating element that ensure uniform distribution of low temperature air inside the oven. Pizza The operation of the fan, combined with the grill and the lower heating element, ensures uniform cooking even with complex recipes. Perfect not just for pizzas, but also for biscuits and cakes. 2.
Use 2.7 Cooking advice General advice • Use a fan-assisted function to achieve uniform cooking at several levels. • It is not possible to shorten cooking times by increasing the temperature (the food could be overcooked on the outside and undercooked on the inside). • Using more ovens at the same time might affect the final cooking results. Advice for cooking meat • Cooking times vary according to the thickness and quality of the food and to consumer taste.
Advice for defrosting and proving • Place frozen foods without their packaging in a lidless container on the first shelf of the oven. • Avoid overlapping the food. • To defrost meat, use the rack placed on the second level and a tray on the first level. In this way, the liquid from the defrosting food drains away from the food. • The most delicate parts can be covered with aluminium foil. • For successful proving, a container of water should be placed in the bottom of the oven. 2.
Use Minute minder timer Setting the time If the time is not set, the oven will not switch on. On the first use, or after a power failure, the digits will be flashing on the appliance’s display. 1. Keep the clock key for two seconds. The dot between the hours and the minutes flashes. 2. The time can be set via the value increase key and value decrease key . Keep the key pressed in to increase or decrease rapidly. 3. Wait 7 seconds. The dot between the hours and the minutes stops flashing.
Timed cooking Timed cooking is the function which allows a cooking operation to be started and then ended after a specific length of time set by the user. 1. Keep the clock key pressed for a few seconds. The display shows the figures and the symbol flashing between the hours and minutes. 2. Press the clock key again. On the display the digit appear alternating with the digit and the symbol flashing under the minutes. 3. Use the value increase and value 5. Wait approx.
Use Programmed cooking Programmed cooking is the function which allows a cooking operation to be started at a set time and then ended after a specific length of time set by the user. 1. Set the cooking time as described in the previous point “Timed cooking”. 2. Press the clock key again. On the At the end of cooking the heating elements will be deactivated. On the display, the symbol turns off, the symbol flashes and the buzzer sounds. 6.
Use EN Cooking information table Weight (Kg) Function Shelf Temperature (°F) Time (minutes) Lasagne Pasta bake 3-4 3-4 Convection Convection 1 1 430 - 450 430 - 450 45 - 50 45 - 50 Roast veal Pork Sausages Roast beef Roast rabbit Turkey breast Roast pork neck Roast chicken 2 2 1.5 1 1.5 3 2-3 1.
Cleaning and Maintenance 3 Cleaning and maintenance 3.1 Instructions WARNING ELECTRICAL SHOCK HAZARD • Before servicing, disconnect the appliance from the power supply. Recommendations We recommend the use of cleaning products distributed by the manufacturer. To keep the surfaces in good condition, they should be cleaned regularly after use. Let them cool first. Ordinary daily cleaning Improper use Risk of damage to surfaces • Do not use steam jets to clean the appliance.
3.2 Cleaning the hob Teppanyaki plate and Griddle 1. Pour some non-abrasive detergent on a damp cloth and wipe the surfaces. 2. Rinse thoroughly. 3. Dry with a soft cloth or a microfibre cloth. The Teppanyaki plate and the Griddle are easier to clean when it is still lukewarm. • Use conventional specific detergents for stainless steel and non-abrasive sponges. Any remaining encrustations or food residues can be easily removed by soaking the plate for a while.
Cleaning and Maintenance Cleaning the igniters and thermocouples • If necessary, clean the igniters and thermocouples with a damp cloth. • If there is any dry residue, remove it with a toothpick or needle. 3.3 Cleaning the door Removing the door 2. Grasp the door on both sides with both hands, lift it forming an angle of around 30° and remove it. 3. To reassemble the door, put the hinges in the relevant slots in the oven, making sure that grooved sections A are resting completely in the slots.
Removing the internal glass panes For easier cleaning the internal glass panes of the door can be removed. 1. Pull the rear part of the internal glass pane gently upwards, following the movement indicated by the arrows (1). 2. Extract the internal glass pane from the front strip (2) to remove it from the door. 3. Remove the intermediate glass pane by lifting it upwards. 4. Clean the external glass pane and the panes removed previously. Use absorbent kitchen roll.
Cleaning and Maintenance 3.4 Cleaning the oven cavity Removing racks/trays support frames In order to keep your oven in the best possible condition, clean it regularly after letting it cool down. Avoid letting food residue dry inside the oven cavity, as this could damage the enamel. Take out all removable parts before cleaning.
Cleaning the top section The oven cavity is fitted with a tilting heating element which facilitates cleaning the top part (roof) of the oven. 1. Free the upper heating element by gently lifting it and rotating its retainers by 90 degrees. Vapor Clean Vapor Clean is an assisted cleaning procedure which facilitates the removal of dirt. Thanks to this process, it is possible to clean the inside of the oven very easily. The dirt residues are softened by the heat and water vapour for easier removal afterwards.
Cleaning and Maintenance • Pour approximately 40 cc of water into the tray. Make sure it does not overflow out of the cavity. • Spray a water and washing up liquid solution inside the oven using a spray nozzle. Direct the spray against the side walls, upwards, downwards and towards the deflector. • Close the door. We recommend spraying approx. 20 times at the most. 38 Vapor Clean cycle setting 1.
End of the Vapor Clean cycle 3.5 Extraordinary maintenance 4. Open the door and wipe away the less stubborn dirt with a microfibre cloth. 5. Use a non-scratch sponge with brass filaments on hard to remove deposits. 6. In case of grease residues use specific oven cleaning products. 7. Remove the residual water inside the oven.
Cleaning and Maintenance 4. Slide out and remove the light bulb. Do not touch the halogen light bulb directly with your fingers, but wrap it in insulating material. 5. Fit the new light bulb. 6. Refit the cover. Ensure the moulded part of the glass (A) is facing the door. 7. Press the cover completely down so that it attaches perfectly to the bulb support. 40 What to do if...
If the door is opened during a fan assisted function, the fan stops: • This is not a fault. It is a normal operation of the appliance, useful when cooking foods in order to avoid excessive heat escaping. When the door is closed, the oven will return to normal operation. If the problem has not been resolved or in the case of other types of fault, contact your local technical support centre.
PAGE INTENTIONALLY LEFT BLANK