Table of Contents 1.1 1.2 1.3 1.4 1.5 10 General Description Cooktop Control panel Other parts Available accessories 2 Use 2.1 2.2 2.3 2.4 2.5 2.6 2.7 2.8 10 11 11 12 13 15 Instructions Using the accessories Using the cooktop Using the storage compartment Using the main oven Using the auxiliary oven Cooking advice Programming clock 3 Cleaning and maintenance 3.1 3.2 3.3 3.4 3.
Important Safety Instructions TIP OVER HAZARD WARNING • A child or adult can tip the range and be killed. • Make sure that the anti-tip device has been properly installed and attached. The wall-mounted brackets should anchor the sides of the range (primary system) or, in case of floormounted brackets, they should anchor the rear of the range to the ground. • Make sure that the anti-tip device is re-attached when the range is moved.
Important Safety Instructions WARNING EN • This appliance is intended for use in the home only. • Use this appliance only for its intended purpose. The manufacturer cannot be held liable for damage caused by improper use of this range. • This appliance complies with current safety regulations. Improper use of this range can result in personal injury and material damage. • Read all the instructions before installing or using the range for the first time.
Important Safety Instructions WARNING PRIMARY FASTENING SYSTEM: Visually check that the wall-mounted brackets are inserted into the appropriate lateral hooks (on both sides). SECONDARY FASTENING SYSTEM: Visually check from the inside of the drawer that the floor-mounted bracket is inserted into the appropriate lateral hooks (left or right). • Proper installation is your responsibility. Make sure your appliance is properly installed and grounded by a qualified installer.
• DO NOT TOUCH SURFACE BURNERS OR THE INSIDE OF THE APPLIANCE: Heating elements may be hot even though they are dark in color. The oven cavity can be hot enough to cause burns. During and after use, do not touch areas near burners or the inside of the oven until they have had sufficient time to cool. Do not allow garments or any flammable material to come into contact with hot surfaces. If personal clothing or hair catches on fire, drop and roll immediately to extinguish the flames.
Important Safety Instructions • WARNING: NEVER cover any slots, holes or passages in the oven bottom or cover an entire rack with materials such as aluminium foil. Doing so blocks air flow through the oven and may cause carbon monoxide poisoning. Aluminium foil linings may also trap heat, causing a fire hazard. • Prevent aluminum foil from contacting the heating elements. • Never leave the range unattended when using high heat settings. Boilover can cause smoke and spattered grease can ignite.
• Make sure that your range is properly secured and the anti-tip device is correctly installed. Refer to the instructions inside the installation manual. • Do not stand or sit on the oven door or drawer. • Remove all packing materials and temporary labels from the oven and rangetop. • Record the Model and Serial number on Page 2 of this booklet. The Model and Serial numbers are on the Range ID plate. The ID Plates are visibly located on the back of the appliance and on the oven door frame.
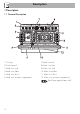
Description 1 Description 1.
Description EN 1.2 Cooktop UR2 int. = Ultra-rapid internal UR2 ext. = Ultra-rapid external BBQ = Barbecue plate AUX = Auxiliary R = Rapid SR = Semi-rapid 1.3 Control panel 1 Hob burner knobs Useful for lighting and adjust the hob burners. Press and turn the knobs anticlockwise to the value to light the relative burners. Turn the knobs to the zone between the maximum and minimum setting to adjust the flame. Return the knobs to the off the burners.
Description 3 Auxiliary oven function/temperature knob The oven’s various function are suitable for different cooking models. The cooking temperature is selected by turning the knob clockwise to the required setting, between 120°F and 450°F 8 Barbecue knob Adjusts the power of the barbecue element on the hob. Turn the knob to any position from 1 to 9 to activate the heating element. 9 Barbecue indicator light Useful for displaying the current time, set programmed cooking operations and program the timer.
Description Griddle EN Cooling fan The fan cools the oven and comes into operation during cooking. The fan causes a steady outflow of air that exits from the rear of the appliance and which may continue for a brief period of time even after the appliance has been turned off. Do not obstruct ventilation openings and heat dispersal slots.
Description Rack Tray rack Useful for supporting containers with food during cooking. Rotisserie This is placed above the oven tray, and is used for cooking foods that might drip. Useful for cooking chicken and all foods which require uniform cooking over their entire surface. Some models are not provided with all accessories. The accessories intended to come into contact with food are made of materials that comply with the provisions of current legislation.
Use 2.1 Instructions High temperature inside the oven during use Danger of burns • Keep the oven door closed during cooking. • Protect your hands by wearing oven gloves when moving food inside the oven. • Do not touch the heating elements inside the oven. • Do not pour water directly onto very hot trays. • Keep children under the age of 8 away from the appliance when it is in use.
Use High temperature inside the oven during use Danger of fire or explosion • Do not spray any spray products near the appliance. • Do not use or leave flammable materials near the appliance or the storage compartment. • Do not use plastic cookware or containers when cooking food. • Do not put sealed tins or containers in the oven. • Do not leave the appliance unattended during cooking operations where fats or oils could be released. • Remove all trays and racks which are not required during cooking.
2.2 Using the accessories Ring reducers Barbecue plate The ring reducers must be placed on the hob grids. Make sure they are placed properly. High temperature Danger of burns EN Use • After being used for a long time, the plate will remain hot even after the heating element has been switched off. Keep children away. • Only remove the plate once it has cooled down. High temperature Risk of damaging the appliance Do not use the barbecue plate without the cooktop guard.
Use Rotisserie 1. Insert the 4 supplied bushings in the 4 corner holes of the deep tray and screw them onto the ring nuts with a suitable tool (such as a screwdriver). 2. Position the rotisserie supports in the bushings as shown in the figure below. 18 3. Prepare the rotisserie rod with the food using the clip forks provided. The clip forks can be tightened using the fastening screws. 4. Once you have prepared the rotisserie rod, place it on the supports.
5. Place the tray on the first runner (see “General Description”). 6. Insert the tip of the rod in the rotisserie motor housing on the left of the rear wall of the oven. 7. To activate the rotisserie, turn the function knob to select the function and use the temperature knob to set a cooking temperature. Pour a little water into the tray to prevent smoke from forming. 8. When cooking is complete, remove the tray with the rotisserie. 9.
Use 2.3 Using the cooktop WARNING FIRE HAZARD • For your safety: do not allow the burner flame to extend beyond the edge of the pan. • Turn off all controls when the range is not in use. All the appliance's control and monitoring devices are located together on the front panel. The burner controlled by each knob is shown next to the knob. The appliance is equipped with an electronic ignition device. Simply press the knob and turn it counterclockwise to the maximum flame symbol, until the burner lights.
Practical tips for using the hob For better burner efficiency and to minimise gas consumption, use pans with lids and of suitable size for the burner, so that the flames do not reach up the sides of the pan. Once the contents come to the boil, turn down the flame far enough to ensure that the liquid does not boil over. Cookware diameters: • AUX: 12 - 14 cm. • SR: 16 - 24 cm. • R: 18 - 26 cm. • UR2 int + ext.: 18 - 28 cm.
Use Correct positioning of the hob grids 2.4 Using the storage compartment Before lighting the hob burners, make sure that the grids are correctly positioned on the hob. Bear in mind that: • Each grid has its own position on the hob. • The raised section must always face the appliance's upstand. There is a storage compartment located at the bottom of the cooker; this can be used to store pans or metal objects required for its use. 1. To open the storage compartment, pull lightly the door. 2.
2.5 Using the main oven Switching on the main oven To switch the oven on: 1. Select the cooking function using the function knob. 2. Select the temperature using the temperature knob. Ensure that the programmer clock shows the cooking duration symbol , otherwise it will not be possible to turn on the oven. Press the key to reset the programmer clock. Functions list Static As the heat comes from above and below at the same time, this system is particularly suitable for certain types of food.
Use Fan assisted The operation of the fan, combined with traditional cooking, ensures consistent cooking even with complex recipes. Perfect for biscuits and cakes, even when simultaneously cooked on several levels. (For multiple-level cooking, we recommend using the 2nd and 4th shelves).
Fan-assisted bottom The combination of the fan with only the bottom heating element allows cooking to be completed more rapidly. This system is recommended for sterilizing or for finishing off the cooking of foods already well-cooked on the surface, but not inside, which therefore need a little more heat. Perfect for any type of food. 2.7 Cooking advice Fan with grill The air produced by the fan softens the strong heatwave generated by the grill, grilling perfectly even very thick foods.
Use • Foods should be seasoned before cooking. Foods should also be coated with oil or melted butter before cooking. • Use the oven tray on the first bottom shelf to collect fluids produced by grilling. • Grilling processes should never last more than 60 minutes using multifunction ovens, 30 minutes inside the auxiliary oven. Advice for cooking desserts and biscuits • Use preferably dark metal moulds: they help to absorb the heat better.
Use Setting the time The programming clock only works for the main oven. EN 2.8 Programming clock If the time is not set, the oven will not switch on. On the first use, or after a power failure, the digits will be flashing on the appliance’s display. 1. Keep the clock key for two seconds. The dot between the hours and the minutes flashes. 2.
Use Timed cooking Minute minder timer The minute minder timer does not stop the cooking operation but rather informs the user when the set time has run out. The minute minder timer can be activated at any time. 1. Keep the clock key pressed for a few seconds. The display shows the figures and the symbol flashing between the hours and minutes. 2. Use the value increase 1. Keep the clock key pressed for a few seconds. The display shows the figures and the symbol flashing between the hours and minutes.
Use Programmed cooking Programmed cooking is the function which allows a cooking operation to be started at a set time and then ended after a specific length of time set by the user. will appear on the display. At the end of cooking the heating elements will be deactivated. On the display, the symbol turns off, the symbol flashes and the buzzer sounds. 6. To turn the buzzer off, simply press one of the programmer clock keys. 7. Press the clock key programmer clock.
Use At the end of cooking the heating elements will be deactivated. On the display, the symbol turns off, the symbol flashes and the buzzer sounds. 6. To turn the buzzer off, simply press one of the programmer clock keys. 7. Press the clock key programmer clock. to reset the 12h or 24h format The default mode is 12h format. 1. Keep the value increase key for a few seconds. The symbols or disappear on the display and 24h format is set. 2.
Use EN Cooking information table Weight (Kg) Function Shelf Temperature (°F) Time (minutes) Lasagne Pasta bake 3-4 3-4 Convection Convection 1 1 430 - 450 430 - 450 45 - 50 45 - 50 Roast veal Pork Sausages Roast beef Roast rabbit Turkey breast Roast pork neck Roast chicken 2 2 1.5 1 1.5 3 2-3 1.
Cleaning and Maintenance 3 Cleaning and maintenance 3.1 Instructions WARNING ELECTRICAL SHOCK HAZARD • Before servicing, disconnect the appliance from the power supply. Recommendations We recommend the use of cleaning products distributed by the manufacturer. To keep the surfaces in good condition, they should be cleaned regularly after use. Let them cool first. Ordinary daily cleaning Improper use Risk of damage to surfaces • Do not use steam jets to clean the appliance.
3.2 Cleaning the hob Teppanyaki plate and Griddle 1. Pour some non-abrasive detergent on a damp cloth and wipe the surfaces. 2. Rinse thoroughly. 3. Dry with a soft cloth or a microfibre cloth. The Teppanyaki plate and the Griddle are easier to clean when it is still lukewarm. • Use conventional specific detergents for stainless steel and non-abrasive sponges. Any remaining encrustations or food residues can be easily removed by soaking the plate for a while.
Cleaning and Maintenance Cleaning the igniters and thermocouples • If necessary, clean the igniters and thermocouples with a damp cloth. • If there is any dry residue, remove it with a toothpick or needle. 3. Remove the heating element stop B and lower the heating element so that the four feet enter the holes in the cooktop. 3.3 Cleaning the door Removing the door Cleaning the barbecue cooktop guard 1. Lift the heating element A and keep it in position using the stop B. 2.
2. Grasp the door on both sides with both hands, lift it forming an angle of around 30° and remove it. 3. To reassemble the door, put the hinges in the relevant slots in the oven, making sure that grooved sections A are resting completely in the slots. Lower the door and once it is in place remove the pins from the holes in the hinges. Removing the internal glass panes For easier cleaning the internal glass panes of the door can be removed. 1.
Cleaning and Maintenance 3. Remove the intermediate glass pane by lifting it upwards. 4. Clean the external glass pane and the panes removed previously. Use absorbent kitchen roll. In case of stubborn dirt, wash with a damp sponge and neutral detergent. 5. When you have finished cleaning, reinsert the intermediate glass pane in its housing in the door. 6. To reposition the internal glass pane, slide the upper part into the door strip and insert the two rear pins into their seats by pressing lightly.
Cleaning and Maintenance Removing the rack/tray support frames enables the sides to be cleaned more easily. To remove the rack/tray support frames: • Pull the frame towards the inside of the oven to unhook it from its groove A, then slide it out of the seats B at the back. • When cleaning is complete, repeat the above procedures to put the rack/tray support frames back in.
Cleaning and Maintenance Vapor Clean Vapor Clean is an assisted cleaning procedure which facilitates the removal of dirt. Thanks to this process, it is possible to clean the inside of the oven very easily. The dirt residues are softened by the heat and water vapour for easier removal afterwards. • Pour approximately 40 cc of water into the tray. Make sure it does not overflow out of the cavity.
Vapor Clean cycle setting End of the Vapor Clean cycle 1. Turn the function knob to the symbol and the temperature knob at a temperature ranging between 120°F and 180°F. 2. Set a cooking time of 18 minutes using the programmer clock. The Vapor Clean cycle starts a few seconds after the last press on the programmer clock keys. 3. At the end of the Vapor Clean cycle, the timer will deactivate the oven heating elements, the buzzer will start to sound and the numbers on the programmer clock dial will flash.
Cleaning and Maintenance 3.5 Extraordinary maintenance 4. Slide out and remove the light bulb. Replacing the internal light bulb Live parts Danger of electrocution • Unplug the appliance. The oven is fitted with two 40W light bulbs. 1. Completely remove all accessories from inside the oven. 2. Remove the rack/tray support frames. 3. Remove the bulb cover using a tool (e.g. a screwdriver). Do not touch the halogen light bulb directly with your fingers, but wrap it in insulating material. 5.
What to do if... The appliance is not working properly: • The switch is defective: check the fuse box to see whether the switch is in working order. • Loss of power: check that the appliance indicator lights are operational. The gas burner does not light: • Loss of power or moisture in the igniters: light the gas burner with a lighter or match. The oven does not heat up: • Defective fuse: check and replace the switch if necessary. • The function knob has not been set: set the function knob.
For LP Gas: Turn off the burners and unplug the appliance from the electrical power supply. For regulating the minimum with LP, the screws at the side of the tap rod must be turned clockwise all the way. Once the regulation has been completed, replace the seal on the by-passes using paint or similar materials. Follow the instructions given in point 9 to locate the adjustment screws. Lubricating the surface burner gas valves Over time, the surface burner gas valves may become stiff or jam.
43