INSTRUCTION MANUAL FS61XNG8 FREE STANDING COOKER
ENGLISH 3 - 34 Thank you for choosing our product. We advise you to read this manual carefully. It contains all necessary instructions for maintaining unaltered the appearance and functional qualities of the appliance.
Contents 1. INSTRUCTIONS FOR USE ..................................................................................................... 4 2. SAFETY PRECAUTIONS ........................................................................................................ 6 3. ENVIRONMENTAL CARE ....................................................................................................... 8 3.1 Our environmental care ...........................................................................................
General instructions 1. INSTRUCTIONS FOR USE This manual is an integral part of the appliance. It must be kept in its entirety and in an accessible place for the whole working life of the appliance. We urge you to read this manual and all the information it contains carefully before using the appliance. Installation must be carried out by qualified personnel in accordance with the regulations in force. This appliance is intended for domestic use and conforms to the EC directives currently in force.
General instructions Do not use the hob if pyrolysis is taking place inside the oven (where present). If you intend to go away for a prolonged period of time, close the mains gas tap or the gas cylinder tap. Take care that no objects are stuck in the door of the oven. Do not open the storage compartment (where present) when the oven is on and still hot. The temperatures inside it may be very high. If the surfaces are still very hot during cooking, do not pour water directly onto the trays.
General instructions 2. SAFETY PRECAUTIONS Consult the installation instructions for safety standards on electrical or gas appliances and for ventilation functions. In your interests and for your safety the law requires that the installation and servicing of all electrical and gas appliances be carried out by qualified personnel in accordance with the regulations in force. Our approved installers guarantee a satisfactory job.
General instructions This appliance must not be controlled using an external timer or remote control system. Be aware of how rapidly the cooking zones heat up. Do not place empty saucepans on the heat. Danger of overheating. Fats and oils can catch fire if they overheat. You are therefore recommended not to leave the appliance while preparing foods containing oils or fats. If fats or oils catch fire, never put water on them. Place the lid on the saucepan and turn off the cooking zone.
Instructions for disposal 3. ENVIRONMENTAL CARE 3.1 Our environmental care Adequate differentiated collection for the subsequent forwarding of the decommissioned product to recycling, processing and ecologically compatible disposal contributes to avoiding possible negative effects on the environment and on health, and promotes recycling of the appliance's constituent materials. Illicit disposal of the product by the user will lead to the application of administrative sanctions.
Instructions for the user 4. GET TO KNOW YOUR APPLIANCE Cooking hob Control panel Oven seal Oven light (double on some models) Door sensor (on some models only) Rack/tray support frame/guide Fan Roof liner (on some models only) Door 4.1 Description of the controls on the front panel 4.1.1 Temperature selection knob The cooking temperature is selected by turning the knob clockwise to the required setting, between 50° and 260°C. The indicator light comes on to indicate that the oven is heating up.
Instructions for the user 5. AVAILABLE ACCESSORIES NOTE: Some models are not provided with all accessories. Rack: useful for holding cooking containers. Tray rack: to be placed over the top of the oven tray; for cooking foods which may drip. Oven tray: useful for collecting fat from foods placed on the rack above. Deep oven tray: for baking cakes, pizza and oven-baked desserts. Reduction pan stand: useful when using small pans. WOK reduction: useful when using a wok.
Instructions for the user 5.2 Using the support rack The support rack is inserted into the tray (as shown in the figure). Using this, foods can be cooked and the fat can be collected separately from the food which is being cooked. 5.3 Using the reduction pan stands The reduction pan stands should be placed on top of the hob pan stands as shown in the adjacent figure. Make sure they are stable. The WOK pan stand should only be used when cooking with a wok. 5.
Instructions for the user 6. USING THE COOKING HOB 6.1 General warnings and advice Before lighting the hob burners, make sure that the flame-spreader crowns are correctly positioned in their housings with their respective burner caps. Before lighting the burners lift the glass lid (where present); before closing it again, turn off all the burners and wait for them to cool. 6.2 Lighting the hob burners All the appliance's control and monitoring devices are placed together on the front panel.
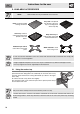
Instructions for the user 6.4 Pan diameters Burner Ø min. (cm) Ø max. (cm) Auxiliary 12 14 Semi-rapid 16 24 Ultra-rapid 18 26 To prevent damage to the appliance or adjacent units, all pans or griddles must be placed inside the perimeter of the hob. Make sure never to come into contact with the lid glass with pots or pans that are still hot. The glass could crack and break with the heat. 6.
Instructions for the user 7. USING THE OVEN 7.1 Before using the appliance • Remove any labels (apart from the technical data plate) from trays, dripping pans and the cooking compartment. • Remove any protective film from the outside or inside of the appliance, including from accessories such as trays, dripping pans, the pizza plate or the base cover. • Before using the appliance for the first time, remove all accessories from the oven compartment and wash them as indicated in “9.
Instructions for the user 7.6 General warnings and advice for use All cooking operations must be carried out with the door closed. The dissipation of heat may cause hazards. During cooking, do not cover the bottom of the oven with aluminium or tin foil and do not place pans or oven trays on it as this may damage the enamel coating. If you wish to use greaseproof paper, place it so that it will not interfere with the hot air circulation inside the oven.
Instructions for the user 7.7 Electronic programmer LIST OF FUNCTIONS Timer key End of cooking key Cooking duration key Value decrease key Value increase key 7.7.1 Setting the time On the first use, or after a power failure, will be flashing on the oven's display. Press the and keys together, and at the same time press the or keys: this will increase or decrease the setting by one minute for each pressure. Press either of the value modification keys to display the current time. 7.7.
Instructions for the user 7.7.5 Automatic cooking Automatic cooking is the function which allows a cooking operation to be started at a set time and then ended after a specific length of time set by the user. Having selected a function, press and hold hold Press and hold When and simultaneously use or ; the display will show the numbers ; press and to set the required number of minutes. and the sum of the current time plus the preset cooking time will appear on the display.
Instructions for the user 8. COOKING WITH THE OVEN The ECO symbol indicates which function gives the least energy consumption. BOTTOM: The heat coming just from the bottom allows to complete the cooking of foods that require a longer basic cooking time, without affecting their browning. Perfect for cakes, pies, tarts and pizzas. This symbol also includes the cleaning function, see “9.6 VAPOR CLEAN: assisted oven cleaning (on some models only)”.
Instructions for the user 8.1 Cooking advice and instructions 8.1.1 General advice • We recommend preheating the oven before putting the food in. Place the food in the oven only once the cooking light is off. • • • For cooking on several levels, we recommend using a fan-assisted function to achieve uniform cooking at all heights. • In general, it is not possible to shorten the cooking times by increasing the temperature (the food could be well-cooked on the outside and undercooked on the inside).
Instructions for the user 8.
Instructions for the user 9. CLEANING AND MAINTENANCE Do not use steam jets for cleaning the appliance. The steam could reach the electronics, damaging them and causing short-circuits. WARNING: For your safety, you are advised to wear protective gloves while performing any cleaning or extraordinary maintenance. Do not use cleaning products containing chlorine, ammonia or bleach on steel parts or parts with metallic finishes on the surface (e.g. anodizing, nickel- or chromium-plating).
Instructions for the user 9.4.2 Pan stands Remove the pan stands and clean them with lukewarm water and non-abrasive detergent, making sure to remove any encrustations. Dry them thoroughly and return them to the hob. Continuous contact between the pan stands and the flame can cause modifications to the enamel over time in those parts exposed to heat. This is a completely natural phenomenon which has no effect on the operation of this component. 9.4.
Instructions for the user 9.5 Cleaning the oven For the best oven upkeep, clean it regularly after having allowed it to cool. • Take out all removable parts. • Clean the oven racks with hot water and non-abrasive detergent. Rinse and dry. • For easier cleaning, the door can be removed (see “10.2 Removing the door”). The oven should be operated at the maximum heat setting for 15/20 minutes after use of specific products, to burn off the residues left inside the oven.
Instructions for the user 9.6 VAPOR CLEAN: assisted oven cleaning (on some models only) VAPOR CLEAN is an assisted cleaning procedure which facilitates the removal of dirt. Thanks to this process, it is possible to clean the inside of the oven with great ease. The dirt residues are softened by the heat and water vapour for easier removal afterwards. Before starting the assisted cleaning cycle, make sure that the oven does not contain any foods or large spills from previous cooking operations.
Instructions for the user 9.6.2 Setting the assisted cleaning cycle Once the preparations have been made for the assisted cleaning cycle, proceed as follows: 1 Turn the function knob to the symbol and the temperature selection knob to the symbol the VAPOR CLEAN function. 2 Set a cooking time of 15 minutes using the electronic programmer. 3 At the end of the assisted cleaning cycle, the timer will deactivate the oven heating elements. for 9.6.
Instructions for the user 10. EXTRAORDINARY MAINTENANCE The oven requires periodic minor maintenance or replacement of parts subject to wear, such as gaskets, light bulbs, etc. Specific instructions for each operation of this kind are given below. Before any intervention that requires access to live parts, disconnect the appliance from the power supply. WARNING: For your safety, you are advised to wear protective gloves while performing any cleaning or extraordinary maintenance. 10.
Instructions for the user 10.3 Removing the door seal (not on pyrolitic models) To permit thorough cleaning of the oven, the door seal may be removed. There are fasteners on all four sides to attach it to the edge of the oven. Pull the edges of the seal outwards to detach the fasteners. The seal must be replaced when it loses elasticity and hardens. 10.4 Removing the internal glass panels The glass in the door should always be kept thoroughly clean.
Instructions for the installer 11.INSTALLATION The appliance connection point shall be accessible with the appliance installed. 11.1 Clearances above and around domestic appliances Extract from AS5601 REQUIREMENTS 1 Overhead clearances – (Measurement A) Range hoods and exhaust fans shall be installed in accordance with the manufacturer’s instructions.
Instructions for the installer 11.3 Gas connection This appliance is suitable for installation with Natural Gas or ULPG (propane/butane). Refer to page 25 for the relevant burner pressure and appropriate injector sizes. When the appliance is to be connected to Natural Gas then the pressure regulator supplied must be fitted to the gas inlet. A test point (for checking the gas pressure) is supplied either with the regulator or as a separate fitting in the case of ULPG (propane) appliances.
Instructions for the installer 11.6 Electrical connection Make sure the voltage and the cross-section of the power supply line match the specifications indicated on the identification plate positioned on the appliance. Do not remove this plate for any reason. A copy of the plate is attached to the instructions. The appliance must be connected to the power supply by a qualified technician. Before performing any operations, switch off the power supply to the appliance.
Instructions for the installer 11.7 Positioning the skirt (on some models only) The skirt must always be positioned and secured correctly on the appliance. 1 Unscrew the 2 nuts (B) on the back of the worktop. 2 Position the skirt above the worktop, taking care to align the pins (C ) with the holes (D). 3 Secure the skirt to the worktop by tightening screws (A). C 11.
Instructions for the installer 3) Use the same height on the wall to drill the holes for fastening the brackets. The distance between the centres of the holes is given in the diagram above. 4) Before tightening the brackets fully to the wall, check that the index on the brackets is at the same height as the index on the back of the appliance. Position the appliance, taking care that the brackets are correctly inserted. 11.
Instructions for the installer 12. ADAPTATION TO DIFFERENT TYPES OF GAS BEFORE PERFORMING ANY OPERATIONS, SWITCH OFF THE POWER SUPPLY TO THE APPLIANCE. Appliance set for gas: Natural gas at a pressure of 1.0 kPa (see label on product) In the case of operation with other types of gas, the burner nozzles must be changed and the minimum flame adjusted on the gas taps. To change the nozzles, proceed as described in the following paragraphs. 12.
Instructions for the installer 12.3 Burner and nozzle characteristics table Burner ULPG - 2.75 kPa Auxiliary Semi-rapid Ultra-rapid Nominal gas consumption (MJ/h) Injector (1/100 mm) 3.9 6.3 15.0 54 68 105 Burner NG - 1.0 kPa Auxiliary Semi-rapid Ultra-rapid Nominal gas consumption (MJ/h) Injector (1/100 mm) 3.9 7.5 15 90 120 175 12.4 Final operations After replacing the nozzles, reposition the flame-spreader crowns, the burner caps and the pan stands.
The manufacturer reserves the right to make any changes deemed useful for improvement of his products without prior notice. The illustrations and descriptions contained in this manual are therefore not binding and are merely indicative.
Space for rating plate 914774951/ A