Libretto di Istruzioni Instructions Manual Manuel d’Instructions Bedienungsanleitung Gebruiksaanwijzing Manual de instrucciones Manual de Instruções ɋɮɥɩɝɩɟɬɭɝɩ ɪɩ ɸɥɬɪɦɮɛɭɛɱɣɣ Bruksanvisning KI90C-1
INDICE IT CONSIGLI E SUGGERIMENTI ..............................................................................................................................................4 CARATTERISTICHE ..............................................................................................................................................................5 INSTALLAZIONE...............................................................................................................................................
ÍNDICE PT CONSELHOS E SUGESTÕES ............................................................................................................................................58 CARACTERÍSTICAS ............................................................................................................................................................59 INSTALAÇÃO .....................................................................................................................................................
RECOMMENDATIONS AND SUGGESTIONS The Instructions for Use apply to several versions of this appliance. Accordingly, you may find descriptions of individual features that do not apply to your specific appliance. INSTALLATION • The manufacturer will not be held liable for any damages resulting from incorrect or improper installation.
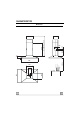
CHARACTERISTICS 90 130 20 120 306 min.861 -max.1146 696 Dimensions 650 min.
Components Ref. 1 2 2.1 2.2 7.1 7.1a 7.1b 8a 8b 9 10 14 14.1 15 24 25 Ref. 11 12c 12e 12f 12g 12h 12q 21 22 23 EN Q.
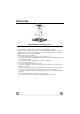
INSTALLATION Drilling the Ceiling/shelf and fixing the frame DRILLING THE CEILING/SHELF • Use a plumb line to mark the centre of the hob on the ceiling/support shelf. • Place the drilling template 21 provided on the ceiling/support shelf, making sure that the template is in the correct position by lining up the axes of the template with those of the hob. • Mark the centres of the holes in the template.
Fixing the frame • Loosen the two screws fastening the lower chimney and remove this from the lower frame. • Loosen the two screws fastening the upper chimney and remove this from the upper frame. If you wish to adjust the height of the frame, proceed as follows: • Unfasten the metric screws joining the two columns, located at the sides of the frame. • Adjust the frame to the height required, then refit all the screws removed as above.
RECIRCULATION VERSION AIR OUTLET • Push fit connection 15 onto the hood body outlet. • Insert the connection extension pieces laterally 14.1 in connection 15. • Make sure that the outlet of the extension pieces 14.1 is horizontally and vertically aligned with the chimney outlets. If this is not the case, adjust the position by either reversing the connection extension pieces 14.1 and then reassemble as described previously. • Ensure that the activated charcoal filters have been inserted. 15 14.
ELECTRICAL CONNECTION • Connect the hood to the mains through a two-pole switch having a contact gap of at least 3 mm. • Remove the grease filters (see paragraph Maintenance) being sure that the connector of the feeding cable is correctly inserted in the socket placed on the side of the fan. • Connect the control connector Cmd. • Place the connectors in the junction box 24 and close it using the 2 screws 12e (2,9 x 9,5) provided.
USE L S V1 V2 V3 L Light Switches the lighting system on and off. S Led Motor running led. V1 Motor Switches the extractor motor on and off at low speed. Used to provide a contin-uos and silent air change in the presence of light cooking vapours. V2 Speed V3 Intensive Medium speed, suitable for most operating conditions given the optimum treated air flox/noise level ratio. Maximum speed, used for eliminating the highest cooking vapour emission, including long periods.
MAINTENANCE Grease filters CLEANING METAL SELF- SUPPORTING GREASE FILTERS • The filters must be cleaned every 2 months of operation, or more frequently for particularly heavy usage, and can be washed in a dishwasher. • Remove the filters one at a time by pushing them towards the back of the group and pulling down at the same time. • Wash the filters, taking care not to bend them. Allow them to dry before refitting. • When refitting the filters, make sure that the handle is visible on the outside.