WASHING MACHINE INSTRUCTION MANUAL EN
Contents 1. 2. 3. 4. 5. 6. 7. PRECAUTIONS FOR SAFETY AND USE ............................................................................ 2 INSTALLATION INSTRUCTIONS ........................................................................................... 6 DESCRIPTION OF CONTROLS ........................................................................................... 11 USING THE APPLIANCE FOR WASHING .........................................................................
EN READ THE INSTRUCTIONS Attention! You are advised to read all the instructions in this manual carefully; it will inform you about the right conditions for the proper, safe use of your washing machine. It is very important to keep this instruction manual with the appliance for future reference. In the event of sale or transfer, ensure that the manual always accompanies the appliance, to provide the necessary information about its use. 1.
EN WARNING: the higher the spin speed, the higher will be the noise and the loer the remaining moisture content. The lower the amount of residual moisture at the end of the wash, the lower the energy consumption will be during drying." Information on household detergents, additives and cleaning agents can be found on the following website www.cleanright.eu.
EN vironments (powders, vapours, and gases) or explosive and/or corrosive liquids. Do not install the washing machine in places with a risk of frost. Frozen pipes may burst under the pressure. Make sure that the drain hose connected to the sink is securely fastened and cannot move. If it is not fixed in place, the repulsive force of the water might thrust it away from the sink, causing the risk of flooding.
EN cause permanent injury to the eyes, mouth, and throat, or even cause death by suffocation. The appliance is not intended for use by persons (including children) with reduced physical, sensory or mental capabilities, or lack of experience and knowledge, unless they have been given supervision or instruction concerning use of the appliance by a person responsible for their safety. Do not store flammable fluids near the appliance. Length periods out of use.
EN L = brown N = blue = yellow-green In the event of damage to the supply cord, it must be replaced by the manufacturer or an authorized technical service centre to avoid any risk. Important! This appliance is easy to use. However, for the best results it is important to read this manual carefully and follow all the instructions before putting it into operation. The manual provides the correct instructions for installation, use and maintenance, as well as giving useful advice.
EN B A 4. Fit all the plastic plugs (C) provided, to prevent water splashes from getting into the appliance, and contact with live parts. C WARNING! Do not turn the appliance upside-down or place it on its sides. All the transport retainer fittings should be kept in a safe place; they must be fitted again if the appliance must be moved around in the future. 2.2 POSITIONING AND LEVELLING 1. Place the appliance in the chosen position. 2.
EN Once the appliance is in position in the kitchen, the height of the rear feet must be increased so that the appliance no longer stands on the skids. After adjusting the rear feet, level the appliance and fix the front feet at the height required. The water intake and drain hoses can be fitted pointing to the left or right for effective installation. WARNING! This operation must be carried out with care to prevent the washing machine from vibrating, moving, or generating excessive noise during use.
EN WARNING! If the connection is made to new pipelines, or lines which have been out of use for a long time, allow a considerable amount of water to flow out before connecting the intake hose. This prevents any sand or other dirt from fouling the filters installed in the appliance to protect the water intake valves. The new intake hose supplied with the appliance must be used, and the old water supply hose must not be used. Supplementary note regarding the water connection for the German market.
EN 2.5 ELECTRICAL CONNECTION Before connecting the plug to the power socket ensure that: 1. The electrical system voltage is the same as that stated on the nameplate on the front of the appliance, in the zone visible when the door is open. The rated power supply and the fuses required are specified on the nameplate. 2. The meter, safety breakers, power supply line and power socket are rated to withstand the maximum load required, stated on the nameplate. 3.
EN 3. DESCRIPTION OF CONTROLS 3.1 CONTROL PANEL All the appliance's control and monitoring devices are placed together on the front panel. Display: shows the settings (spin speed, cycle status, child lock on/off). The settings can be modified using the buttons underneath. Buttons (from left to right): Spin speed selection Option selection Confirm option Delay Timer Child Lock Start/Pause button: For starting and stopping working cycles.
EN 4. USING THE APPLIANCE FOR WASHING 4.1 PREPARING THE ITEMS FOR WASHING 1. 2. Subdivide the items for washing by fabric type and colour fastness. Wash white and coloured items separately. New coloured items should be washed separately the first time. Normally, items carry labels with washing instructions. The following is a short description of the symbols used on these labels. WASHING Machine wash at max. 90°C Machine wash at max.
EN 4.2 OPENING THE DOOR The appliance is fitted with a safety device which prevents the door from being opened while the programme is in progress. 1. Check that all the water has been drained from the tank and the drum is at a standstill. WARNING! If the washing programme is interrupted, it will be from 3 to 15 minutes before the door can be opened, depending on the temperature reached inside the appliance. WARNING! The water may still be boiling hot if the wash was at high temperature.
EN The main wash detergent compartment has a tang allowing the use of liquid detergent. To insert it, pull it towards the front and then lower it. Following the recommendations in the "Programmes Table" supplied with this manual, place the detergent and any additives in the drawer before the start of the programme. Never fill with liquids above the maximum level marked; otherwise the trays will empty too quickly.
EN 4.7 LIQUID DETERGENT DOSES 1. Pour the dose required into the measuring cap supplied with the bottle of liquid detergent and place it in the drum or use the main wash compartment of the detergent drawer, fitting the insert provided. 2. The scale on the red insert is intended as an aid when deciding the dose of liquid detergent. WARNING! Liquid detergents can be used, at the doses recommended by the producer, only for the main wash, i.e. in all programmes without prewash. 4.
EN 4.11 SELECTING AND CONFIRMING OPTIONS Options Option selection Confirm option Start Pause 1. The Option Selection button can be used to select the following options in sequence (from the top down): Prewash: adds a stage before the main wash, lasting about 20 minutes at a temperature of 35°C. Suitable for loads of particularly dirty items. Intensive: the max. temperature is changed to 60°C and the washing stage is extended to increase the effectiveness of the enzymes in the detergents.
EN 4.12 TIME TO END Delay Time to end Start pause symbol Start Pause Delay Time to end 1. The Time to End key can be pressed repeatedly to select the time after which the washing programme will end. The time to end of cycle function calculates the initial duration of the washing cycle, the settings made (temperature, spin speed and options) which may shorten or lengthen the cycle's initial duration, and the delay time the user wishes to add before the cycle starts. 2.
EN 4.14 INTERRUPTING OR CHANGING THE WASHING PROGRAMME The washing programme in progress can be interrupted at any moment: 1. Press the “Start/Pause” button for about 3 seconds: the display shows the word PAUS (for 1 second) alternating with the time remaining until the end of the cycle (for 1 second). The Start/Pause light flashes on and off. Programmes can also be interrupted by turning the programme/temperature setting knob while the cycle is in progress. 2.
EN 4.16 CHILD LOCK 1. When this function is activated, the modification of options, temperatures, spin speed and the washing/drying cycle is not possible while the cycle is in progress. Child Lock Symbol 1 2 1. To activate the Child Lock Function, press the the Options selection (1) button and hold it down. Also press the Child Lock (2) button within 3 seconds. 2. The Child Safety Function symbol lights up to show that the function has been activated. 3.
EN 5. CLEANING AND MAINTENANCE Important – Before carrying out any cleaning or maintenance procedure, the plug must be disconnected from the power supply socket. 5.1 CLEANING THE OUTSIDE OF THE APPLIANCE Regular, thorough cleaning will keep your appliance looking good. Clean the exterior of the appliance with soap and water only, then dry thoroughly with a soft cloth. The plastic parts should just be wiped with a damp cloth.
EN 5.4 CLEANING THE DRAIN PUMP The drain pump only needs cleaning if it has been blocked by buttons, brooches or similar objects and the water is not being pumped out. In this case, proceed as described below. 1. Remove the mains plug to disconnect the appliance from the electricity supply. 2. Depending on the model, proceed as follows: Built-in/totally concealed model – use a small screwdriver as a lever to remove the plugs shown here, turn the plinth downwards and access the pump.
EN 5.5 CLEANING THE DETERGENT DRAWER The detergent drawer should be kept clean, removing all solid deposits. To simplify this operation, completely remove the detergent drawer (pull the drawer fully out, press in the zone marked PUSH and then remove completely). Remove the siphon "A" and clean all parts with hot water. Fully re-insert the siphon and remove any detergent deposits before putting the drawer back in position. 5.
EN 6. TROUBLESHOOTING This produce complies with the relevant regulations governing the safety of electrical equipment. For safety reasons, any technical inspections or repairs must be performed by qualified staff, to prevent all hazards for the user. If the appliance does not work, before calling the After-Sales Service, to avoid unnecessary expense, check yourself that the operations listed in this troubleshooting table have been carried out..
EN 11 Appliance does not spin Anti-imbalance safety device tripped because laundry not evenly distributed in drum. If laundry is still wet at end of cycle, rearrange it in the drum by hand and repeat spin programme only. 12 Emptying drum from In the event of a power blackout or appliance failure, the water can be removed from the drum using the emergency procedure. 13 Laundry spun properly Large items screwed up and not evenly distributed within drum. Always wash a mix of large and small items.
EN 6. ADDITIONAL INFORMATION FOR THE USER The following information is provided in accordance with the European Ecodesign regulation (EU) 2019/2023 The values indicated for programs other than Eco 40-60 are indicative only. Washing machine Cycle Rated capacity (kg) Energy consumption (kWh/ cycle) * Water consumption (l/cycle) (*) Programme duration (h:min)* Temperature Max. (°C) 5 min (*) (***) Spin speed (rpm) * Residual moisture content (%) * Detergent Eco 4060** 7 1.
EN ** Eco 40-60 program Test program compliant with European Ecodesign regulation (EU 2019/2023) and the European regulation on energy labelling using cold water (15°C) (EU 2019/2014). Washing program that is able to clean normally soiled cotton laundry declared to be washable at 40°C or 60°C together in the same washing cycle.
GUIDA PROGRAMMI Scomparti cassetto detersivi Programmi Cotone Lana Temp. (°C) Max Max.
ISTRUZIONI DI MONTAGGIO DELLE LAVATRICI INTEGRABILI CON FRONTALINO SCOPERTO 1 IT
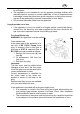
ISTRUZIONI DI MONTAGGIO DELLE LAVATRICI INTEGRABILI CON FRONTALINO SCOPERTO IMPORTANTE - La macchina risponde alle vigenti norme di sicurezza relative alle apparecchiature elettriche e deve essere installata da un tecnico specializzato secondo le norme in vigore, onde evitare pericoli per l’utente. Dimensioni per l’inserimento Le quote del vano di alloggiamento devono essere: altezza minima 820mm, larghezza minima 600mm e profondità minima 584mm (fig. 1).
Regolazione altezza frontalino Per regolare l’altezza del frontalino alla stessa altezza dei cassetti dei mobili adiacenti, occorre togliere o aggiungere i due listelli aventi l’altezza di 10m e 5mm. I listelli sono fissati tra loro ed al frontalino mediante incastro e due viti. L’altezza minima (120mm) si ottiene togliendo entrambi i listelli.
Applicazione dei 1) Praticare sul pannello i fori per l’applicazione delle cerniere (fig. 5), del gancio di chiusura per la chiusura push pull (fig. particolari sul 5), oppure della piastrina metallica se si desidera utilizzare pannello e fisla chiusura magnetica (fig. 6) e dei fori di fissaggio delle saggio del pancerniere (fig. 6). nello 2) La profondità di 13mm dei fori diametro 2mm, per il fissaggio delle cerniere e della piastrina metallica per il magnete, è valida per il pannello in legno massiccio.
Applicazione dello zoccolo Lo zoccolo continuo dei mobili componibili dovrà essere removibile per permettere l’eventuale pulizia della pompa di scarico. In alcuni casi, lo zoccolo dei mobili componibili non è continuo, ma è limitato semplicemente alla larghezza della lavatrice. In questo caso, lo zoccolo del mobile può essere fissato allo zoccolo della lavatrice con 4 viti, rispettando i 4 riferimenti predisposti sul medesimo (vedi fig. 10-11-12).
1 ! 596mm 820mm ! 560mm 120-135mm 820mm 70mm 58mm ca.
3 3-A 2 2 1 C 3 7 8 3 9 5 10 4 A-B 11 12 6 C 9 C A B D 5 6 1 1 2 3 7 8 3 4 A-B 2 D C 3-B 4 5
4 Unterkante Lower edge Côté inférieur Lato inferiore Lado inferior Onderkant e 16...21mm 9 Unterkante Lower edge Côté inférieur Lato inferiore Lado inferior Onderkant e 16...21mm 592...595mm 592...
7 8 2 2 1 1 3 3 4 5 6 9 1 2 2 ? 1 3
10 12 11