Contents 1. 2. 3. 4. 5. 6. IMPORTANT SAFETY INSTRUCTIONS ____________________ 2 INSTALLATION AND HOOK-UP _________________________ 10 DESCRIPTION OF THE CONTROLS _____________________ 18 OPERATING INSTRUCTIONS ___________________________ 26 CLEANING AND MAINTENANCE ________________________ 27 TROUBLESHOOTING _________________________________ 28 Thank you for choosing one of our products.
Installation TRANSLATION OF INSTRUCTIONS THE ORIGINAL 1. IMPORTANT SAFETY INSTRUCTIONS 2 SAVE THESE INSTRUCTIONS Before using the appliance, carefully read all the instructions contained in this manual. During installation, take care not to injure yourself on the sharp edges of the appliance: wear safety gloves. This manual is an integral part of the appliance; it must always be kept intact together with the dishwasher for future reference (even if sold).
Installation Do not operate your dishwasher unless all enclosure panels are properly in place. Do not tamper with controls. The appliance must be installed and connected in accordance with the instructions provided by the manufacturer. Installation must be performed by qualified technicians in accordance with applicable regulations. The installation and repair or servicing shall be carried out by qualified and authorised technical personnel.
Installation Never leave waste packaging unattended. Do not allow children to play with packaging materials. Separate waste packaging materials by type and consign them to the nearest recycling centre. The plate with the technical data, serial number and marking is in a visible position on the inside edge of the door. It must not be removed. The appliance must be earthed in compliance with electrical safety regulations.
Installation Building-in the appliance underneath a hob is absolutely forbidden. Installing a hob on top of freestanding appliance is absolutely forbidden. To ensure stability, install the appliance only under continuous worktop, securely fixed to adjacent cabinets. If the appliance is installed in a high cabinet, both the appliance and the cabinet must be adequately fixed.
Installation The appliance must be connected to the water supply by means of new hoses. Briefly test the appliance after installation. Run a wash cycle with a temperature of between 113°F and 158°F (45°C-70°C) with the dishwasher empty and using a specific dishwasher detergent. (It is not sufficient to run a soak cycle). If the dishwasher fails to operate correctly, disconnect it from the electrical power supply and call the nearest technical service centre.
Installation Some detergents are strongly alkaline. Avoid contact with the skin and eyes. Detergents can be extremely dangerous if swallowed. They contain substances capable of causing permanent damage to the mouth and throat, and even leading to suffocation. Observe all the safety instructions on the packaging of these products. Do not drink the water residues which may be present on the dishes or appliance at the end of the washing program.
Installation 8 void the warranty but may also put the user’s safety at risk. In the event of a fault, disconnect the dishwasher from the electrical power supply and shut off the water tap. In the event of damage to the supply cord, have it replaced by the manufacturer or an authorised technical service centre. Some components are live even with the on/off button in the off position. Before performing any maintenance work on the appliance, disconnect it from the electrical power supply.
Installation 1.1 Disposal The appliance does not contain substances in quantities sufficient to be considered hazardous to health and the environment, in accordance with current European directives: To dispose of the appliance: Remove the washing compartment door. Cut the power cable, Make the lock unusable.
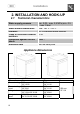
Installation 2. INSTALLATION AND HOOK-UP 2.1 Technical characteristics Water supply pressure Water supply temperature Capacity Class of protection against moisture Protection against electric shock Electrical data min. 0,05 - max. 0,9 MPa (min. 0.5 – max. 9 bar) max.
Installation 2.2 General Information This appliance may be placed up against walls or other furniture units. If the appliance is installed near a heat source, fit a special insulating panel to prevent overheating and malfunction of the appliance. To facilitate the installation procedure, the intake and drain hoses can be positioned in any direction; make sure that the hoses are not kinked, crushed or pulled too tightly.
Installation Some models are equipped with only one adjustable foot at the rear, which can be adjusted by turning the screw on the lower front part of the appliance. Building-in a dishwasher underneath a hob is absolutely forbidden. Moreover, dishwashers may not be installed directly touching appliances which are not conventional built-in kitchen appliances (e.g. fireplaces, stoves, etc.).
Installation For free-standing models only - Installing a hob on top of a free-standing dishwasher is absolutely forbidden. - If the appliance is accessible from one side, the door hinge area has to be covered for safety reasons (risk of injury). The covers are available as an accessory and can be ordered through the Technical Assistance Service. - The top surface of the dishwashers can be removed to allow installation under a worktop.
Installation 2.3 Water supply connection CONNECTING TO THE WATER SUPPLY Connect the intake hose to a cold water supply with ¾” gas thread, inserting the filter A supplied with the dishwasher. Take care to screw the hose firmly into place with your hands and then complete by tightening about ¼ of a turn with pliers. In dishwashers equipped with the AQUASTOP device, the filters is already fitted inside the threaded ring.
Installation DRAIN CONNECTION Insert the dishwasher’s drain hose into a drain pipe having a diameter of at least 4 cm (1"37/64), or alternatively, place it inside the kitchen sink using the plastic support provided, taking care not to crush or excessively bend the hose. It is important to prevent the hose from coming loose and falling. For this purpose, the plastic support is equipped with a hole for tying it to the wall or water tap.
Installation 2.4 Electrical connection Check that the voltage and the frequency of the mains match the ratings on the name plate of the appliance positioned on the inner edge of the door. This appliance must be grounded. In the event of a malfunction or breakdown, grounding will reduce the risk of electric shock by providing a path of least resistance for electric current. This appliance is equipped with a cord having an equipmentgrounding conductor and a grounding plug.
Installation Do not use adaptors or shunt connections in order to avoid the possibility of overheating or burning. The power cable must be replaced by the manufacturer or by an Authorized Service Centre.
User instructions 3. DESCRIPTION OF THE CONTROLS 3.1 Upper panel All the dishwasher controls are grouped on the front panel. Programming and option selection are only possible with the door closed. 1 ON/OFF BUTTON AND WARNING LIGHT 2 OPTION SELECTION BUTTONS AND WARNING LIGHTS 3 START/PAUSE BUTTON 4 PROGRAM SELECTION BUTTONS 5 INFORMATION DISPLAY 6 HANDLE TO OPEN THE DOOR N.B.: symbols and styling are guideline and may vary depending on the model or version of the dishwasher purchased.
User instructions 3.2 Information display The dishwasher is equipped with a practical DISPLAY which provides information on the programmed dishwasher functions. Rinse aid lack warning indicator Salt lack warning indicator End of cycle signal Shows that sanitation has been completed. 000 H0….H5 b0….
User instructions LIGHTING Pressing the ON/OFF button will start the dishwasher and will lit up the dishwasher pilot light. After approximately 3 second from this operation the DISPLAY will be turned on with a visualization that will depend upon the state of the dishwasher. PROGRAMMING All the programming operations are possible only with closed door. With open door, on the DISPLAY will appear - - : - -. SELECTION PROGRAM The program selection is possible through the relative buttons.
User instructions Warning: during the initial phase of the wash program the spray arms cannot be heard in operation because they start turning about 5 minutes after the start. This is the normal wash cycle sequence. END PROGRAM At the end of the program the DISPLAY shows “end”. By pressing one of the program buttons the dishwasher is ready to start a new cycle.
User instructions (1) Duration (min) SOAK cold - - - - 15 P2(**) CRYSTAL & CHINA - 45°C (113°F) 2 55 °(4) /70°C (131°F/158°F) ● 126 (4) /76 1,19 gal. 15.6l 4,12gal P3 (2) (**) NORMAL - 45°C (113°F) cold 55 ° (4)/64°C (127°F/158°F) ● 170(4) /83 3,4l 0.9gal 0,6 P4 (**) MIX cold 65°C (149°F) cold 55 ° (4)/70°C (131°F/158°F) ● 150(4) /108 15.
User instructions 1 – The cycle times and electrical energy listed use and care manual are based on normal soil loads and 120°F (49°C) incoming water and will vary based on your actual conditions. 2 – Program for energy star; the DRY ASSIST option must be enabled. 3-Only “POTS & PANS” program conforms to NSF std 184 and is certified by INTERTEK with the ETL SANITATION LISTED.
User instructions Description of the programs: SOAK Pans and dishes awaiting completion of the load CRYSTAL & CHINA Wash cycle for delicate items, such as wine glasses and lightly soiled fine china. Ideal when you require dazzlingly clean glassware NORMAL Normally soiled dishes including driedon residues, for daily use. MIX Mixed dishes very dirty, including driedon residues. POTS & PANS ETL SANITATION LISTED Mixed dishes very dirty and pans dirty, including dried-on residues.
User instructions 1 Option SPECIAL Description Creates additional programs. 2 DRY ASSIST Allows the dishes to be dried perfectly even at low rinse temperatures, with significant energy savings. It starts automatically if the selected program is compatible with it. If it is not required, press the button to disable it. 3 HALF-LOAD Allows you to wash just a few dishes when distributed evenly between the baskets.
User instructions 4. OPERATING INSTRUCTIONS After having installed the dishwasher, remove the basket retainers. 4.1 Adding the salt The salt prevents the formation of scale deposits. Unscrew the cap of the salt container. Only for the first time, fill the container with a litre of water. Pour salt (approx. 1 kg) into the container using the funnel provided with the dishwasher. Remove any salt residues before screwing the cap back on.
User instructions 5. CLEANING AND MAINTENANCE Before carrying out any work, always unplug the appliance from the electrical supply or switch off the omnipolar circuit breaker. CLEANING THE WATER INTAKE FILTER Close the water supply tap, unscrew the end of the water intake hose, remove the filter A and clean it under running water. Put the filter A back into its seat and carefully screw the water intake hose back on. CLEANING THE SPRAY ARMS Remove the spray arms and wash them with a jet of water.
User instructions 6. TROUBLESHOOTING The dishwasher is equipped with a self-diagnostics system that is capable of detecting and signalling a number of possible faults. TABLE OF FAULTS DETECTED BY THE SELF-DIAGNOSTICS SYSTEM FAULT DESCRIPTION E 01 The anti-flooding system (where present) has been tripped service. E 02 The water level limitation system has tripped. E 03 The appliance cannot heat the water. E 04 The temperature sensor is disconnected. E 05 The appliance cannot take in the water.