Contents 1. 2. 3. 4. 5. 6. 7. 8. INSTRUCTIONS FOR USE ................................................................ 4 SAFETY PRECAUTIONS ................................................................... 6 ENVIRONMENTAL CARE................................................................... 8 USING THE HOB................................................................................ 9 CLEANING AND MAINTENANCE.................................................... 11 POSITIONING IN THE COUNTER TOP ......
General instructions 1. INSTRUCTIONS FOR USE This manual is an integral part of the appliance. It must be kept in its entirety and in an accessible place for the whole working life of the appliance. We recommend reading this manual and all information it contains carefully before using the appliance. Installation must be carried out by qualified personnel in accordance with the standards in force. This appliance is intended for domestic use and conforms to the EC directives currently in force.
General instructions NEVER USE PANS OR GRIDDLE PLATES WHICH PROJECT BEYOND THE OUTSIDE EDGE OF THE HOB. SUITABLE HEAT-PROOF GLOVES SHOULD BE WORN FOR ALL OPERATIONS. DO NOT USE OR STORE FLAMMABLE MATERIALS IN THE APPLIANCE STORAGE DRAWER OR NEAR THIS APPLIANCE. THIS APPLIANCE IS DESIGNED FOR COOKING FOOD AND IT SHALL NOT BE USED AS A SPACE HEATER.
General instructions 2. SAFETY PRECAUTIONS REFER TO THE INSTALLATION INSTRUCTIONS FOR THE SAFETY REGULATIONS FOR ELECTRIC OR GAS APPLIANCES AND VENTILATION FUNCTIONS. IN YOUR INTERESTS AND FOR YOUR SAFETY THE LAW REQUIRES THAT THE INSTALLATION AND SERVICING OF ALL ELECTRICAL APPLIANCES IS CARRIED OUT BY QUALIFIED PERSONNEL IN ACCORDANCE WITH THE REGULATIONS IN FORCE. OUR APPROVED INSTALLERS GUARANTEE A SATISFACTORY JOB. GAS OR ELECTRICAL APPLIANCES MUST ALWAYS BE DISCONNECTED BY SUITABLY SKILLED PEOPLE.
General instructions THIS APPLIANCE MAY NOT BE USED BY PEOPLE (INCLUDING CHILDREN) OF REDUCED PHYSICAL AND MENTAL CAPACITY, OR LACKING IN EXPERIENCE IN THE USE OF ELECTRICAL APPLIANCES, UNLESS THEY ARE SUPERVISED OR INSTRUCTED BY ADULTS RESPONSIBLE FOR THEIR SAFETY. DO NOT LET CHILDREN GO NEAR THE APPLIANCE WHEN IT IS IN OPERATION OR PLAY WITH IT AT ANY TIME. DO NOT INSERT POINTED METAL OBJECTS (CUTLERY OR UTENSILS) INTO THE SLITS IN THE APPLIANCE. DO NOT USE STEAM JETS FOR CLEANING THE APPLIANCE.
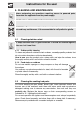
Instructions for disposal 3. ENVIRONMENTAL CARE Our products packing is made of non-polluting materials, which are therefore compatible with the environment and recyclable. Please help by disposing of the packaging correctly. You can obtain the addresses of collection, recycling and disposal centres from your retailer or from the competent local organisations. Do not discard the packaging or any part of it, or leave it unattended.
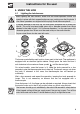
Instructions for the user 4. USING THE HOB 4.1 Lighting the hob burners Before lighting the hob burners, check that the flame-spreader crowns are correctly in place with their respective burner caps, making sure that the holes 1 in the flame-spreaders are aligned with the plugs 3 and thermocouples 2. To prevent damage to the work top, the hob comes complete with a raised pan stand 4: This must be placed under pans with a diameter greater than those indicated in the table in point "4.3 Cookware diameters".
Instructions for the user 4.2 Practical tips for using the burners For better burner efficiency and to minimise gas consumption, use pans with a flat, smooth base and a lid that have a suitable size for the burner, thus preventing the flames reaching the sides of the pan (see point “4.3 Cookware diameters”). Once the contents come to the boil, turn down the flame far enough to prevent the liquid from boiling over.
Instructions for the user 5. CLEANING AND MAINTENANCE Before performing any operations requiring access to powered parts, disconnect the appliance from the power supply. NEVER USE A JET OF STEAM TO CLEAN THE APPLIANCE. WARNING: For your safety, before performing any cleaning or extraordinary maintenance, it is recommended to use protective gloves. 5.1 Cleaning stainless steel To keep stainless steel in good condition it should be cleaned regularly after use. Let it cool first. 5.1.
Instructions for the installer 6. POSITIONING IN THE COUNTER TOP The following operation requires building and/or carpentry work and must therefore be carried out by a competent tradesman. Installation can be carried out on various materials such as masonry, metal, solid wood or plastic laminated wood as long as they are heat resistant (T 90°C).
Instructions for the installer Carefully trim the surplus away from edge beyond the seal. The dimensions given in figure 2 refer from the hole to the inside of the seal. Dimensions: Gas and electrical connection location (measurements in mm).
Instructions for the installer Max 150 mm Min. 20 mm Max 100 mm IMPORTANT: if the appliance is mounted on a unit, make sure that a separating shelf is installed, as shown in the figure. If the appliance is instead on an oven installed under the hob, there is no need to install a separating shelf. If installed on top of an oven, the latter must be equipped with a cooling fan.
Instructions for the installer 6.2 Clearances above and around domestic appliances Extract from AS5601 REQUIREMENTS 1 Overhead clearances – (Measurement A) Range hoods and exhaust fans shall be installed in accordance with the manufacturer’s instructions. However, in no case shall the clearance between the highest part of the hob of the cooking appliance and a range hood be less than 600 mm or, for an overhead exhaust fan, 750 mm.
Instructions for the installer NOTES 1 2 3 4 5 6 6.3 Requirement 3 does not apply to a freestanding or elevated cooking appliance which is designed to prevent flames or the cooking vessels from extending beyond the periphery of the appliance. The ‘cooking surface area’ is defined as that part of the appliance where cooking normally takes place and does not include those parts of the appliance containing control knobs. For definition of hob, see Clause 1.4.64. For definition of trivet, see Clause 1.4.109.
Instructions for the installer The manufacturer declines all responsibility for damage to persons or things caused by non-observance of the above prescriptions or by interference with any part of the appliance. If installed over an oven, make sure that the cables (oven and hob) follow the optimal path, so as to avoid any contact with the oven. 6.4 Room ventilation The room containing the appliance should have a permanent air supply in accordance with the standards in force.
Instructions for the installer 6.6 Gas connection This appliance is suitable for installation with Natural Gas or ULPG (propane/butane). Refer to page 21 for the relevant burner pressure and appropriate injector sizes. When the appliance is to be connected to Natural Gas then the pressure regulator supplied must be fitted to the gas inlet. A test point (for checking the gas pressure) is supplied either with the regulator or as a separate fitting in the case of ULPG (propane) appliances.
Instructions for the installer Installation with the flexible hose must be carried out so that the length of the piping does not exceed 1.2 metres fully extended; make sure that the hoses do not come into contact with moving parts and that they are not crushed in any way. 6.7 Connection to liquid gas Use a pressure regulator and make the connection on the gas cylinder following the guidelines established by the regulations in force.
Instructions for the installer 7. ADAPTATION TO DIFFERENT TYPES OF GAS Before carrying out the following operations, disconnect the appliance from the power supply. The appliance is preset for natural gas NG at pressure of 1.0 kPa. In case of operation with other types of gas, the burner nozzles must be changed and the minimum flame adjusted on the gas taps. To change the nozzles, proceed as described in the following paragraphs. 7.
Instructions for the installer 7.2 Burner and nozzle characteristics table Burner ULPG – 2.75 kPa Nominal gas Consumption (MJ/h) 3.9 6.3 15.2 Auxiliary (1) Semi-rapid (2) UR2 (3) Burner Injector (mm) 0.54 0.68 0.94 + 0.46 NG – 1.0 kPa Nominal gas Consumption (MJ/h) 3.9 7.5 15.2 Auxiliary (1) Semi-rapid (2) UR2 (3) 7.3 1 3 Injector (mm) 0.90 1.20 1.65 + 0.
Instructions for the installer 8. FINAL OPERATIONS After making the adjustments described above, reassemble the appliance by following in reverse the instructions reported in paragraph "7.1 Replacement of the cooking hob nozzles". After adjustment with a gas other than the preset one, replace the label on the casing of the appliance with the label corresponding to the new gas. This label can be obtained from the nearest Authorised Service Centre. 8.