Contents 1. 2. 3. 4. 5. 6. 7. 8. 9. 10. 11. 12. 13. 14. INSTRUCTIONS FOR USE .................................................................. 35 INSTRUCTIONS FOR DISPOSAL – OUR ENVIRONMENTAL CARE ........................................................... 36 SAFETY INSTRUCTIONS .................................................................... 37 GET TO KNOW YOUR OVEN .............................................................. 38 BEFORE INSTALLATION...................................................
Instructions for use 1. INSTRUCTIONS FOR USE THIS MANUAL IS AN INTEGRAL PART OF THE APPLIANCE. IT MUST BE KEPT IN ITS ENTIRETY AND IN AN ACCESSIBLE PLACE FOR THE WHOLE WORKING LIFE OF THE OVEN. WE ADVISE CAREFUL READING OF THIS MANUAL AND ALL THE INSTRUCTIONS THEREIN BEFORE USING THE APPLIANCE. INSTALLATION MUST BE CARRIED OUT BY QUALIFIED PERSONNEL IN ACCORDANCE WITH THE REGULATIONS IN FORCE. THIS APPLIANCE IS INTENDED FOR DOMESTIC USES AND CONFORMS TO THE EEC DIRECTIVES CURRENTLY IN FORCE.
Instructions for disposal 2. INSTRUCTIONS FOR DISPOSAL – OUR ENVIRONMENTAL CARE Our product's packing is made of non-polluting materials, therefore compatible with the environment and recycable. Please help by disposing of the packing correctly. Find the addresses of collection, recycling and disposal centres from your retailer or from the competent local organisations. Do not throw the packing or any part of it away. They can constitute a suffocation hazard for children, especially the plastic bags.
Safety instructions 3. SAFETY INSTRUCTIONS CONSULT THE INSTALLATION INSTRUCTIONS FOR THE SAFETY STANDARDS FOR ELECTRICAL OR GAS APPLIANCES AND FOR THE VENTILATION FUNCTIONS. IN YOUR INTERESTS AND FOR YOUR SAFETY IT HAS BEEN ESTABLISHED BY LAW THAT THE INSTALLATION AND SERVICING OF ALL ELECTRICAL APPLIANCES IS TO BE CARRIED OUT BY QUALIFIED PERSONNEL IN ACCORDANCE WITH THE REGULATIONS IN FORCE. OUR REGULAR INSTALLERS GUARANTEE A SATISFACTORY JOB.
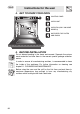
Instructions for the user 4. GET TO KNOW YOUR OVEN CONTROL PANEL OVEN LIGHT OVEN FAN (ONLY ON SOME MODELS) SUPPORTS FOR PLATES AND RACKS 5. BEFORE INSTALLATION Do not discard packing in the home environment. Separate the various waste materials and take them to the nearest special garbage collection centre. In order to remove all manufacturing residues, is recommended to clean the inside of the appliance. For further information on cleaning see chapter"11. CLEANING AND MAINTENANCE" .
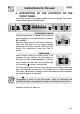
Instructions for the user 6. DESCRIPTION OF THE CONTROLS ON THE FRONT PANEL All the oven controls are grouped together on the front panel. The symbols used are described in the table below. THERMOSTAT SWITCH Cooking temperature is selected by turning the switch clockwise to the desired setting, between 50° and 250°C. When this light comes on, the oven is heating up. When this light goes out, the preset heating temperature has been reached. When the light flashes, the temperature inside the oven is steady.
Instructions for the user FUNCTION SWITCH KNOB Rotate the knob in either direction to select a desired function from the following: The combined or microwave only functions are selected positioning the knob on the orange-coloured symbols.
Instructions for the user LUMINOUS FUNCTIONS PANEL This panel shows the functions selected with the function switch knob. THERMOSTAT INDICATOR LIGHT (YELLOW) light comes on when the oven is heating up.
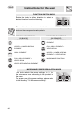
Instructions for the user 7. USE OF THE OVEN Before using the oven, make sure you have selected either a cooking time or manual functioning 7.1 . Warnings and general advice Before using the oven for the first time, pre-heat it to maximum temperature long enough to burn any manufacturing oily residues which could give the food a bad taste. Do not use the microwave or combined functions for this first preheating.
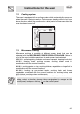
Instructions for the user 7.2 Cooling system The oven is equipped with a cooling system which automatically comes on when the oven is being turned on. Fans cause a steady outflow of air from above the door which may continue for a brief period of time even after the oven has been turned off. 7.3 Microwave cooking Microwave cooking is possible at different power levels that can be selected with the MICORWAVE POWER REGULATION KNOB.
Instructions for the user 7.3.1 Safety warnings concerning the use of the microwave 1 Do not activate the microwave if: • there is no food inside the oven; • the oven door is buckled, its hinges are loose or its seal is defective. In each of these cases, a specialised technician must intervene. 2 It is dangerous for anybody, except the specialised technician, to carry out repairs or maintenance operations that entail removing any cover that provides protection against energy given off by the microwaves.
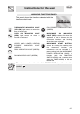
Instructions for the user 7.3.2 Kitchenware Not all kitchenware is suitable for use with microwave cooking.
Instructions for the user 8. AVAILABLE ACCESSORIES The oven features 4 support positions for plates and racks of different height. Grill: useful for holding cooking containers. Pastry plate: for baking cakes, pizza and oven desserts. Accessories available on request Original accessories may be ordered from any Authorised Service Centre.
Instructions for the user 9. COOKING HINTS WITHOUT MICROWAVE In fan-assisted mode preheating should be carried out at 30/40°C above the cooking temperature. This considerably shortens cooking times and reduces power consumption, as well as giving better cooking results. Keep the oven door closed during cooking. 9.1 Traditional cooking FUNCTION SWITCH THERMOSTAT 50 ÷ 250 °C This traditional cooking method, in which heat comes from above and below, is suitable for cooking food on a single level.
Instructions for the user 9.3 Grill cooking FUNCTION SWITCH THERMOSTAT Permits rapid browning of foods. For short-term cooking of small quantities, place the grid in the fourth guide from the bottom. For long-term cooking and grills, put the grid in the lowest guide in accordance with the size of the pieces. Keep the oven door closed during cooking. Grilling with the door open can permanently damage the oven and jeopardise safety whilst the grill is on. 9.
Instructions for the user 9.5 Thawing FUNCTION SWITCH THERMOSTAT 0 The movement of air ensured by the fan causes faster thawing of foods. The air circulating inside the oven is at room temperature. Thawing at room temperature has the advantage of not altering the taste and appearance of the food.
Instructions for the user 9.6 Recommended cooking table Cooking times, especially meat, vary according to the thickness and quality of the food and to consumer taste. Cooking times are given for a pre-heated oven. TRADITIONAL COOKING LEVEL FROM BELOW TEMPERATURE °C TIME IN MINUTES 2-3 2-3 210 - 230 210 - 230 30 40 2 2 2 2 2 2 2 2 170 - 200 210 - 240 170 - 200 170 - 200 170 - 200 140 - 170 170 - 200 170 - 200 30 - 40 / KG. 30 - 40 / KG. 30 - 40 / KG.
Instructions for the user HOT-AIR COOKING LEVEL FROM BELOW TEMPERATURE °C TIME IN MINUTES 2 2 2 190 - 210 190 - 210 190 - 210 20 - 25 25 - 30 20 - 25 2 2 2 2 2 2 2 2 2 2 2 150 - 170 150 - 160 160 - 170 160 - 180 130 - 150 170 - 180 170 160 - 170 150 - 160 150 - 160 160 - 170 140 - 170 65 - 90 70 - 100 65 - 90 35 - 45 100 - 130 40 - 45 70 - 90 100 - 160 160 - 240 80 - 100 30 - 50 15 - 25 FISH 2-3 150 - 170 According to dimensions PIZZA BREAD TOAST 2-3 2-3 1-2 210 - 240 190 - 210 220 - 240 30
Instructions for the user 10. COOKING HINTS FOR THE MICROWAVE 10.1 General information about microwaves Microwaves penetrate into the food agitating the water molecules inside it; this very high frequency movement generates heat at the centre of the food which heats up and cooks leaving the surrounding environment cold. This cooking system gives a saving in time and electricity, since the heat is produced inside the food achieving the desired result more rapidly.
Instructions for the user 10.2 Microwaves FUNCTION SWITCH THERMOSTAT MICROWAVE POWER 0 BETWEEN 20 AND 100% BETWEEN 30" AND 60' TIMER Before starting microwave cooking you have to provide yourself with special utensils and kitchenware. On this regard, please refer to the headings "7.3.2 Kitchenware" and "10.1 General information about microwaves". After placing the food in the oven and closing the door, select the desired power setting using the regulation knob (please refer to heading "7.
Instructions for the user MICROWAVE COOKING WEIGHT (in grams) LEVEL FROM BELOW MICROWAVE PERCENTAGE TIME IN MINUTES MEAT CHICKEN VEAL LAMB CHOPS 1000 800 450 2 2 2 100% 100% 100% 25 20 8 FISH 4 FISH BASS FISH SLICES 200-300 800 N° 4 2 2 2 100% 100% 100% 10 10 10 FRESH VEGETABLES PEPPERS POTATOES CAULIFLOWER 400 450 450 2 2 2 100% 100% 100% 11 10 10 FROZEN VEGETABLES BROCCOLI SPINACH PEAS 300 450 450 2 2 2 100% 100% 100% 10 8 7 FRUIT PEARS PEACHES APPLES N°4 N°4 N°4 2 2 2 100% 100
Instructions for the user 10.3 Combined microwave FUNCTION SWITCH THERMOSTAT MICROWAVE POWER 50 ÷ 250 °C BETWEEN 20 AND 100% BETWEEN 30' AND 100' TIMER Before starting microwave cooking you have to provide yourself with special utensils and kitchenware. On this regard, please refer to the headings "7.3.2 Kitchenware" and "10.1 General information about microwaves".
Instructions for the user COMBINED MICROWAVE COOKING WEIGHT (g) LEVEL FROM BELOW SCALLOPS 800 MUSSELS AU GRATIN 1500 QUICHE LORRAINE GNOCCHI ALLA ROMANA LASAGNE % MICROWAVES COOKING TEMPERATURE (°C) TIME IN MINUTES 3 60 225 5 3 50 200 8 1100 2 30 225 20 500 2 60 225 12 1300 2 80 225 13 1500 2 100 225 10 SALMON 1500 2 100 180 10 DENTEX 1000 2 50 225 20 STUFFED SARDINES 1000 2 100 225 10 CHICKEN 1000 2 80 225 20 FILLET 700 3 70 225 6 GUINEA-
Instructions for the user 10.4 Thawing and reheating with the microwave FUNCTION SWITCH 0 BETWEEN 20 AND 100% BETWEEN 30' AND 100' THERMOSTAT MICROWAVE POWER TIMER With your appliance it is possible to reheat food or drinks prepared in advance and conserved, tinned and pre-cooked foods as well as to thaw foods kept in the freezer. 10.4.
Instructions for the user 10.4.
Instructions for the user 11. CLEANING AND MAINTENANCE The oven must be periodically cleaned to maintain its working characteristics unaltered. Inadequate cleaning could jeopardise its appearance and above all its functioning. Before performing any operations requiring access to powered parts, switch off the power supply to the appliance. Do not use a steam jet for cleaning the inside of the oven. 11.
Instructions for the user 11.4 Cleaning the oven For best oven upkeep clean regularly after having allowed to cool. Take out all removable parts. • • Clean the oven grill and side guides with hot water and non-abrasive detergent. Rinse and dry. For easier cleaning, the door can be removed (see heading “11.5 Removing the door”) 11.5 Removing the door 11.5.
Instructions for the user 12. EXTRAORDINARY MAINTENANCE The oven may require extraordinary maintenance or replacement of parts subject to wear such as seals, bulbs, and so on. The following instructions describe how to carry out these minor maintenance operations. Before any intervention disconnect the power supply of the device. 12.1 Replacement of light bulb Remove the bulb protector A by turning anticlockwise and change bulb B with a similar one (25 W). Re-fit the bulb protector A.
Instructions for the user 13. SOMETHING NOT WORKING? PROBLEM PROBABLE CAUSE The oven does not heat up The oven is not connected The fuse has "blown". The temperature selected is too low. The oven lamp no longer The lamp is unserviceable works The oven is not connected. The cooling fan continues to turn for a long time after the oven has been switched off LIKELY SOLUTION Connect the oven. Change the fuse contacting the Technical Assistance Centre. Increase the temperature selected.
Instructions for the installer 14. INSTALLING THE APPLIANCE 14.1 Electrical connection The I.D. plate with technical data, registration number and brand name is positioned visibly on the oven door frame. The plate must not be removed. It is obligatory for all electrical system to be grounded according to the methods required by safety rules.
Instructions for the installer Never use the oven door to lever the oven into place when fitting. Avoid exerting too much pressure on the oven door when open.