USE, INSTALLATION AND MAINTENANCE INSTRUCTIONS FOR ELECTRICAL BUILT-IN HOT PLATES Dear User, we are sincerely grateful to you for purchasing one of our products. We are sure that the appliance modern, functional and easy to use, built with the finest materials and components will satisfy all your needs. We would ask that you read the instructions within this booklet very carefully so as to enable you to obtain quality results from the outsets.
WARNING: the appliance and its accessible parts become hot during use. Care should be taken to avoid touching heating elements. Children less than 8 years of age shall be kept away unless continuously supervised.
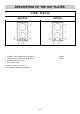
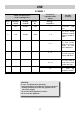
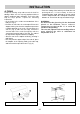
DESCRIPTION OF THE HOT PLATES TYPE: PFVZ 02 S232CX S232TCX 1 2 3 4 5 6 “Hi-light” electric heating element Ø 140 mm “Hi-light” electric heating element Ø 180 mm 1200 W 1800 W Switch for electric element n. 1 Timer control knob Switch for electric element n.
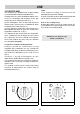
USE 1) ELECTRIC HOB Timer Timer allows to heating elements to turn off automatically by acoustic warning. It can be used also as timer (without turning off) and can be set for a period of max. 60 minutes. The hot plates are equipped with “hi-light” heating elements with different powers and diameters. Cooking zones are aesily identifiables thanks to the circles (see illustration in description) on the top; relative powers are listed in the scheme n. 1.
USE SCHEME 1 Position for regulation of the knobs Power and dimensions of the cooking zones Zone n° Diameter in mm Heating element Power W 1 145 “hi-light” 1200 2 180 “hi-light” Possible cookings Energy regulators 1 1800 1-4 4-8 8 - 10 To heat small quantities of liquid and to keep dishes warm. To heat foods, thaw deep-frozen foods, to cook fruits and pulses. To cook meat, fish, pulses with sauce. 10 - 12 To cook roast of meat, fish; to cook steaks and eggs.
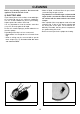
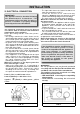
USE WARNINGS: - If you should not to use this appliance any more (or replace an old model), before disposing of it, make it inoperative in conformity with current law on the protection of health and the prevention of environmental pollution by making its dangerous parts harmless, especially for children who might play on an abandoned appliance. for a correct use, please look at fig. 3 and remind: - switch on the electricity only after having placed the pot on the cooking zone.
CLEANING Before any cleaning operation, disconnect the appliance from the electric circuit. - Marks of liquid, overflowed from the pot, can be removed using vinegar or lemon. - Pay attention to not let fall sugar or element with sugar. In this case turn the switch off and clean the surface with hot water and the razor blade scraper. - After a period of time may appear metal reflex and scratches (fig. 5) due to the wrong cleaning and the wrong use of the pots.
INSTALLATION TECHNICAL INFORMATION FOR THE INSTALLER 3) INSERTING Check that the appliance is in a good condition after having removed the outer packaging and internal wrappings from around the various loose parts. In case of doubt, do not use the appliance and contact qualified personnel. Never leave the packaging materials (cardboard, bags, polystyrene foam, nails, etc.) within children’s reach since they could become potential sources of danger.
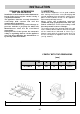
INSTALLATION 4) FIXING - Since the casing of the hob may overheat due to a prolonged use, it is necessary to insert a separation plane wood, blocked by screws, which must be installed under the cooktop at a minimum distance of 70 mm from the top, as shown in fig.6. A special sealing strip underneath the hob for damage. Make sure it is correctly positioned with no gaps; it avoids any water infiltration.
INSTALLATION 5) ELECTRICAL CONNECTION - The input cable has to be located so that never reach the temperature of 90 °C. - Please do not use in the connection any reduction, adaptation that may provoke a false contact with following dangerous overheatings. - The outlet must be accessible after the built-in.
MAINTENANCE longer than "live" ones, and must respect the cautions in paragraph "ELECTRICAL CONNECTION". To reassemble the appliance repeat the inverse process. Before doing any action, disconnect the appliance from the input power. 6) COMPONENTS SUBSTITUTION To replace the components lodged in the internal part, is necessary to take the appliance up from the furniture, overturn it, loosen the screws and take away the bottom.
TECHNICAL DATA MODEL 2 HEATING ELEMENTS (2 “HI-LIGHT”) Voltage 230 – 240 V ~ Frequency 50/60 Hz Tot. Rating 3000 W TECHNICAL ASSISTANCE AND SPARE PARTS This appliance, before leaving the factory, has been carefully tested and regulated by expert and specialized personnel in order to guarantee the best performances. Any repairs or adjustments which may be subsequently required may only be carried out by qualified personnel with the utmost care and attention.
INSTRUCTIONS ET CONSEILS POUR L’EMPLOI, L’INSTALLATION ET L’ENTRETIEN DES TABLES DE CUISSON ENCASTRABLES ÉLECTRIQUES EN VITROCÉRAMIQUE Cher Client, vous venez d’acheter un de nos produits et nous vous en remercions vivement. Nous sommes certains que ce nouvel appareil, moderne, fonctionnel et pratique, réalisé avec des matériaux de toute première qualité, saura vous donner entière satisfaction.
AVERTISSEMENT: l’appareil et ses éléments accessibles deviennent chauds durant l’utilisation. Prenez soin d’éviter tout contact avec les éléments chauffants. Les enfants de moins de 8 ans ne doivent jamais s’approcher de l’appareil sans être constamment supervisés.
DESCRIPTION DES TABLES DE CUISSON TYPE: PFVZ 02 S232TCX S232CX 1 Foyer électrique “hi-light” Ø 140 de 1200 W 2 Foyer électrique “hi-light” Ø 180 de 1800 W 3 Manette de commande du foyer avant n° 1 4 Bouton timer 5 Manette de commande du foyer avant n° 2 6 Voyant d'indication chaleur résiduelle 27
EMPLOI 1 ) TA B L E D E C U I S S O N E N VITROCÉRAMIQUE L’élément chauffant se met en marche lorsque l'on tourne dans le sens des aiguilles d'une montre ou dans le sens contraire des aiguilles d'une montre le bouton dans la position souhaitée (fig. 1). Les tables sont équipées de deux foyers électriques “hi-light” de diamètres différents et fonctionnant à des puissances différentes.
EMPLOI TABLEAU 1 Puissance et dimensions des zones de cuisson Positions de règlage des manettes de commande Types de cuisson possibles Zone n° Diamètre en mm. Foyer Puissance W Régulateurs d’énergie 1 145 “hi-light” 1200 1 Pour faire fondre le beurre,le chocolat et autre. 1-4 Pour chauffer de petites quantités de liquide et pour maintenir les plats au chaud. 4-8 Pour chauffer des plats consistants, décongeler les aliments surgelés et faire cuire fruits et légumes.
EMPLOI AVERTISSEMENTS: pour utiliser correctement votre table de cuisson, observez la figure 3 et rappelez-vous de: - mettre l’appareil sous tension uniquement après avoir posé la casserole sur la zone de cuisson. - Utiliser des casseroles à fond plat et épais. - Ne pas utiliser de casseroles plus petites que le foyer. - Essuyer le fond de la casserole avant de la poser sur le foyer. - Ne pas traîner les casseroles sur le plan en verre pour ne pas le rayer.
NETTOYAGE Débranchez l’appareil du réseau d’alimentation électrique avant toute opération de nettoyage. - Les traces des liquides qui auraient débordé des marmites s’éliminent avec du vinaigre ou du citron. - Attention: ne laissez pas tomber de sucre ni d’aliments sucrés sur la table pendant la cuisson. Si cela devait vous arriver, éteignez la plaque et nettoyez immédiatement à l’eau chaude en utilisant un grattoir sur les taches encore chaudes.
INSTALLATION 3) MISE EN PLACE INFORMATIONS TECHNIQUES RÉSERVÉES AUX INSTALLATEURS Après avoir retiré l’emballage extérieur et les protections intérieures enveloppant les différentes parties mobiles, assurez-vous que l’appareil est en bon état. En cas de doute, n’utilisez pas l’appareil et adressez-vous à un technicien qualifié. Ne laissez pas les éléments de l’emballage (carton, sachets, polystyrène expansé, clous, etc...) à la portée des enfants car ils représentent un danger potentiel.
INSTALLATION 4) FIXATION DE LA TABLE AVERTISSEMENTS Le collant qui fixe le revêtement plastique au meuble doit résister à une température minimale de 150 °C pour éviter que le revêtement ne se décolle. Les parois latérales ne doivent pas dépasser la hauteur de la table de cuisson. Le panneau arrière, les surfaces adjacentes et celles qui entourent la table de cuisson doivent résister à une température de 90 °C.
INSTALLATION 5) BRANCHEMENT ELECTRIQUE - N’utilisez pas de réductions, adaptateurs ou dérivations car ils pourraient provoquer de faux contacts et ensuite des échauffements dangereux. - La sortie doit être accessible après la fonction intégrée. Dans le cas de raccordement direct au réseau d’alimentation électrique: - interposez un disjoncteur omnipolaire entre l’appareil et l’alimentation, dimensionné suivant la charge de l’appareil, ayant une distance d’ouverture des contacts d’au moins 3 mm.
ENTRETIEN terre plus long par rapport aux conducteurs de phase et respecter les recommandations du paragraphe “BRANCHEMENT ÉLECTRIQUE”. Pour remonter la table, répétez les opérations cidessus dans le sens inverse. Débranchez l’appareil du réseau d’alimentation avant d’effectuer toute opération d’entretien. 6) REMPLACEMENT DES PIÈCES Pour pouvoir remplacer les pièces à l’intérieur de la table, retirez-la du meuble, retournez-la, dévissez les vis et retirez le fond.
DONNÉES TECHNIQUES 2 FOYERS “DOMINO” (2 “HI-LIGHT”) Tension 230 - 240 V ~ Fréquence 50/60 Hz Puissance nominale totale 3000 W SERVICE APRÈS-VENTE ET PIÈCES DÉTACHÉES Avant de quitter l’usine, cet appareil a été testé et mis au point par des techniciens qualifiés et spécialisés afin d’en obtenir les meilleurs résultats de fonctionnement. Les pièces détachées d’origine sont disponibles exclusivement auprès de nos centres de service aprèsvente et dans les magasins autorisés.