Table of Contents 1. PRECAUTIONS FOR USE ...................................................................... 31 2. DISPOSAL INSTRUCTIONS - OUR ENVIRONMENT POLICY .............. 32 3. SAFETY PRECAUTIONS ........................................................................ 33 4. GET TO KNOW YOUR OVEN ................................................................. 34 5. BEFORE INSTALLATION........................................................................ 34 6.
Precautions for Use 1. PRECAUTIONS FOR USE THIS MANUAL IS AN INTEGRAL PART OF THE APPLIANCE. TAKE GOOD CARE OF IT AND KEEP IT TO HAND THROUGHOUT THE OVEN'S LIFE CYCLE. WE URGE YOU TO READ THIS MANUAL AND ALL THE INFORMATION IT CONTAINS CAREFULLY BEFORE USING THE APPLIANCE. INSTALLATION MUST BE CARRIED OUT BY QUALIFIED STAFF IN COMPLIANCE WITH THE RELEVANT REGULATIONS. THIS APPLIANCE IS INTENDED FOR HOUSEHOLD USE AND COMPLIES WITH THE EEC DIRECTIVES CURRENTLY IN FORCE.
Disposal instructions 2. DISPOSAL INSTRUCTIONS - OUR ENVIRONMENT POLICY Our products are only packaged using non-pollutant, environment-friendly, recyclable materials. We urge you to cooperate by disposing of the packaging properly. Contact your local dealer or the competent local organisations for the addresses of collection, recycling and disposal facilities. Never leave all or part of the packaging lying around.
Safety Precautions 3. SAFETY PRECAUTIONS SEE INSTALLATION INSTRUCTIONS FOR SAFETY REGULATIONS FOR ELECTRIC OR GAS APPLIANCES AND FOR VENTILATION FUNCTIONS. IN YOUR INTEREST AND TO ENSURE YOUR SAFETY, BY LAW ALL ELECTRIC APPLIANCES MUST ONLY BE INSTALLED AND SERVICED BY QUALIFIED STAFF, IN ACCORDANCE WITH THE RELEVANT REGULATIONS. OUR APPROVED INSTALLATION ENGINEERS GUARANTEE YOU A JOB WELL DONE. GAS OR ELECTRIC APPLIANCES MUST ALWAYS BE DISCONNECTED BY SUITABLY SKILLED PEOPLE.
Instructions for the User 4. GET TO KNOW YOUR OVEN CONTROL PANEL OVEN LIGHT HOT AIR FAN (ON SOME MODELS ONLY) SHELF AND TRAY RUNNERS 5. BEFORE INSTALLATION Never leave packaging residues unattended in the home. Separate waste packaging materials by type and consign them to the nearest separate disposal centre. The inside of the appliance should be cleaned to remove all manufacturing residues. For further information, see "10. CLEANING AND MAINTENANCE".
Instructions for the User 6. DESCRIPTION OF FRONT PANEL CONTROLS All the cooker's control and monitoring devices are placed together on the front panel. The table below provides the key to the symbols used.
Instructions for the User FUNCTION SELECTOR KNOB (STATIC OVEN) The cooking temperature is selected by turning the knob clockwise to the value required, between 50° and 240/250°C (depending on the model). For different heating effects, users can switch on only the bottom heating element ( ) or only the grill element ( ). At the end of the knob rotation scale, the symbol switches on the rotisserie motor and the grill top heating element.
Instructions for the User FUNCTION CONTROL KNOB (MULTIFUNCTION OVEN) Rotate the knob in either direction to select desired function from the following: NO FUNCTION SET THAWING INSIDE LIGHT (NO HEATING ELEMENTS ON) TOP+BOTTOM HEATING ELEMENTS+FAN TOP+BOTTOM HEATING ELEMENTS GRILL ELEMENT + FAN GRILL ELEMENT IN OPERATION ALTERNATING WITH BOTTOM HEATING ELEMENT + FAN FAN HEATING ELEMENT GRILL ELEMENT SMALL GRILL ELEMENT + FAN BOTTOM HEATING ELEMENT BOTTOM HEATING ELEMENT + FAN SMALL GRILL ELEMENT
Instructions for the User TIMER KNOB Allows selection of manual cooking or the minute minder function with the oven automatically switched off at the end of the cooking time. If no cooking duration is selected, the timer knob must be turned to the symbol. To set the cooking duration, turn the knob clockwise to the "90/120" setting and then set the cooking duration required. Numbers 5 to 90/120 correspond to minutes.
Instructions for the User 7. USING THE OVEN 7.1 Precautions and General Advice When the oven and grill are used for the first time, they should be heated to the maximum temperature for long enough to burn off any oily residues left by the manufacturing process, which might contaminate foods with unpleasant smells. During cooking, do not cover the bottom of the oven with aluminium or tin foil, and do not place pans or oven dishes on it; this may damage the enamel coating.
Instructions for the User 7.2 Cooling fan system (on some models only) The appliance is equipped with a cooling system which comes into operation when the oven is switched on. The operation of the fans generates a normal air flow which comes out above the door depending on the model, and may continue for a short time even after the oven is switched off. 7.
Instructions for the User 8. ACCESSORIES AVAILABLE The oven is fitted with 4 runners for placing trays and shelves at different heights. Shelf: useful to support pans containing the food for cooking. Tray grid: for placing on top of a tray for cooking foods which may drip. Oven tray: useful for collecting fat from foods placed on the grid above. Pastry tray: useful for cooking cakes, pizza and confectionery. Roof liner: remove it to simplify cleaning inside the oven.
Instructions for the User 9. COOKING ADVICE The oven should always be preheated in fan mode to 30/40°C above the cooking temperature. This considerably shortens cooking times and reduces electricity consumption, as well as giving better results. The oven door must be closed during cooking operations. 9.1 Conventional cooking FUNCTION SELECTOR THERMOSTAT 50 ÷ 250 °C This conventional cooking method, with heat from above and below, is suitable for cooking food on just one shelf.
Instructions for the User 9.3 Delicate cooking FUNCTION SELECTOR THERMOSTAT 50 ÷ 250 °C This type of cooking, for which it is extremely important to preheat the oven in fan mode, is particularly suitable for finishing cooking of foods underneath, or for processes which require heat mainly from below. The tray should be placed on the bottom runner. 9.4 Grilling FUNCTION SELECTOR THERMOSTAT Used for quick browning of foods.
Instructions for the User Keep the door closed during grilling. Grilling with the door open may permanently damage the oven and reduce operating safety. 9.6 Thawing FUNCTION SELECTOR THERMOSTAT 0 The air movement provided by the hot air fan alone thaws foods more quickly. The air circulating inside the oven is at room temperature. Thawing at room temperature has the advantage that the food's flavour and appearance are retained intact.
Instructions for the User 9.7 Rotisserie cooking (models with static oven only) THERMOSTAT Prepare the rotisserie rod with the food, tightening the screws A of the prongs. Fit the shelf B onto the third runners from the bottom. Remove the handle D and position the rotisserie rod so that the pulley E is still in the guides on the shelf B. Push the shelf B fully in until the tip of the rotisserie rod enters the hole C on the rear of the oven.
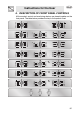
Instructions for the User 9.8 Recommended cooking tables Cooking times, for meat in particular, vary depending on the food's thickness and quality and personal preference. All times are calculated with the oven preheated. CONVENTIONAL COOKING RUNNER POSITION FROM THE BOTTOM TEMPERATURE °C. TIME IN MINUTES 2-3 2-3 210 - 230 210 - 230 30 40 2 2 2 2 2 2 2 2 170 - 200 210 - 240 170 - 200 170 - 200 170 - 200 140 - 170 170 - 200 170 - 200 30 - 40 PER Kg. 30 - 40 PER Kg. 30 - 40 PER Kg.
Instructions for the User HOT AIR COOKING RUNNER POSITION FROM THE BOTTOM TEMPERATURE °C.
Instructions for the User 10. CLEANING AND MAINTENANCE Before carrying out any operations, disconnect the appliance from the electricity supply. Never use a jet of steam for cleaning the inside of the oven. 10.1 Cleaning stainless steel To keep stainless steel in good condition, it must be cleaned regularly, after each use of the oven, after allowing it to cool. 10.
Instructions for the User 10.4 Cleaning the oven To keep the oven in good condition, it must be cleaned regularly, after allowing it to cool down. Remove all removable parts. • • Clean the oven shelves with hot water and non-abrasive detergents, rinse and dry. For easier cleaning, the door can be removed (see point “10.6 Removing the door”) 10.5 Cleaning the oven with self-cleaning liners (on some models only) The oven is fitted with enamelled liners that are continuously self-cleaning.
Instructions for the User 10.5.3 Removing the self-cleaning liners Remove all accessories from the inside of the oven and proceed as follows: 1 Remove the side runners (fig.1); 2 Extract the side liners “F” and “G” (fig. 2); 3 Extract the back liner “A” after undoing the threaded ring-nut “C” (fig. 2); 4 Replace the liners in their original positions. 1) 2) 10.6 Removing the door 10.6.
Instructions for the User 10.6.2 Removing doors with pins Open the door completely and insert the pins (supplied) into the holes from the inside. Close the door to an angle of about 45° and lift it off. To reassemble, fit the hinges into their grooves, then lower the door into place and extract the pins. 10.7 Removing the door glazing The glass in the door should always be kept thoroughly clean. For easier cleaning, the door glazing can be fully removed by proceeding as described below.
Instructions for the User 1) 2) 3) Use absorbent kitchen roll; remove stubborn dirt with a damp sponge and ordinary detergent. Warning: before removing the panes of glass, make sure that the door has been locked in open position as described in points "10.6 Removing the door". This operation might have to be repeated during the removal process if the door is accidentally freed. To replace the panes of glass in the oven door, follow the instructions provided in reverse order. WARNING.
Instructions for the User 11. EXTRAORDINARY MAINTENANCE Occasionally, the oven will require minor servicing procedures or the replacement of parts subject to wear and tear, such as gaskets, light bulbs, etc. The specific operations for each procedure of this kind are provided below. Before carrying out any operation involving access to live parts, disconnect the appliance from the electricity supply. 11.
Instructions for the Installer 12. INSTALLING THE APPLIANCE 12.1 Electrical connection The nameplate with the technical data, serial number and mark is in a visible position on the oven door frame. The nameplate must never be removed. The appliance must be connected to earth in compliance with electrical system safety regulations.
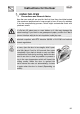
Instructions for the Installer 12.2 Positioning the oven The appliance is designed for building-in to cabinets made from any heatresistant material. Comply with the dimensions shown in figures 1, 2, and 3. When installing under worktops, comply with the dimensions shown in figure 1-3. When installing under worktops incorporating combined hobs, a gap of at least 110 mm must be left from any side wall, as shown in figure 1.
Instructions for the Installer Never use the door for leverage when inserting the oven in the cabinet. Never apply excessive pressure to the open door.