START STOP 99328004 FR DA DE EN ES IT NL PT GUIDE D'UTILISATION BRUGERVEJLEDNING BETRIEBSANLEITUNG USER GUIDE MANUAL DE UTILIZACIÓN MANUALE D'USO GEBRUIKSAANWIJZING MANUAL DE UTILIZAÇÃO Four Ovn Backofen Oven Horno Forno Oven Forno
EN TABLE OF CONTENTS 1 / INFORMATION FOR THE USER • Safety instructions _________________________________________ • Care for the environment ____________________________________ 04 05 2 / INSTALLING YOUR APPLIANCE • Choice of location __________________________________________ • Fitting ____________________________________________________ • Electric connection _________________________________________ 06 06 07 3 / DESCRIPTION OF YOUR APPLIANCE • Introduction to your oven ______________________________
EN 1 / INFORMATION FOR THE USER • For children, always: - heat bottles without the teat, shake the liquid and check its temperature on the back on your hand before feeding the child. - mix and check the temperature of children’s food before eating in order to avoid serious internal burns. • It is recommended to cover food in most cases; it will have more flavour and your appliance will remain cleaner for longer.
EN 1 / INFORMATION FOR THE USER • Never use steam or high-pressure devices to clean the oven (requirement imposed by electrical safety concerns). • Do not modify or attempt to modify any of the characteristics of this appliance. This would be dangerous to your safety. • During cooking, ensure that the door of your oven is completely closed so that the seal can do its job properly.
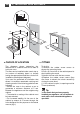
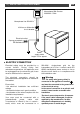
0 10 20 50 2 / INSTALLING YOUR APPLIANCE EN 22 548 550 380 378 393 595 560 550 i min 550 mini 400 560 310 • CHOICE OF LOCATION • FITTING To do this: 1) Remove the rubber screw covers to access the mounting holes. 2) Drill a Ø 2 mm hole in the cabinet panel to avoid splitting the wood. 3) Attach the oven with the two screws. 4) Replace the rubber screw covers (they also serve to absorb the shock caused by closing the oven door).
EN 2 / INSTALLING YOUR APPLIANCE Monophase 20A Counter 220-240V~ 50Hz Monophase line 220-240 V ~ 16A fuse or differential circuit breaker Electrical outlet earth 2 prong receptacle +e CEI Standard 60083 Power supply cable length 1.50 m approx. • ELECTRIC CONNECTION Electrical safety must be provided by a correct build-in. During fitting and maintenance operations, the appliance must be unplugged from the electrical grid; fuses must be switched off or removed.
EN 2 / INSTALLING YOUR APPLIANCE Warning We cannot be held responsible for any accident or incident resulting from non-existent, defective or incorrect earthing. If the electrical installation in your residence requires any changes in order to hook up your appliance, call upon a professional electrician. If the oven malfunctions in any way, unplug the appliance or remove the fuse corresponding to the sector where the oven is hooked up.
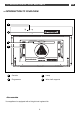
3 / DESCRIPTION OF YOUR APPLIANCE EN • INTRODUCTION TO YOUR OVEN A START STOP B C D A Controls C Lamp B Programmer D Wire shelf supports •Accessories Your appliance is equipped with a flat grid and a glass dish.
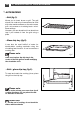
EN 3 / DESCRIPTION OF YOUR APPLIANCE • ACCESSORIES •Grid (fig.1): Allows you to toast, brown or grill. The grid should not under any circumstances be used with other metal cookware on the micro-wave, grill + micro-wave or circulating heat + microwave settings. However, you can reheat food in an aluminium tray if you insulate it from the grid using a plate. fig.1 •Glass drip tray (fig.2): It can also be used half-full of water for double-boiler cooking methods using the circulating heat function.
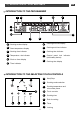
EN 3 / DESCRIPTION OF YOUR APPLIANCE • INTRODUCTION TO THE PROGRAMMER B A K J C I H G D E F A Cooking modes display G Cooking end time display B Oven temperature display.
EN 4 / USING YOUR APPLIANCE •How to set the time START STOP - When supplied with electricity The display flashes at 12:00 (fig.1) fig.1 Set the time by pressing the + or - touch controls (holding your finger on the touch control allows you to scroll through the numbers rapidly). START STOP Example: 12:30 fig.2 Press the START touch control to validate. The time display no longer flashes (fig.2).
EN 4 / USING YOUR APPLIANCE • Micro-wave cooking YOUR OVEN HAS 6 MICRO-WAVE COOKING FUNCTIONS Warning Never turn on the oven in any mode when empty. Press once on the START touch control to START STOP select the function (fig.1). Press the START button a second time to access the cooking time settings (fig.2): - 0.00 flashes - Adjust by pressing the + or – buttons. Example: 30 seconds fig.1 START STOP Adjusting the power level: - Press the button, “1000 w” begins flashing (fig.3).
EN 4 / USING YOUR APPLIANCE • AUTOMATIC MICRO-WAVE DEFROSTING With your new micro-wave, say goodbye to hours of waiting for your food to defrost! The microwave is the freezer’s best ally, making it possible to defrost food up to 10 times quicker than at room temperature. Tip: Defrosting time depends on the type of appliance. It also depends on the shape, size, initial temperature and quality of the food. Be sure to remove the metallic tie from the defrosting bag when defrosting food directly in the bag.
EN 4 / USING YOUR APPLIANCE • DEFROSTING GUIDE Food Defrosting bread and pastry French bread Loaf of bread Flaky or short crust Food Defrosting crustaceans Scallops Shelled prawns Whole pink shrimp Prawns (10) Langoustines Food Defrosting Fish Cod or haddock fillets Atlantic cod, hake Sole, plaice (2) Slices of hake Pollock, salmon Trout (3) Food Defrosting Meat Cockerel, pigeon Chicken breast (2) Chicken legs (4) Whole chicken Veal ribs Roast beef Beefburgers (4) Cubes of meat Food Defrosting Fr
EN 4 / USING YOUR APPLIANCE •Combined cooking YOUR OVEN COMBINES BOTH TRADITIONAL COOKING AND MICROWAVE COOKING FUNCTIONS Warning Never turn on the oven when empty in either mode. Press once on the START touch control to START STOP select the function (fig.1). Time setting: - Press the START button a second time to access the cooking time settings (fig.2): - 0.00 flashes - Adjust by pressing the + or – buttons. Example: 30 seconds fig.
EN 4 / USING YOUR APPLIANCE •Traditional cooking SETTINGS: In this cooking mode the resistors are the only source of energy. Choose the cooking mode: Press once on the START touch control to START STOP select the function (fig.1). Pressing and holding down the START button will allow you to scroll down to select the desired cooking function. The temperature is displayed: Example: 200°C. Press the START touch control to start cooking. Your oven recommends the most commonly used temperature.
EN 4 / USING YOUR APPLIANCE • PROGRAMMED COOKING •Immediate cooking with programmed cooking time Set the desired cooking mode and adjust the temperature if necessary START STOP fig.1 Example: Circulating heat position . temperature 200°C then press the START button (fig.1). - Press the “cooking time” button. The cooking time flashes 0:00 to indicate that it is now possible to set it (fig.2). START STOP fig.2 - Press the + or - touch controls to set the desired time. Example: 25 minutes of cooking (fig.
EN 4 / USING YOUR APPLIANCE • DELAYED COOKING •Delayed cooking with programmed cooking end This function is only possible for the following functions: START STOP fig.1 - Proceed as for an immediate cooking programme, then after entering the cooking time, - Press the “end of cooking” touch control, the end of cooking time appears and flashes, to indicate that it is now possible to set the time. Example: It is 12:05 (fig.1). START STOP fig.2 You programmed a cooking time of 25 minutes.
EN 4 / USING YOUR APPLIANCE • CUSTOMISING COOKING TEMPERATURE AND POWER •Traditional cooking When selecting the cooking mode or during a cooking programme, you can customise the temperature for traditional cooking: START STOP fig.1 - Press the touch control (approx. 2 seconds) until the temperature digits begin flashing (fig.1). - Use the + and - touch controls to adjust the temperature setting you wish to record (fig.2). - Validate by pressing the touch control (fig.3).
EN 4 / USING YOUR APPLIANCE •Combined traditional and microwave cooking When selecting the cooking mode or during a cooking programme, you can customise the power and temperature for combined cooking: START STOP Customising the power level: fig.1 - Press the touch control (approx. 2 seconds) until the power digits begin flashing (fig.1). START STOP - Use the + and - touch controls to adjust the power setting you wish to record (fig.2). - Validate by pressing the fig.2 touch control.
EN 4 / USING YOUR APPLIANCE • USING THE TIMER FUNCTION - Your oven’s programmer can be used as an independent timer that allows you to count down a time without operating the oven. START STOP In this case, the timer display has priority over the clock display. - Press the The button (fig.1). fig.1 timer symbol and 0m00s flash - Adjust the chosen time by pressing the + or touch controls (max 59 minutes 50 seconds) (fig.2). - Press the START touch control to validate. START STOP fig.
EN 4 / USING YOUR APPLIANCE • DISPLAY STAND-BY MODE - To limit your oven’s consumption of energy when it is not in use, you may put it in STANDBY MODE. To do so, perform the following procedure: START STOP ACTIVATION OF STAND-BY MODE: - Your oven must be in time display mode. - Press the + and – touch controls simultaneously for 5 seconds (fig.1). - Your display indicates “LCD OFF” (fig.2). - Release the buttons. - 30 seconds later, your display will turn off. fig.1 fig.
EN 5 / OVEN COOKING MODES MICRO-WAVE (recommended positions 1000 W min 100 max 1000) •The energy source is supplied by the micro-waves. •Energy is distributed by a combination of - 1 upper element - 1 lower element. AUTOMATIC DEFROSTING (recommended power 200 W) •This function allows optimised defrosting. KEEPING WARM (recommended power 350 W) •Food is kept warm by the fan which circulates heated air. The temperature never exceeds 50°C to avoid drying out the food.
EN 5 / OVEN COOKING MODES COMBINED HEAT: CIRCULATING HEAT + MICRO-WAVE (recommended temperature 190°C min 40°C max 210°C) (recommended positions 200 W min 100 max 350) •This mode combines circulating heat + micro-waves. •Circulating heat cooks the food through the movement of hot air and the micro-waves speed up cooking on the inside. COMBINED HEAT: GRILL + MICRO-WAVE (recommended positions 2 min 1 max 4) (recommended positions 200 W min 100 max 500) •This mode combines the grill and micro-waves.
EN 6 / CARING FOR AND CLEANING YOUR APPLIANCE • CLEANING THE OUTER SURFACES Before manually cleaning your oven, allow the appliance to cool down. In general abrasive powders and scouring pads as well as sharp objects should be avoided. It is recommended that you clean your oven regularly using a damp sponge and soapy water and to remove any food build-up. If the appliance is not cleaned regularly, its surface could become damaged, affecting the appliance’s lifespan and possibly causing a safety hazard.
EN 7 / TROUBLESHOOTING If you have a doubt about the correct functioning of your oven, this does not necessarily mean that there is a malfunction. In any event, check the following items: YOU OBSERVE THAT… POSSIBLE CAUSES - The oven is not connected. - Your fuse is out of order. The oven is not heating. The oven light is not working. The cooling fan continues to operate after the oven stops. The oven produces sparks. Food is not heated during a microwave programme.
EN 8 / AFTER-SALES SERVICE • SERVICE CALLS Any repairs that are made to your appliance must be handled by a qualified professional authorised to work on the brand. When you call, mention your appliance’s complete reference (model, type, serial number). This information appears on the manufacturer’s nameplate (fig.1). BRANDT APPLIANCES SAS 7 rue Henri Becquerel 92500 RUEIL MALMAISON MADE IN FRANCE 230V ~ 50 Hz fig.