Contents 1. 2. 3. 4. 5. 6. 7. 8. 9. 10. INSTRUCTIONS FOR USE ......................................................................... 68 SAFETY PRECAUTIONS ............................................................................ 70 ENVIRONMENTAL RESPONSIBILITY ........................................................ 72 GET TO KNOW YOUR OVEN...................................................................... 73 AVAILABLE ACCESSORIES ....................................................................
General instructions 1. INSTRUCTIONS FOR USE THIS MANUAL IS AN INTEGRAL PART OF THE APPLIANCE. IT MUST BE KEPT IN ITS ENTIRETY AND IN AN ACCESSIBLE PLACE FOR THE WHOLE WORKING LIFE OF THE APPLIANCE. CAREFUL READING OF THIS MANUAL AND ALL THE INSTRUCTIONS THEREIN BEFORE USING THE APPLIANCE IS ESSENTIAL. INSTALLATION MUST BE CARRIED OUT BY QUALIFIED PERSONNEL IN ACCORDANCE WITH THE REGULATIONS IN FORCE. THIS APPLIANCE IS INTENDED FOR HOUSEHOLD USE AND COMPLIES WITH THE EEC DIRECTIVES CURRENTLY IN FORCE.
General instructions DO NOT USE STEEL SPONGES AND SHARP SCRAPERS AS THEY WILL DAMAGE THE SURFACE. USE NORMAL NON-ABRASIVE PRODUCTS, INCLUDING WOODEN OR PLASTIC UTENSILS IF NECESSARY. RINSE THOROUGHLY AND DRY USING A SOFT CLOTH OR A MICROFIBRE CLOTH. DO NOT ALLOW RESIDUES OF SUGARY FOODS (SUCH AS JAM) TO SET INSIDE THE OVEN. IF THEY ARE ALLOWED TO SET FOR TOO LONG, THEY COULD RUIN THE ENAMEL COVERING THE INSIDE OF THE OVEN. DO NOT USE PLASTIC KITCHENWARE OR CONTAINERS.
General instructions 2. SAFETY PRECAUTIONS REFER TO THE INSTALLATION INSTRUCTIONS FOR THE SAFETY REGULATIONS FOR ELECTRIC OR GAS APPLIANCES AND VENTILATION FUNCTIONS. IN YOUR INTERESTS AND FOR YOUR SAFETY THE LAW REQUIRES THAT THE INSTALLATION AND SERVICING OF ALL ELECTRICAL APPLIANCES IS CARRIED OUT BY QUALIFIED PERSONNEL IN ACCORDANCE WITH THE REGULATIONS IN FORCE. OUR APPROVED INSTALLERS GUARANTEE A SATISFACTORY JOB. GAS OR ELECTRICAL APPLIANCES MUST ALWAYS BE DISCONNECTED BY SUITABLY SKILLED PEOPLE.
General instructions DO NOT LET CHILDREN GO NEAR THE APPLIANCE WHEN IT IS IN OPERATION OR PLAY WITH IT AT ANY TIME. DO NOT INSERT POINTED METAL OBJECTS (CUTLERY OR UTENSILS) INTO THE SLITS IN THE APPLIANCE. DO NOT USE STEAM JETS FOR CLEANING THE APPLIANCE. THE STEAM COULD REACH THE ELECTRONICS, DAMAGING THEM AND CAUSING SHORT-CIRCUITS. DO NOT MODIFY THIS APPLIANCE. DO NOT SPRAY ANY SPRAY PRODUCTS NEAR THE ELECTRICAL APPLIANCE WHILE IT IS IN OPERATION.
Instructions for disposal 3. ENVIRONMENTAL RESPONSIBILITY 3.1 Our environmental responsibility Pursuant to Directives 2002/95/EC, 2002/96/EC and 2003/108/EC relating to the reduction of the use of hazardous substances in electrical and electronic appliances, as well as to the disposal of refuse. The crossed out bin symbol on the appliance indicates that the product, at the end of its useful life, must be collected separately from other refuse.
Instructions for the user 4.
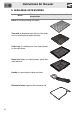
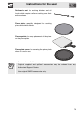
Instructions for the user 5. AVAILABLE ACCESSORIES NOTE: Some models accessories. are Rack: for holding cooking containers. Tray rack: to be placed over the top of the oven tray; for cooking foods which may drip. Oven tray: for collecting fat from foods placed on the rack above. Deep oven tray: for baking cakes, pizza and oven desserts. Handle: for removing hot racks and trays. Rotisserie frame: supports the rotisserie rod.
Instructions for the user Rotisserie rod: for cooking chicken and all foods which require uniform cooking over their entire surface. Pizza plate: specially designed for cooking pizza and similar dishes. Pizza spatula: for easy placement of the pizza on the pizza plate. Pizza plate cover: for covering the pizza plate when it is not in use. • Accessories available on request: Original supplied and optional accessories may be ordered from any Authorised Support Centre.
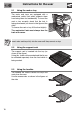
Instructions for the user 5.1 Using the rack or tray The racks and trays are equipped with a mechanical safety lock which prevents them from being taken out accidentally. To insert the rack or tray correctly, check that the lock is facing downwards (as shown in the figure at the side). To remove the rack or tray, lift the front slightly. The mechanical lock must always face the back of the oven. Insert racks and trays fully into the oven until they come to a stop. 5.
Instructions for the user 5.4 Using the rotisserie rod (on some models only) When cooking with the rotisserie, position the frame on the third runner (see 6.2.1 Oven runners). Once the frame is inserted, the shaped part must sit facing outwards (as shown in the figure). Then prepare the rotisserie rod with the food, using the clip forks provided. So that you can handle the rod with the food on it readily, screw on the handle provided.
Instructions for the user 5.5 Using the pizza plate (on some models only) With the oven cold, remove the circular cover from the bottom (as shown in the figure) and insert the pizza plate. Make sure that the plate is inserted correctly in the recess provided. To cook, follow recipe usage instructions (see 6.11 Selecting a recipe). Do not use the pizza plate other than as described, for example do not use it on gas or glass-ceramic hobs or in ovens which are not designed for this purpose.
Instructions for the user 6. USING THE OVEN 6.1 Before using the appliance • Remove any labels (apart from the technical data plate) from trays, dripping pans and the cooking compartment. • Remove any protective film from the outside or inside of the appliance, including from accessories such as trays, dripping pans, the pizza plate or the base cover. • Before using the appliance for the first time, remove all accessories from the oven compartment and wash them as indicated in “8.
Instructions for the user 6.2.3 Oven inside lights The oven lights come on when the door is opened or any function or recipe is selected, except for and , (where present). When set to ON, the oven lights can be switched on/ off by briefly pressing the on/off button. (ON/OFF knob) 6.3 Warnings and general advice for usage All cooking operations must be carried out with the door closed.
Instructions for the user To prevent any steam in the oven from causing problems, open the door in two stages: half open (5 cm approx.) for 4-5 seconds and then fully open. If you need to access the food, always leave the door open for as short a time as possible to prevent the temperature in the oven from falling and ruining the food. To prevent excessive amounts of condensation from forming on the internal glass, hot food should not be left inside the oven for too long after cooking.
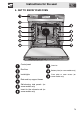
Instructions for the user 6.4 Description of the controls on the front panel All the appliance's control and monitoring devices are located together on the front panel. Temperature selection knob This knob can be used to: set the clock, select a temperature and the cooking time, and set programmed cooking. (Temperature knob) Pyrolitic models only ON/OFF knob This knob can be used to access the three oven operating modes or select a cooking function/recipe.
Instructions for the user If the symbols to the side of the display are lit up, it means: Indicates that the door lock is activated (on pyrolytic models only). In multifunction models, this symbol is replaced with If flashing, it indicates that the time is being set; if steady it shows the normal display. Delayed-start timed cooking activated Recommended runner number according to the selected recipe. Appliance in cooking phase Timed cooking activated.
Instructions for the user 6.5 Operating modes This appliance has three operating modes which can be activated by pressing the on / off knob. STAND-BY setting: the appliance displays the current time (activated as soon as the current time has been confirmed). ON setting: from the standby setting, press the ON/OFF knob once. It is now possible to select a function or recipe as described in “6.8 Selecting a cooking function” , “6.11 Selecting a recipe”.
Instructions for the user 6.7 Setting the current time Turn the temperature selection knob right or left to reduce or increase the displayed time. Keep it in the turned position to reduce or increase more rapidly. (Temperature knob) A few seconds after the last adjustment is made, the time display will steady and the colon separating the hours from the minutes will flash to indicate the start of the countdown. It may become necessary to change the current time, for example for daylight saving time.
Instructions for the user On pyrolytic models, the special defrosting and proving functions are brought together under the same function indicated by . See “7.4 Proving and defrosting functions” for further details. Cooking can be interrupted at any time by holding down the ON/OFF knob for at least two seconds. 6.8.1 Modifying the preset temperature The preset temperature for each function can be changed to suit the user's requirements.
Instructions for the user At this point it is possible to select the desired cooking function and wait for the buzzer to sound, indicating that the cooking time is over. Press the temperature selection knob to switch off the buzzer. The symbol flashes, and another time can then be selected by turning the same knob right or left. (Temperature knob) If the timer was set in STAND-BY mode, when the oven is activated in ON mode (selection of a cooking operation), the counter is reset to zero. 6.9.
Instructions for the user 6.10 Programmed cooking 6.10.1 Semi-automatic cooking Semi-automatic cooking is the function which allows a cooking operation to be started and then ended after a specific length of time set by the user. Select a cooking function as described in "6.8 Selecting a cooking function". Press the temperature selection knob twice. The display will show the digits and (flashing).
Instructions for the user To extend the cooking time manually (if the food has not been cooked properly), press the temperature selection knob again. The appliance will restart its normal operation with the previously selected cooking settings. (Temperature knob) To completely switch off the appliance, press the ON/OFF knob for 2 seconds. (ON/OFF knob) Modifying the set data Once semi-automatic cooking has started, its duration can be changed.
Instructions for the user 6.10.2 Automatic cooking Automatic cooking is the function which allows a cooking operation to be started at a set time and then ended after a specific length of time set by the user. Select a cooking function as described in “6.8 Selecting a cooking function”. Press the temperature selection knob twice. The display will show the digits and (flashing).
Instructions for the user When cooking is complete, the word STOP will appear, cooking will be interrupted and a buzzer will sound which can be deactivated by pressing the temperature selection knob. It is also possible to select an additional cooking time semi-automatically by turning the temperature selection knob. (Temperature knob) To extend the cooking time manually (if the food has not been cooked properly), press the temperature selection knob.
Instructions for the user 6.11 Selecting a recipe The appliance is equipped with preset recipes and 3 free recipes. A recipe is a combination of preset functions, temperatures, cooking times and shelf position for the dish. In the ON state only, a recipe can be selected by simply turning the ON/OFF knob to the right or left. (ON/OFF knob) The selected recipe will light up on the display. Cooking will start with the preset parameters ( and lit up).
Instructions for the user 6.11.1 Modifying the set data During cooking with a recipe, it is possible to modify the preset temperature by turning the temperature selection knob. To alter the time, press the temperature selection knob then turn it right or left. (Temperature knob) (Temperature knob) The modifications to the set data must be carried out when both and are steadily lit. 6.11.
Instructions for the user 6.12 Permanently modifying a recipe The appliance is equipped with preset recipes and three free recipes indicated by . To modify or set a recipe permanently: In ON mode, select the recipe to be modified by turning the ON/OFF knob right or left. (ON/OFF knob) Within 5 seconds, press and hold the temperature selection knob for at least 2 seconds. will flash to indicate the modification phase for the selected recipe.
Instructions for the user Press the temperature selection knob to confirm the modification and go on to modifying the cooking time. (Temperature knob) Turn the temperature selection knob right or left to alter the cooking time associated with the recipe. (Temperature knob) Press the temperature selection knob to confirm the change and go on to modifying the recommended runner level.
Instructions for the user 6.13 Table of predefined recipes: Class Type Beef Roast beef Pork Chicken Lamb Fish Roast Roast chicken Roast leg of lamb Bass baked in foil Vegetables Stuffed peppers Qty. Temp. Cooking Funct. Runner (°C) time (min.) 0.7 kg 200 30 1 kg 200 40 1.5 kg 200 65 0.5 kg 180 50 1 kg 190 80 1.5 kg 180 110 0.5 kg 190 40 1 kg 200 60 2 kg 180 90 1.0 kg 190 65 1.5 kg 190 90 0.7 kg 200 35 1.0 kg 200 45 1 kg 170 45 1.
Instructions for the user The cooking times in the table refer to the food indicated in the recipe and are a guide only; they may vary depending on the weight. The table gives the factory-set data. To reset a recipe with the original settings after it has been modified, just enter the data given in the table. If the limited power mode is activated (see 6.14 Secondary menu) the cooking times may vary from those indicated.
Instructions for the user 6.14 Secondary menu The appliance also has a concealed secondary menu allowing the user to: • Activate or deactivate the child lock mode. • Activate or deactivate Showroom mode (which disables all the heating elements so that only the control panel works). Activate or deactivate low power mode. • With the appliance in the OFF condition, turn the knobs on both commands (temperature knob and ON-OFF knob) to the right at the same time and keep them turned for at least 5 seconds.
Instructions for the user 6.14.1 Child lock mode By activating this mode, after two minutes of operation without any intervention from the user, the controls will automatically be locked, indicated by lighting up. To temporarily release the lock during cooking, hold down the temperature selection knob for 5 seconds. Two minutes after the last setting the lock will become active again. (Temperature knob) If the symbols on touch-sensitive zones are pressed, the word “BLOC” will appear for two seconds. 6.14.
Instructions for the user 7. COOKING WITH THE OVEN ECO: Using the grill and the lower heating element in combination is particularly suitable for cooking on a single runner only, as it provides low energy consumption. STATIC: As the heat comes from above and below at the same time, this system is particularly suitable for certain types of food. Traditional cooking, also known as static or thermal radiation cooking, is suitable for cooking just one dish at a time.
Instructions for the user FAN-ASSISTED GRILL: The air produced by the fan softens the strong heatwave generated by the grill, giving perfect grilling even with very thick foods. Perfect for large cuts of meat (e.g. shin of pork). We recommend using the 4th runner. FAN-ASSISTED BOTTOM: The combination of the fan with just the lower heating element allows cooking to be completed more rapidly.
Instructions for the user 7.1 Cooking advice and instructions 7.1.1 General advice We recommend preheating the oven before putting the food in. Do not place foods inside the oven until on the display stops flashing and the beep has sounded to confirm that the programmed temperature has been reached. For cooking on several levels, we recommend using a fan-assisted function to achieve uniform cooking at all heights.
Instructions for the user When defrosting meat, we recommend using a rack positioned on the second runner with the food on it and a tray positioned on the first runner. In this way, the liquid from the defrosting food drains away from the food. The most delicate parts can be covered with aluminium foil. For successful proving, a container of water should be placed in the bottom of the oven. 7.1.
Instructions for the user 7.
Instructions for the user RUNNER POSITION FROM BOTTOM TEMPERATURE °C TIME IN MINUTES 1 or 2 220 - 230 40 - 50 1 or 2 220 - 230 40 2 180 - 190 70 - 80 2 180 - 190 70 - 80 2 180 - 190 90 - 100 2 180 - 190 70 - 80 2 180 - 190 110 - 120 2 180 - 190 190 - 210 2 190 - 200 60 - 70 1ST SURFACE 2ND SURFACE 4 250 - 280 7-9 5-7 3 250 - 280 9 - 11 5-9 3 250 - 280 9 - 11 9 - 11 4 250 - 280 2-3 2-3 3 250 - 280 7-9 5-6 3 250 - 280 7-9 5-6 On a rotisserie rod 250 - 28
Instructions for the user DISHES WEIGHT FUNCTION PIZZA Fan-assisted static BREAD Circular FOCACCIA Turbo DESSERTS DOUGHNUT Fan-assisted static FRUIT TART Fan-assisted static FRUIT TART Static SHORT PASTRY Circular JAM TARTS Turbo PARADISE CAKE Fan-assisted static PARADISE CAKE Static ECLAIR Turbo LIGHT SPONGE CAKE Circular RICE PUDDING Turbo RICE PUDDING Static CROISSANTS Circular APPLE PIE Static CROISSANTS (on multiple runners) SHORT PASTRY BISCUITS (on multiple runners)
Instructions for the user RUNNER POSITION FROM BOTTOM TEMPERATURE °C TIME IN MINUTES 1 250 - 280 6 -10 2 190 - 200 25 -30 2 180 - 190 15 -20 2 160 55 - 60 2 160 30 - 35 2 170 35 - 40 2 160 - 170 20 - 25 2 160 20 - 25 2 160 55 - 60 2 170 50 - 60 2 150 - 160 40 - 50 2 150 - 160 45 - 50 2 160 40 - 50 2 170 50 - 60 2 160 25 - 30 3 180 60 2 and 4 160 - 170 16 - 20 2 and 4 160 - 170 16 - 20 For cooking on multiple runners it is recommended use only the foll
Instructions for the user 7.4 Proving and defrosting functions On pyrolytic models, the special defrosting and proving functions are brought together under the same function indicated by . The choice of temperature determines whether defrosting or proving takes place based on the table below. On multifunction models, it is not possible to vary the temperature in the defrosting and proving functions.
Instructions for the user 8. CLEANING AND MAINTENANCE NEVER USE A STEAM JET FOR CLEANING THE APPLIANCE. We recommend the use of cleaning products distributed by SMEG. 8.1 Cleaning stainless steel To keep stainless steel in good condition it should be cleaned regularly after use. Let it cool first. 8.2 Ordinary daily cleaning To clean and preserve the stainless steel surfaces, always use only specific products that do not contain abrasives or chlorine-based acids.
Instructions for the user 8.5 Cleaning the inside of the oven For the best oven upkeep, clean it regularly after having allowed it to cool. • Take out all removable parts. • Clean the oven racks with hot water and non-abrasive detergent. Rinse and dry. • For easier cleaning, the door can be removed (see “9.2 Removing the door”). The oven should be operated at the maximum heat setting for 15/20 minutes after use of specific products, to burn off the residues left inside the oven.
Instructions for the user Lift up the edge of the lower heating element a few centimetres and clean the bottom. Put the pizza plate support back in place, pushing it in until it hits the back of the oven, and push it down so that the heating element plate is embedded into the base itself. When the operation is complete, damp parts should be dried thoroughly. 8.5.
Instructions for the user 8.6 Cleaning the pizza plate The pizza plate (where included) should be washed separately according to the following instructions: Pyrolytic models: leave the pizza stone inside and activate the pyrolysis function, then at the end, when the stone has cooled down to lukewarm, wipe it with a damp microfibre cloth to remove any residues. Multifunction models: the stone must be cleaned after every use. Do not heat it again if it has any encrustations.
Instructions for the user 8.7 Pyrolysis: automatic oven cleaning (on some models only) Pyrolysis is an automatic high-temperature cleaning procedure which causes dirt to dissolve. Thanks to this process, it is possible to clean the inside of the oven very easily. During the first automatic cleaning cycle, unpleasant smells may occur due to the normal evaporation of oily manufacturing substances. This is an absolutely normal phenomenon which disappears after the first cleaning cycle.
Instructions for the user • Remove the guide frames, see “8.5.1 Removing guide frames”. • At the end of the cleaning cycle, when the oven has cooled down, reinsert the frames by repeating the previously used procedure in reverse order. • Make sure that the oven door is firmly closed. Refer to the following diagram for setting the cleaning cycle duration: CLEANING DURATION LIGHT DIRT MEDIUM DIRT HEAVY DIRT 90 MIN. 135 MIN. 180 MIN.
Instructions for the user 8.7.2 Setting the cleaning cycle In ON mode (see 6.5 Operating modes), turn the ON/OFF knob right or left to select one of the two cleaning cycles out of and . (ON/OFF knob) To start the cleaning cycle (pyrolysis), the temperature selection knob must be pressed. will light up to indicate that it is now possible to set the cycle duration.
Instructions for the user To select a cleaning cycle with delayed start, after setting the duration press the temperature selection knob once. and the current time will appear on the display. (Temperature knob) Turn the knob right or left to increase or decrease the time when you want to start the cleaning cycle. (Temperature knob) A few seconds after the required duration is set, and will stay lit, and the oven will wait for the starting time set for the cleaning cycle.
Instructions for the user 8.8 VAPOR CLEAN: assisted oven cleaning (on some models only) VAPOR CLEAN is an assisted cleaning procedure which facilitates the removal of dirt. Thanks to this process, it is possible to clean the inside of the oven very easily. The dirt residues are softened by the heat and water vapour for an easier removal afterwards. Before starting the assisted cleaning cycle, make sure that the oven does not contain any foods or large spills from previous cooking operations.
Instructions for the user IN PIZZA MODELS • Remove any accessories. In order to save energy, you are advised to remove the pizza plate and put the cover back in its slot. • Place a tray on the base of the oven as shown in the figure. • Pour approximately 40 cl of water into the tray. Make sure it does not overflow out of the cavity. • Spray a water and washing up liquid solution inside the oven using a spray nozzle.
Instructions for the user In ON mode (see 6.5 Operating modes), turn the ON/OFF knob right or left to select the VAPOR CLEAN cleaning cycle. (ON/OFF knob) To start the cleaning cycle (VAPOR CLEAN), the temperature selection knob must be pressed. will light up to show that the cleaning phase is in progress. (Temperature knob) The display will show the temperature at which the cleaning cycle is taking place and the remaining time.
Instructions for the user 9. EXTRAORDINARY MAINTENANCE The oven may require extraordinary maintenance or replacement of parts subject to wear such as gaskets, bulbs, etc. The following instructions describe how to carry out these minor maintenance operations. Before any intervention that requires access to live parts, disconnect the power supply of the appliance. 9.1 Replacing the light bulb If a light bulb needs to be replaced because it is worn or burnt out, remove the guide frames; see “8.5.
Instructions for the user 9.2 Removing the door 9.2.1 With moveable levers Open the door completely. Lift the levers A of the two hinges away from them until they engage. Grasp the door on both sides with both hands, lift it forming an angle of around 30° and remove it. If the hinges have not unlocked, repeat the operation, raising the levers A and keeping the door slightly raised.
Instructions for the user 9.2.2 With pins Open the door completely. Insert two pins into the holes indicated A in the two hinges towards the back of them until they engage. Grasp the door on both sides with both hands, lift it forming an angle of around 30° and remove it. To reassemble the door, put the hinges in the relevant slots in the oven, making sure that the grooved sections C are resting completely in the slots. Lower the door and once it is in place remove the pins from the holes in the hinges.
Instructions for the user 9.3 Removing the door seal For multifunction models only: To permit thorough cleaning of the oven, the door seal may be removed. There are fasteners on all four sides to attach it to the edge of the oven. Pull the edges of the seal outwards to detach the fasteners.
Instructions for the user 9.4 Removing the internal glass panels The glass in the door should always be kept thoroughly clean. To facilitate cleaning, it is possible to remove the door (see 9.2 Removing the door) and place it on a canvas, or open it and lock the hinges in order to extract the glass panels. The glass panels of the door can be completely removed by following the instructions provided below.
Instructions for the user Cleaning: • Now it is possible to clean the external glass panel and the panels removed previously. Use absorbent kitchen roll. In the case of stubborn dirt, wash with a damp sponge and neutral detergent. Replacing the glass panels: • Replace the panels in the reverse of the order in which they were removed. • Reposition the internal glass panel, taking care to centre and insert the 4 pins attached to the glass into their slots in the oven door by applying a slight pressure.
Instructions for the user 9.5 What to do if... The oven display completely off is • • The oven does not heat up • The controls respond. do not • The cooking times are • longer than those indicated in the table. After the automatic • “pyrolysis” cleaning cycle (only on some models) it is not possible to select a function. The display shows ERR 4 (on pyrolytic models only) • If the door is opened during • a fan-assisted function, the fan stops. Check the mains power supply.
Instructions for the installer 10.INSTALLING THE APPLIANCE 10.1 Electrical connection The identification plate bearing the technical data, serial number and brand name is visibly positioned on the appliance. Do not remove this plate for any reason. The appliance must be connected to earth in compliance with electrical system safety regulations.
Instructions for the installer 10.2 Cable replacement Should the supply cable need replacing, remove the back guard by unscrewing the screws to gain access to the terminal. Replace the cable. The cable crosssection must be no less than 1.5 mm² (3 x 1.5) (see 10.1 Electrical connection). Make sure that the cables (for the oven or any hob) follow the best route in order to avoid any contact with the oven. WARNING: The tightening torque of the screws of the terminal supply wires must be 1.5 - 2 Nm. 10.
Instructions for the installer When installing in tall units, comply with the dimensions shown in figures 1 and 2, bearing in mind that the top/rear of the unit must have an opening 35-40 mm deep. Remove the screw covers on the frame and screw in the 2 screws A (fig. 5) to fix the appliance to the unit. Replace the screw covers. For installing beneath a countertop hob, allow for a rear and bottom clearance as shown in Figure 1 (ref. F). See the relevant instructions for fitting and securing the appliance.
Instructions for the installer 130 FIG. 2 FIG. 3 FIG. 4 FIG.