
Technical data
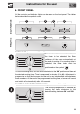
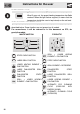
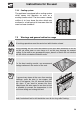
Table Of Contents
- 1. INSTRUCTIONS FOR USE
- 2. SAFETY PRECAUTIONS
- 3. ENVIRONMENTAL RESPONSIBILITY
- 4. GET TO KNOW YOUR OVEN
- 5. AVAILABLE ACCESSORIES
- 6. FRONT PANEL
- 7. USING THE OVEN
- 7.2.1 Internal oven lights
- 7.2.2 Oven runners
- 7.2.3 Cooling system
- 7.6.1 Cooking with a preset temperature
- 7.6.2 Changing the preset temperature
- 7.7.1 Cooking timed with the timer
- 7.7.2 Semi-automatic cooking
- 7.7.3 Automatic cooking
- 7.7.4 Changing the preset temperature
- 1 P1: OFF / ON Activate or deactivate the child safety lock (); this function, after 2 minutes of operation without any actions by the user, locks all the functions and knobs; it is identified by the appearance of on DSP1. To temporarily deactivate l...
- 2 P2: OFF / ON Activate or deactivate the Show Room function; this function disables all the heating elements so that only the control panel works (to use the oven normally, set P2:OFF).
- 3 P3: OFF / ON Activate or deactivate the function that allows a maximum consumption of 2300 W.
- 7.8.1 Change the settings in the secondary menu
- 8. COOKING WITH THE OVEN
- 9. CLEANING AND MAINTENANCE
- 10. EXTRAORDINARY MAINTENANCE
- 11. INSTALLING THE APPLIANCE
Instructions for the user
57
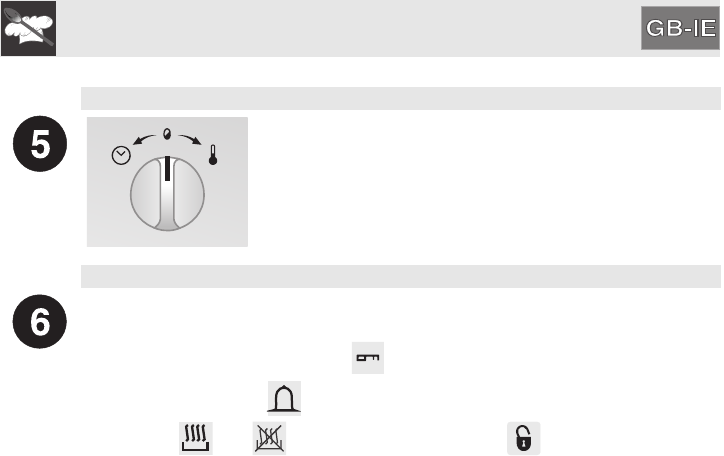
TIMER/THERMOSTAT KNOB (on some models only)
This knob allows you to set the time, to select the cooking
temperature and duration and to program the cooking
start and end times.
For convenience, it will be referred to in this
document as PT1.
DISPLAY (on some models only)
With the oven off, the 4-digit LED display shows the current time; when the oven
is working, the selected cooking temperature and duration are displayed.
The function lock indicator light (see “7.8 Secondary menu”), the active
timer indicator light , the symbols relating to programmed cooking
procedures and and the door lock indicator are also shown.
For convenience, it will be referred to in this document as DSP1.