Table of Contents 1.1 1.2 1.3 1.4 8 General Description Control panel Other parts Available accessories 2 Use 2.1 2.2 2.3 2.4 2.5 2.6 8 8 9 10 11 Instructions First use Using the accessories Using the oven Cooking advice Secondary menu 3 Cleaning and maintenance 3.1 3.2 3.3 3.4 3.5 3.6 3.7 3.8 3.
Important Safety Instructions RECOGNIZE SAFETY INFORMATION This is a safety alert symbol. This symbol alerts you to potential hazards that can result in severe personal injury or death. UNDERSTAND SIGNAL WORDS A signal word - DANGER, WARNING or CAUTION - is used with the safety alert symbol. DANGER denotes the most serious hazards. It means you could be killed or seriously injured if you do not immediately follow the instructions.
WARNING To reduce the risk of fire, electrical shock, personal injury, or damage when using the appliance, follow basic safety precautions, including the following: • Read all instructions. • Proper installation is your responsibility. Have a qualified technician install and ground this appliance in accordance with these installation instructions. • Make sure the installer complies with installation information specified on the model/serial ID plate.
Important Safety Instructions • ELECTRICAL GROUNDING IS REQUIRED. It is the customer’s responsibility: 1. To contact a qualified electrician. 2. To ensure that the electrical system is adequate and in compliance with the National Electrical Code ANSI / NFPA 70 Electrical Code – latest edition – or the CANADIAN ELECTRICAL CODE, C22.11 – 1982 and C22.2 No. 01982 – or latest edition – and all local codes and ordinances.
Important Safety Instructions How to read the user manual EN • Do Not Use Water on Grease Fires Smother fire or flame or use dry chemical or foam-type extinguisher. • Use Only Dry Potholders - Moist or damp potholders on hot surfaces may result in burns from steam. Do not let potholder touch hot heating elements. Do not use a towel or other bulky cloth. • Do not stand or sit on the oven door. • Remove all packing materials and temporary labels from the oven.
Description 1 Description 1.1 General Description 1 Control panel 2 Oven light 3 Seal 4 Door 1.
Description 1.3 Other parts EN 1 PT1 knob Oven shelves This knob allows you to set the time, select the cooking temperature and time and program the timed cooking start and stop times. The oven features shelves for positioning trays and racks at different heights. The insertion heights are indicated from the bottom upwards (see 1.1 General Description). Cooling fan 2 DSP1 display This display shows the current time or the cooking time.
Description 1.4 Available accessories Deep tray Some models are not provided with all accessories. Rack Useful for collecting fat from foods placed on the rack above and for cooking pies, pizzas and baked desserts. Useful for holding cooking containers. Tray rack The oven accessories intended to come into contact with food are made of materials that comply with the provisions of current legislation. Original and optional accessories can be requested to Authorized Assistance Centers.
Use 2.1 Instructions High temperature inside the oven during use Danger of burns • Keep the oven door closed during cooking. • Protect your hands using oven mitts when moving food inside the oven. • Do not touch the heating elements inside the oven. • Do not pour water directly on very hot trays. • Do not allow children near the oven when it is in operation. High temperature inside the oven during use Danger of fire or explosion • Do not use any spray products near the oven.
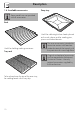
Use 2.3 Using the accessories Tray rack Racks and trays The tray rack must be inserted into the tray. In this way fat can be collected separately from the food which is being cooked. Racks and trays must be inserted into the side guides until they come to a complete stop. • The mechanical safety locks that prevent the rack from being taken out accidentally must face downwards and towards the oven back. 2.
• OFF mode: from the ON position, press and hold PT2 until it turns off. Only the symbol on DSP1 remains illuminated. First use Selecting an oven function While the oven is in the ON mode only, any cooking function can be selected by simply turning PT2 to the right or left. The selected function will change color to red on the display. After the selection, the preset cooking temperature for that function will be displayed on DSP3.
Use Function Default preset Range 320°F 120°F - 500°F 340°F 120°F - 500°F 480°F 120°F - 535°F 340°F 120°F - 500°F 320°F 120°F - 500°F 320°F 120°F - 500°F 480°F 120°F - 535°F 320°F 120°F - 500°F 320°F 120°F - 500°F 320°F 120°F - 500°F 85°F -- 105°F -- Using the timer Warning: the timer does not stop the cooking process. It only alerts the user that the preset number of minutes has elapsed. Press PT2 to turn off the oven. Press PT1 once (while the oven is in STAND-BY or ON mode).
Timed cooking Timed cooking is the function which allows a cooking operation to be started and then ended after a specific length of time set by the user. Select an oven function and press PT1 twice. The display will show the value and the symbol (flashing). Turn PT1 to the right or left to set the cooking time (from 00:01 to 23:59). A few seconds after the desired cooking time is set, the symbol will stop flashing and timed cooking will start from that moment.
Use After setting the amount of cooking time, press PT1 once. The symbol and the current time will appear on the display. Turning PT1 to the right increases the time, allowing the desired cooking start time to be set. A few seconds after the desired time is set, the and symbols will stop flashing, and the oven will start to wait for the start time setting. When the cooking time is over, the word will appear on DSP1, cooking will stop and a buzzer will sound. Press PT1 once to silence it.
Functions list ECO The combination of the fan and the convection heating element in ECO mode is intended for cooking on a single shelf to save power. Upper and lower heating elements As the heat comes from above and below at the same time, this system is particularly suitable for certain types of food. Traditional cooking, also known as static cooking, is suitable for cooking just one dish at a time.
Use 18 Convection with lower heating element The combination of the fan with just the lower heating element allows cooking to be completed more rapidly. This system is recommended for sterilizing or for finishing off the cooking of foods which are already well cooked on the surface, but not inside, and therefore need a little more heat. Perfect for any type of food.
Advice for cooking meat • Cooking times vary according to the thickness and quality of the meat and personal preferences. • Use a meat thermometer when roasting meat, or simply press on the roast with a spoon. If it is hard, it is ready; if not, it needs another few minutes cooking. Advice for cooking with the Broil and the Convection broil functions • Meat can be grilled by placing it a cold oven or after preheating the oven depending on the desired result.
Use Cooking information table Food Runner Temperature position from (°F) the bottom 1 410 - 450 1 410 - 450 Weight (lb.) Function Lasagna Pasta bake 6-9 6-9 Upper+lower Upper+lower Roast veal Pork Sausages Roast beef Roast rabbit Turkey breast Roast pork neck Roast chicken 4.4 4.4 3 2 3 3 4-7 2.6 Europ. conv.+up+lo Europ. conv.+up+lo Convection broil Europ. conv.+up+lo European conv. Europ. conv.+up+lo Europ. conv.+up+lo Europ. conv.
Use The appliance also has a concealed “secondary menu” allowing the user to: • Enable or disable the Child Lockout feature. • Enable or disable the Showroom feature (which disables all the heating elements so that only the control panel works). • enable or disable the Power Miser feature. With the appliance in OFF mode press and hold PT1 for at least 5 seconds to display the secondary menu. Turning PT1 to the right or left changes the feature status (ON/ OFF) or (HI/LO).
Cleaning and Maintenance 3 Cleaning and maintenance 3.1 Instructions Improper use Risk of damage to surfaces • Do not use steam jets for cleaning the appliance. • Do not use cleaning products containing chlorine, ammonia or bleach on steel parts or parts with metallic finishes on the surface (e.g. anodizing, nickel- or chromium-plating). • Do not use abrasive or corrosive detergents on glass parts (e.g. powder products, stain removers and metallic sponges).
Cleaning and Maintenance 3.7 Removing the internal glass panels EN 3. To reassemble the door, put the hinges in the relevant slots in the oven, making sure the grooved sections A are resting completely in the slots. Lower the door and once it is in place remove the pins from the holes in the hinges. The door's internal glass panels can be disassembled for easier cleaning. 1. Remove the internal glass panel by pulling the rear part gently upwards, following the movement indicated by the arrows (1). 2.
Cleaning and Maintenance 4. Clean the external glass panel and the panels previously removed using paper towels. In case of stubborn dirt, wash with a damp sponge and neutral detergent. 3.8 Cleaning the inside of the oven 5. Replace the panels in the reverse order in which they were removed. 6. Reposition the internal glass panel. Take care to center and insert the 4 pins into their housings in the oven door by applying slight pressure. Clean the oven racks with warm water and non-abrasive detergent.
Cleaning and Maintenance Removing the guide frames makes cleaning the sides of the oven easier. This operation should be performed each time the automatic cleaning cycle is used (only on some models). To remove the guide frames. Pull the frame towards the inside of the oven to unhook it from its groove A, then slide it out of the slots B at the back. When cleaning is complete, repeat the above procedures to put the guide frames back in. 3.
Cleaning and Maintenance 5. Replace the lamp with one of the same type (40W). 6. Replace the cover correctly, so that the moulded part of the glass is facing the door. 7. Press the cover down as far as it will go so that it attaches completely to the bulb support. Removing the door seal To permit thorough cleaning of the oven, the door seal may be removed. There are fasteners on all four sides to attach it to the edge of the oven. Pull the 4 corners of the seal outwards to detach the fasteners.