Contents 1.1 1.2 1.3 1.4 1.5 1.6 1.7 General safety instructions Manufacturer liability Appliance purpose Disposal Identification plate This user manual How to read the user manual 2 Description 2.1 2.2 2.3 2.4 General Description Control panel Other parts Available accessories 3 Use 3.1 3.2 3.3 3.4 3.5 3.6 3.7 3.8 3.
Instructions 1 Instructions 1.1 General safety instructions Risk of personal injury • During use the appliance and its accessible parts become very hot. • Never touch the heating elements during use. • Keep children under eight years of age at a safe distance if they are not constantly supervised. • Children must never play with the appliance. • Never rest metallic objects such as knives, forks, spoons and lids on the appliance during use. • Switch off the appliance immediately after use.
For this appliance 1.4 Disposal • Ensure that the appliance is switched off before replacing the bulb. • Do not rest any weight or sit on the open door of the appliance. • Take care that no objects are stuck in the doors. This appliance must be disposed of separately from other waste (Directives 2002/95/EC, 2002/ 96/EC, 2003/108/EC). The appliance does not contain substances in quantities sufficient to be considered hazardous to health and the environment, in accordance with current European directives.
Instructions Our appliances are packed in nonpolluting and recyclable materials. • Deliver the packing materials to the appropriate recycling centre. Plastic packaging Danger of suffocation • Do not leave the packaging or any part of it unattended. • Do not let children play with the packaging plastic bags. 1.5 Identification plate The identification plate bears the technical data, serial number and brand name of the appliance. Do not remove the identification plate for any reason. 1.
Description 2 Description EN 2.
Description 2.2 Control panel 1 Display Cooling fan The touchscreen display allows you to interact with the appliance. Press the icons to access the various available functions. The display will show all operational parameters, such as: selected function, time/temperature settings or pre-set cooking program settings. In general, press the symbol to return to the previous menu or end a function; press the symbol to confirm the selected options. 2.
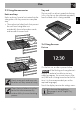
Description 2.4 Available accessories Deep tray EN Some models are not provided with all accessories. Rack Useful for collecting fat from foods placed on the rack above and for cooking pies, pizzas, baked desserts, biscuits, etc. Useful for supporting containers with food during cooking. Tray rack The oven accessories intended to come into contact with food are made of materials that comply with the provisions of current legislation.
Use 3 Use 3.1 Instructions High temperature inside the oven during use Danger of burns • Keep the oven door closed during cooking. • Protect your hands wearing heat resistant gloves when moving food inside the oven. • Do not touch the heating elements inside the oven. • Do not pour water directly onto very hot trays. • Do not allow children to get near the oven when it is in operation. High temperature inside the oven during use Danger of fire or explosion • Do not spray any spray products near the oven.
3.3 Using the accessories Tray rack Racks and trays The tray rack has to be inserted into the tray. In this way fat can be collected separately from the food which is being cooked. Racks and trays have to be inserted into the side guides until they come to a complete stop. • The mechanical safety locks that prevent the rack from being taken out accidentally have to face downwards and towards the oven back. 3.
Use When first connecting or after the power has been cut for a time it will be necessary to wait a few seconds before you can interact with the appliance. (in the example, the recipe recipe 1 has been stored, see “Adding a recipe”). Home screen Press the time on the display. It is now possible to select the various available functions on the home screen of the appliance. Deleting the memory If you wish to delete the memory: 1.
Use Cooking functions 1. Select the cooking functions icon 4. When the preheating stage is over a buzzer will sound to indicate that the food can be placed inside the oven. EN on the “home screen”. It is not recommended to place the dish in the oven during the automatic pre-heat stage. 2. Select the required function. Interrupting a function Press the return symbol for approximately 2 seconds to interrupt a cooking function. Select the required option. 3. The appliance will begin preheating.
Use Changing a function during cooking Modifying the preset temperature 1. Press the function symbol to modify it. 1. Press the displayed temperature to change it. 2. Press the symbol of the new function required. 3. The display will show the new function chosen, the preset temperature, the current time and the progress in reaching the new temperature. To avoid accidentally exiting the current function or screen displayed, the symbol must be pressed and held down for longer than usual.
List of cooking functions Eco The combination of the fan and the circulaire heating element, in ECO mode, is particularly indicated for cooking on a single shelf, with reduced power consumption. Static As the heat comes from above and below at the same time, this system is particularly suitable for certain types of food. Traditional cooking, also known as static cooking, is suitable for cooking just one dish at a time.
Use Circulaire The combination of the fan and the circulaire heating element (incorporated in the rear of the oven) allows you to cook different foods on several levels, as long as they need the same temperatures and type of cooking. Hot air circulation ensures instant and even distribution of heat. It will be possible, for instance, to cook fish, vegetables and biscuits simultaneously (on different levels) without odours and flavours mingling.
Use General advice • Use a fan assisted function to achieve consistent cooking at several levels. • It is not possible to shorten cooking times by increasing the temperature (the food could be overcooked on the outside and undercooked on the inside). • To prevent condensation from forming on the glass, hot food should not be left inside the oven for too long after cooking. Advice for cooking meat • Cooking times vary according to the thickness and quality of the food and to consumer taste.
Use To save energy • Stop cooking a few minutes before the time normally used. Cooking will continue for the remaining minutes with the heat which has accumulated inside the oven. • Reduce any opening of the door to a minimum to avoid heat dispersal. • Keep the inside of the appliance clean at all times. • (Where fitted) When it is not being used, remove the pizza plate and put the cover back in its slot. 3.
Use Timed cooking 4. Press the symbol Activation of timed cooking cancels any minute minder timer which may previously have been set. 1. Press the symbol function. 2. Press on duration. during a cooking The duration of the timer can be from a minimum of 1 minute to a maximum of 13 hours. 3. Enter the required duration (for example 25 minutes: first touch the minutes box, then the numbers 2 and 5). 5. Timed cooking begins.
Use Modifying the data set during timed cooking During operation, it is possible to modify timed cooking duration: 1. Press the symbol . 3. Enter the time at which you require cooking to end (for example at 7:30 p.m.: first touch the hours box, then the numbers 1 and 9; touch the minutes box, then the numbers 3 and 0). 2. Press on duration. 3. Enter the new duration required and press the symbol to confirm. Delay cooking 4. Press the symbol to confirm. 5.
Use Modifying the data set during programmed cooking After modifying the cooking duration, the end of cooking time must be re-set. During operation, it is possible to modify programmed cooking duration: 8. At the end of the cooking cycle, “function ended” appears on the display and a buzzer will sound that can be deactivated by pressing the symbols or 1. Press the symbol . 2. Enter the new duration required (for example 35 minutes) and press the symbol to confirm. . 3.
Use 3.6 Special functions The special functions menu contains some functions like the timer with the oven off, defrosting or cleaning functions. Select the special functions icon on the “home screen”. Proving The proving function, using the heat coming from the top, makes it possible to prove all types of dough, guaranteeing perfect results quickly. Food warming To heat food or keep it hot. Sabbath This function allows food to be cooked while respecting the requirements of the Jewish Sabbath.
Use Pyrolytic (on some models only) Setting this function, the oven reaches temperatures up to 500°C, destroying all the grease which forms on the internal walls. The more complex special functions are illustrated below. For functions such as Vapor Clean, Pyrolytic and ECO Pyrolytic, see “4 Cleaning and maintenance”. Timer The duration of the minute minder can be from a minimum of 1 minute to a maximum of 4 hours. 1. Select timer from the “special functions” menu.
Use 6. If you leave the timer setting screen, the will be displayed at the top symbol left, indicating that a minute minder timer is active. You must return the counter to zero to remove the special timer. If a function is activated after setting a timer time, this time will be automatically used as a timer for the function, except for some special functions, automatic preset recipes and personal recipes. This function only activates the buzzer, without stopping cooking. Defrost by weight 1.
Use 6. Select start to start defrosting, or select change to further modify the set parameters. Type Weight (kg) Time Meat 0.5 01h 45m Fish 0.4 00h 40m Fruit 0.3 00h 45m Bread 0.3 00h 20m EN Preset parameters: Defrost by time 1. Place the food inside the appliance. 2. Select defrost by time from the “special functions” menu. 7. Press the symbol to start the defrost by weight function. 8. The defrost by weight will start. 3.
Use Proving 5. Press the symbol again to start the defrost by time function. 6. The defrost by time will start. For successful proving, a container of water should be placed in the bottom of the oven. 1. Position the dough to prove on the second level. 2. Select proving from the “special functions” menu. 7. While the function is in progress, it is possible to further modify the defrosting duration (see “Timed cooking”). Press the symbol to make the desired changes. 8.
Use Food warming 6. While the function is in progress, it is possible to set a timer for a maximum of 4 hours (see “Timer during function”), a proving duration (see “Timed cooking”) or a delayed proving (see “Delay cooking”). Press the symbol the desired changes. EN 1. Position the tray on the first shelf and place the plates to be warmed at the centre of it. to make Unless otherwise set, the proving will have a maximum duration of 13 hours.
Use 3. Press the symbol to start the food warming function, or press the preset temperature value to change it (from 40° to 80° C). 4. The appliance will begin preheating. 6. While the function is in progress, it is possible to set a timer for a maximum of 4 hours (see “Timer during function”), a warming duration (see “Timed cooking”) or a delayed warming (see “Delay cooking”). Press the the desired changes.
Use The appliance follows some specific behaviour when operating in this function: • Cooking can proceed indefinitely, it is not possible to set any cooking duration. • No preheating will be performed. • The cooking temperature which can be selected varies between 60-100 °C. • Oven light disabled, any operation such as opening the door or manual activation will not activate the light. • Oven fan disabled. • Buzzers disabled.
Use 3.7 Preset recipes This mode allows you to select a pre-set food cooking program. The appliance will automatically calculate the optimum cooking parameters based on the weight entered. Select the preset recipes 2. Select the sub-type of dish to cook and press the name of the sub-type of dish to confirm. icon on the “home screen”. 3. Select the type of cooking (where possible, depending on the dish chosen) and press the name of the cooking type to confirm. Starting a preset recipe 1.
Use The time shown does not include the time to reach temperature. EN 5. Use the symbols and to enter the weight (in kilograms) of the dish. Some predefined cooking parameters can be changed at any time, even after cooking has started. 6. Press the symbol to confirm. 10. A buzzer will sound and a message will be displayed to indicate when to place the food in the oven and enable the start of cooking. 7. Press the symbol again to move to the next screen. 8.
Use Preset recipe end Changing a preset recipe permanently 1. At the end of the preset recipe, the appliance will notify the user with a buzzer and the symbol will flash. 1. Inside the selected preset recipe, select change from the menu of the selected dish. 2. Press the symbol to perform cooking with the same parameters currently set (press the symbol twice if the buzzer is active).
Use 3. Make the required changes. 4. Press the symbol to store the recipe. The appliance will ask to confirm the changes which have just been made. • Cooking time If the changes are not confirmed, the preset recipe will remain unchanged. • Oven shelf 5. If the change is confirmed the display will show confirmation of this.
Use Preset recipe table MEATS Subcategory Roast beef Roast pork Lamb Veal Pork spare ribs Pork chops Pork sausages Bacon Turkey Chicken Rabbit Cooking rare medium well done medium well done roasted roasted roasted Weight (Kg) 1 1 1 1 1 1 1 1 1 1 0.5 3 1 1.5 Function Level Temp.
Use Subcategory Bundt cake Biscuits Muffins Profiteroles Meringues Sponge cake Strudel Tart Brioche bread Croissants Cooking - Weight (Kg) 1 0.6 0.5 0.5 0.3 1 1 0.8 1 0.6 Time (minutes) 60 18 18 70 90 60 40 40 40 30 Function Level Temp. (°C) Fan assisted Turbo Circulaire Turbo Turbo Circulaire Static Static Fan assisted Circulaire 2 2 2 2 2 2 2 2 2 2 160 160 160 180 120 160 170 170 180 160 Weight (Kg) Function Level Temp.
Use LOW TEMPERATURE COOKING Subcategory Veal Beef Pork Lamb Cooking rare well done - Weight (Kg) 1 1 1 1 1 Function Level Temp. (°C) Turbo Static Static Turbo Turbo 2 2 2 2 2 90 90 90 90 90 Time (minutes) 360 105 380 330 360 3.8 Personal programs The cooking times in the table refer to the dish indicated in the recipe and are a guide only; they may vary depending on personal taste. The tables give the factory-set data.
Use Adding a recipe • Cooking function EN 1. Select add from the “personal recipes” menu. • Cooking time All parameters which can be changed will be highlighted in yellow on the main screen. • Oven shelf 2. Press the parameter you wish to change: • Cooking temperature • Weight of dish 3. Make the required changes.
Use 4. Press the symbol to store the recipe. The appliance will ask you to enter a name for the recipe you have just created. 5. Enter the name of the recipe. The character deletes the previous letter (in the example, the recipe, recipe 1 has been stored). The recipe name can contain maximum 10 characters, including spaces. In order to be able to save the recipe, the name must contain at least one character. 6. After entering the name of the new recipe, press the symbol 100 to confirm. 7.
Starting a personal recipe Changing a personal recipe 1. Select a previously saved personal recipe from the “personal recipes” menu (in the example the recipe, recipe 1, has been saved). 1. Select a previously saved personal recipe from the “personal recipes” menu (in the example the recipe, recipe 1 has been saved). 2. Select the start option. 2. Select the change option. 3. Cooking will start with the parameters previously set for the recipe. 3.
Use 2. Select the delete option. Delay cooking 1. Select a previously saved personal recipe from the “personal recipes” menu (in the example the recipe, recipe 1 has been saved). 3. Confirm the deletion. Select yes to permanently delete the recipe. 2. Select the function delayed option. 4. If you confirm the deletion, the display will show confirmation of this. 3. Enter the time at which you require cooking to end (for example at 7:30 p.m.
Use to confirm. 5. The appliance waits for the delay start time. Language Sets the interface language from those available. EN 4. Press the symbol 1. Select language from the “settings” menu. 3.9 Settings The product is set using this menu. Select the settings icon on the “home 2. Press the symbols and the required language. to select screen”. 3. Confirm the selected language. In the event of a temporary power cut, all personal settings will remain stored.
Use Clock Control lock Sets the time displayed. 1. Press the symbol or and select clock from the “settings” menu. Allows the appliance to automatically lock the controls after one minute of normal operation without any intervention from the user. 1. Press the symbol or and select controls lock from the “settings” menu. 2. Enter the current time 2. To confirm activation of the controls lock, select yes. 3. Press the symbol to confirm.
Use This mode deactivates all the appliance's heating elements, while keeping the control panel active. 1. Press the symbol or and select demo mode from the “settings” menu. Eco-Logic This mode allows the appliance to limit the power used. Indicated for use of multiple appliances at the same time on circuits with limited maximum power. If this option is enabled, the symbol will appear next to the function on the display. 1. Press the symbol or and select eco-logic from the “settings” menu. 2.
Use Sound Keep warm Whenever one of the display symbols is pressed, the appliance beeps. This setting disables these sounds. 1. Press the symbol or and select sound from the “settings” menu. This mode allows the appliance to keep cooked food warm (at low temperatures) after cooking finishes with a cooking cycle for which a duration has been set (if this is not manually interrupted), without altering the taste and smell obtained during cooking. 1.
Use EN The keep warm function will be activated as soon as cooking is finished; this is indicated by a series of beeps (see cooking or function finished). The screen below will be shown on the display after a few minutes. 2. To confirm activation of eco-light mode, select yes. To stop the appliance from automatically deactivating the light after one minute, set this mode to OFF. Eco-Light For greater energy savings, the light is automatically deactivated one minute from the start of cooking. 1.
Use Digital clock Displays the time in digital format. When no appliance function is active, the display will show the current time in digital format. 1. Press the symbol or and select digital clock from the “settings” menu. In the event of a temporary power cut, the digital version will remain selected. 2. To confirm activation of the digital clock, select yes.
4 Cleaning and maintenance 4.1 Instructions Improper use Risk of damage to surfaces • Do not use steam jets to clean the appliance. • Do not use detergents which are abrasive, corrosive or which contain chlorine, ammonia or bleach (e.g. scouring powders, stain removers etc.). • Do not use rough or abrasive materials or sharp metal scrapers. In the event you are using specific cleaning products, we recommend running the oven at maximum temperature for 15-20 minutes in order to eliminate any residue. 4.
Cleaning and maintenance 3. To reassemble the door, put the hinges in the relevant slots in the oven, making sure that grooved sections A are resting completely in the slots. Lower the door and once it is in place remove the pins from the holes in the hinges. 4.4 Cleaning the door glazing The glass in the door should always be kept thoroughly clean. Use absorbent kitchen roll. In case of stubborn dirt, wash with a damp sponge and an ordinary detergent.
Cleaning and maintenance Removing the rack/tray support frames Removing the rack/tray support frames enables the sides to be cleaned more easily. This operation should be performed each time the automatic cleaning cycle is used (on some models only). To remove the rack/tray support frames: 1. Pull the frame towards the inside of the oven to unhook it from its groove A. 2. Then slide it out of the seats at the back B. 3.
Cleaning and maintenance 4.5 Vapor Clean (on some models only) • Pour approx. 40 cc of water onto the floor of the oven. Make sure it does not overflow out of the cavity. Vapor Clean is an assisted cleaning procedure which facilitates the removal of dirt. Thanks to this process, it is possible to clean the inside of the oven very easily. The dirt residues are softened by the heat and water vapour for easier removal afterwards.
Cleaning and maintenance If the internal temperature is greater than that required for the Vapor Clean function, the cycle will be stopped immediately and “Internal temperature unsafe, please wait until the oven is cool” will appear on the display. Leave the appliance to cool down before activating the assisted cleaning cycle. 1. Select the Vapor Clean function from the “special functions” menu. 3. Press the symbol to confirm. The assisted cleaning cycle will start. EN Vapor Clean setting 4.
Cleaning and maintenance Setting programmed Vapor Clean End of the Vapor Clean cycle It is possible to program the Vapor Clean start time, like any cooking function. 1. After selecting the Vapor Clean special function, press the symbol . 5. Open the door and wipe away the less stubborn dirt with a microfibre cloth. 6. Use an anti-scratch sponge with brass filaments on tougher encrustations. 7. In case of grease residues use specific oven cleaning products. 8. Remove the water left inside the oven.
Cleaning and maintenance Pyrolytic is an automatic hightemperature cleaning procedure which causes dirt to dissolve. Thanks to this process, it is possible to clean the inside of the oven very easily. Pyrolytic function setting 1. Select eco pyrolytic or pyrolytic from the “special functions” menu. EN 4.6 Pyrolytic (on some models only) Improper use Risk of damage to surfaces • Remove any food residues or large spills from previous cooking operations from the inside of the oven.
Cleaning and maintenance 4. The appliance is ready to start the automatic cleaning cycle. A warning reminds the user to remove any accessories from inside the oven. Press the symbol cleaning. to start pyrolytic Recommended pyrolytic cycle duration: • Light dirt: 2 hours. • Medium dirt: 2 ½ hours. • Heavy dirt: 3 hours. With the eco pyrolytic function, the duration is set to 2 hours and cannot be modified).
5. At the end of the pyrolytic cycle, the door remains locked as long as the temperature inside the oven returns to safety levels. 6. After around 20 seconds, the display will indicate that the cooling procedure is in progress. 7. Wait for the oven to cool down and collect the residues deposited inside with a damp microfibre cloth. During the first pyrolytic cycle, unpleasant odours may occur due to the normal evaporation of oily manufacturing substances.
Cleaning and maintenance Setting of programmed pyrolytic cycle 4.7 Extraordinary maintenance It is possible to program the pyrolytic cycle start time like all other cooking functions. 1. After choosing the duration of the pyrolytic function and pressing the symbol to confirm, press the symbol Removing and fitting the oven seal (pyrolytic models excluded) To remove the oven seal: • Unhook the clips in the 4 corners then pull the oven seal outwards. . 2. Press on function delayed. 3.
Cleaning and maintenance Replacing the internal light bulb 4. Slide out and remove the light bulb. EN Live parts Danger of electrocution • Unplug the appliance. 1. Completely remove all accessories from inside the oven. 2. Remove the rack/tray support frames. 3. Remove the bulb cover using a tool (e.g. a screwdriver). Pay attention not to scratch the oven cavity enamel. Do not touch the halogen light bulb directly with your fingers, but wrap it in insulating material. 5.
Cleaning and maintenance What to do if... The display is completely off: • Check the mains power supply. • Check that any circuit breakers upline of the appliance supply line are in the “ON” position. The appliance does not heat up: • Check whether it has been set in “demo” mode (for further details see “Settings”). The controls do not respond: • Check whether it has been set to “control lock” mode (for further details see “Settings”).
Installation 5.1 Electrical connection Power voltage Danger of electrocution • Have the electrical connection performed by authorised technical personnel. • The appliance must be connected to earth in compliance with electrical system safety standards. • Disconnect the mains supply. General information Check the grid characteristics against the data indicated on the plate. The identification plate bearing the technical data, serial number and brand name is visibly positioned on the appliance.
Installation 5.3 Positioning Position of the power cable Heavy appliance Crushing hazard • Position the appliance into the cabinet cutout with the help of a second person. Pressure on the open door Risk of damage to the appliance • Never use the oven door to lever the appliance into place when fitting. • Avoid exerting too much pressure on the oven door when open. Heat production during appliance operation Risk of fire • Check that the piece of furniture material is heat resistant.
Installation Fastening bushings Appliance overall dimensions (mm) EN 1. Remove the bushing covers inserted on the front of the appliance. 2. Mount the appliance into the recess. 3. Secure the appliance to the piece of furniture using screws. 4. Cover the bushings with the covers removed previously.
Installation Mounting under worktops (mm) Make sure that the piece of furniture rear/bottom part has an opening of approx. 60 mm.
Installation EN Mounting into a column (mm) Make sure that the piece of furniture top/rear part has an opening approx. 35-40 mm deep.