Contents 1.1 1.2 1.3 1.4 1.5 1.6 1.7 General safety instructions Appliance purpose Manufacturer liability This user manual Identification plate Disposal How to read the user manual 2 Description 2.1 2.2 2.3 2.4 2.5 2.6 General Description Control panel Other parts Advantages of steam cooking Available accessories Other cooking containers 3 Use 3.1 3.2 3.3 3.4 3.5 3.6 3.
Instructions 1 Instructions 1.1 General safety instructions Risk of personal injury • During use the appliance and its accessible parts become very hot. Never touch the heating elements during use. • Protect your hands by wearing oven gloves when moving food inside the oven. • Never try to put out a fire or flames with water: Turn off the appliance and smother the flames with a fire blanket or other appropriate cover.
• Keep the oven door closed during cooking. • If you need to move food or at the end of cooking, open the door 5 cm for a few seconds, let the steam come out, then open it fully. • DO NOT USE OR STORE FLAMMABLE MATERIALS NEAR THE APPLIANCE. • DO NOT USE AEROSOLS IN THE VICINITY OF THIS APPLIANCE WHILE IT IS IN USE. • Switch off the appliance immediately after use. • Do not clean the appliance immediately after turning it off – wait for it to cool down first. • DO NOT MODIFY THIS APPLIANCE.
Instructions • Do not use steam jets to clean the appliance. • Do not obstruct ventilation openings and heat dispersal slots. • Never leave the appliance unattended during cooking operations where fats or oils could be released, as these could then heat up and catch fire. Be very careful. • Never leave objects on the cooking surface. • DO NOT USE THE APPLIANCE AS A SPACE HEATER FOR ANY REASON. • Do not spray any spray products near the appliance.
Installation • THIS APPLIANCE MUST NOT BE INSTALLED IN A BOAT OR CARAVAN. • The appliance must not be installed on a pedestal. • Position the appliance into the cabinet cut-out with the help of a second person. • To avoid potential overheating, the appliance must not be installed behind a decorative door or a panel. • Have the electrical connection performed by authorised technical personnel. • The appliance must be connected to earth in compliance with electrical system safety standards.
Instructions 1.2 Appliance purpose • This appliance is intended for cooking food in the home environment. Every other use is considered improper. • The appliance is not designed to operate with external timers or with remote-control systems. 1.
Instructions Plastic packaging Danger of suffocation • Do not leave the packaging or any part of it unattended. • Do not let children play with the plastic bags. 1.7 How to read the user manual This user manual uses the following reading conventions: Instructions General information on this user manual, on safety and final disposal.
Description 2 Description 2.
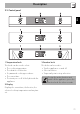
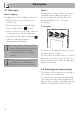
Description EN 2.2 Control panel 1 Temperature knob 3 Function knob This knob can be used to select: • The cooking temperature • The duration of a function • Programmed cooking procedures • The current time • The turning on or off of the light inside the appliance. This knob can be used to: • Turn the appliance on and off • Select a function • Temporarily start or stop a function. To stop the active function and switch off the appliance, press the function knob for a few seconds.
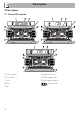
Description 2.3 Other parts Shelves Interior lighting The appliance features shelves to position trays and racks at different heights. The insertion heights are indicated from the bottom upwards (see 2.1 General Description). The appliance’s interior lighting comes on: • When the door is opened (on some models only). • When any function is selected, apart from the Vapor Clean function.
Description 2.5 Available accessories Tray EN Jug Useful when cooking cakes (with cooking times of less than 25 minutes or without steam), rice, beans and cereals. It is also essential for collecting liquids produced by steaming or defrosting of foods contained in the perforated trays above. Tray rack For holding liquids during reservoir filling and emptying. Perforated tray To be placed over the top of the oven tray; for cooking foods which may drip. Useful for steaming fish and vegetables.
Description Rack Some models are not provided with all accessories. Useful for supporting containers with food during cooking.
Use 3.1 Instructions High temperature inside the oven during use Danger of burns • Keep the oven door closed during cooking. • Protect your hands by wearing oven gloves when moving food inside the oven. • Open the appliance door carefully during or after cooking. • Take care because steam may not be visible at certain temperatures. • Do not cook dishes containing large quantities of strong alcoholic beverages. Alcohol vapour inside the oven could ignite. • Do not touch the heating elements inside the oven.
Use High temperature inside the oven during use Danger of fire or explosion • Do not spray any spray products near the appliance. • Do not use or leave flammable materials near the appliance. • Do not use plastic cookware or containers when cooking food. • Do not put sealed tins or containers in the oven. • Do not leave the appliance unattended during cooking operations where fats or oils could be released. • Remove all trays and racks which are not required during cooking. 3.2 First use 1.
Use 3.4 Using the oven If you intend to use the perforated tray for steam cooking, this must be positioned on the second runner while the tray must be positioned on the first runner. This allows the liquids to be collected separately from the food that is being cooked (2 + 1 configuration, see “Automatic programs table”).
Use Setting the time Operating modes When using the appliance for the first time, or after a power failure, the symbol will flash on the display. To be able to start any cooking function, the current time must be set. 1. Turn the temperature knob to set the displayed time (keep the knob turned to produce a faster increase or decrease). 2. Press the temperature knob. 3. Turn the temperature knob to set the minutes (keep the knob turned to produce a faster increase or decrease). 4.
Use Each time the temperature knob is pressed during a function, the parameters will be cycled through in the following order. Temperature Minute minder Timed cooking duration Programmed cooking time (if timed cooking is set) Steam function settings Do not place food or any other object directly on the bottom of the oven. The base of the oven and the evaporation tray must always be left free. 1. Place the food inside the oven. 2. Press the function knob to activate the appliance.
Use 4. Press the temperature knob to confirm the required cooking duration. The timed cooking indicator light remains on steadily, while the temperature indication starts flashing. 5. If you wish to modify the default temperature (100°C), turn the temperature knob to the right or left until you reach the required value. The minimum temperature which can be set is 30°C. Each movement of the temperature knob changes the value by 5°C. At this point it is possible to set programmed cooking.
Use 14. Extract the tube from its seat and insert its end in the jug or container until it reaches all the way to the bottom. EN 10. Press the function knob. A request to fill the reservoir with water is shown on the display. Filling the reservoir • Use cold tap water which is not too hard, softened water or still mineral water. • Do not use distilled water, tap water with a high chloride content (> 40 mg/l), or other liquids. 11.
Use The appliance will automatically draw the quantity of water necessary for cooking on the basis of the set duration. In the event that the water runs out, the appliance will automatically stop the cooking process, a buzzer will sound and the display will show a request to fill the reservoir with water. 16. When the appliance has finished taking in water, shake the tube to remove any residual water. 17. Return the tube to its original position, remove the jug/container of solution and close the door.
Use Steaming is always preceded by a preheating stage, which allows the appliance to heat up to cooking temperature. The temperature reached flashes to indicate that this stage is in progress. When preheating finishes, the temperature reached remains lit steadily, a buzzer sounds and cooking proceeds automatically. If you set a longer cooking time than that previously set - meaning that the water added to the reservoir will be insufficient - the indicator light will flash on the display for a few seconds.
Use Modifying programmed cooking If programmed cooking is set, after modifying the cooking time, the end of cooking time must be re-set. 21. When the timed cooking End of the steam function When cooking finishes, a buzzer will sound and the following screens will alternate on the display. and programmed cooking indicator lights are lit steadily and the appliance is waiting for cooking to start, press the temperature knob. The timed cooking indicator light will start flashing. 22.
Use At the end of steaming, the water can be emptied from the reservoir. 32. Press the function knob to start the drainage of the water into the jug (or container). EN Removing the residual water We recommend emptying the reservoir each time you finish using the appliance to avoid scale build-up. 27. Press the function knob for a few seconds. The water drain screen will appear on the display. 28.
Use When complete, the display will indicate that the residual water removal process is complete. 35. Inside the oven cavity, remove the cover from the evaporation tray and dry it with the sponge provided. 33. Shake the tube in order to remove any remaining water. Note: The evaporation tray cover may be very hot: use appropriate protection. 36. Using a sponge, remove any condensation from the base and walls of the oven, the door glass and drip tray and the front of the appliance. 34.
Advice for steam cooking • Pasta and rice: upon reaching 100°C, the cooking time will be the same as with cooking on a hob. Place the pasta or rice in a metal tray and cover with around a centimetre of water. For best results when cooking rice, place a lid on the container or cover with aluminium foil. This procedure allows the rice to absorb all the water, and it can then be served directly to the table. • Eggs: these may be boiled, scrambled or poached by using the steam function at 100°C.
Use • Reheating: the steam cooking function will not dry foods out and gives a moister result. A previously prepared homecooked meal, covered with aluminium foil, will take around 10-12 minutes to reheat. Ready meals will require approximately double the time indicated on the package. • Defrosting: it is possible to use the steam function to defrost foods. Times vary, but defrosting with the steam cooking function takes around half the time necessary for covered foods left to defrost at room temperature.
Use left to select the required temperature . 6. Press the temperature knob if you wish to change the steam percentage (25% by default). 7. Turn the temperature knob to the right or left to select the required percentage of steam . 8. Press the function knob. A request to fill the reservoir with water is shown on the display. 9. Fill the reservoir as described in chapter “Filling the reservoir”. 10. Press the function knob to start combination cooking.
Use Traditional cooking functions Preheating stage 1. Press the function knob to activate the appliance. 2. Turn the function knob to the right or left to select a traditional function. Traditional functions are always preceded by a preheating stage, which allows the appliance to heat up to cooking temperature. The temperature reached flashes to indicate that this stage is in progress. 3. Press the temperature knob if you wish to change the default temperature. 4.
Use Circulaire The combination of the fan and the circulaire heating element (incorporated in the rear of the oven) allows you to cook different foods on several levels, as long as they need the same temperatures and type of cooking. Hot air circulation ensures instant and even distribution of heat. It will be possible, for instance, to cook fish, vegetables and biscuits simultaneously (on different levels) without odours and flavours mingling.
Use Fan assisted The operation of the fan, combined with traditional cooking, ensures consistent cooking even with complex recipes. Perfect for roasts. Fan with grill The air produced by the fan softens the strong heatwave generated by the grill, grilling perfectly even very thick cuts of meat such as steaks, pork chops, etc. Circulaire + fan + lower element Fan assisted cooking is combined with the heat coming from below and allows you to brown food slightly at the same time.
Use This function only activates the buzzer, without stopping cooking. The minute minder can be activated both during cooking and when the appliance is in standby. 1. Press the temperature knob once (twice if cooking is already in progress). The display shows and the indicator light flashes. 4. Turn the temperature knob to select another minute minder, or press the temperature knob to stop the buzzer. EN Minute minder You must set the value to zero to remove the minute minder.
Use 2. Turn the temperature knob right or left to set the cooking duration from 00:01 to 12:59. Keep the knob turned to produce a faster increase or decrease. Press and hold the function knob down to switch off the appliance. Modifying the data set during timed cooking During operation, it is possible to modify timed cooking duration: 3. A few seconds after the required duration is set, the indicator light stops flashing and timed cooking starts. 4.
Use Programmed cooking is the function which allows cooking to be stopped at an established time depending on the time set by the user, after which the oven will switch off automatically. 1. After selecting a cooking function and temperature, press the temperature knob three times. The display shows and the indicator light flashes. 3. Press the temperature knob a fourth time. The indicator light flashes. Turn the knob right or left to set the cooking end time. 4.
Use 5. At the end of cooking, STOP appears on the display and a buzzer sounds that can be deactivated by pressing the temperature knob. Modifying the data set during programmed cooking After modifying the cooking duration, the end of cooking time must be re-set. During operation, it is possible to modify programmed cooking duration: To extend the cooking time manually, press the temperature knob again. The appliance will resume its normal operation with the previously selected cooking settings. 1.
3.5 Cooking advice General advice • It is not possible to shorten cooking times by increasing the temperature (the food could be overcooked on the outside and undercooked on the inside). • Cooking times vary according to the thickness and quality of the food and to consumer taste.
Use Advice for cooking desserts/pastries and biscuits • Use dark metal moulds: They help to absorb the heat better. • The temperature and the cooking time depend on the quality and consistency of the dough. • To check whether the dessert is cooked right through: At the end of the cooking time, insert a wooden cocktail stick into the highest point of the dessert. If the dough does not stick to the cocktail stick, the dessert is cooked.
Use 3.6 Special functions Proving EN Defrost by time It is not possible to modify the temperature of the defrost by time function. 1. Place the food to be defrosted inside the oven. 2. Press and turn the function knob to select the defrost by time function marked by the indicator lights and . 3. Press the function knob to confirm your choice of function. 4. Turn the temperature knob to set the defrost time (from 00:00 to 13:00). 5. Press the function knob to start defrosting. 6.
Use Reheat Sabbath This function allows you to heat previously cooked food which has been kept in the refrigerator. 1. Place the food to be heated inside the oven. 2. Press and turn the function knob to select the heating function. 3. Turn the temperature knob to modify the heating duration. 4. Press the function knob to confirm the parameters and start heating. 104 This function allows food to be cooked in accordance with the provisions of the Jewish religion day of rest.
Use 1. Press the function knob to select the Sabbath function. 2. Press the temperature knob. 3. Turn the temperature knob to modify the heating duration. 4. Press the function knob to confirm the parameters and start the Sabbath function. 5. When finished, press and hold the function knob down for at least 3 seconds to turn off the appliance. Automatic programs EN After activating the Sabbath function the settings cannot be altered.
Use Automatic programs table MEAT (01 - 04) Pr Subcategory Function Steam Weight Level % (g) Temp. Time (°C) (minutes) 01 Roast pork + 50 1000 2 180 95 02 Roast veal + 40 1000 2 170 70 03 Roast chicken + 50 1000 2 200 40 04 Roast duck + 30 1000 2 150 105 FISH (05 - 08) Pr Subcategory Function Cod fillet 05 (piece of approx. 150 g) Salmon fillet 06 (piece of approx. 150 g) 07 Prawns 08 Whole fish + Steam Weight Level % (g) Temp.
Use Pr Subcategory Function Steam Weight Level % (g) Temp. Time (°C) (minutes) 13 Biscuits/muffins 0 600 1 160 18 14 Tart 0 800 1 170 40 100 200 1 100 50 25 1000 1 165 35 Pudding 15 (300 g in moulds) (400 g in a pudding basin) Sponge cake 16 Paradise cake + PASTA (17 - 20) Pr Subcategory 17 White leavened bread Function + Steam Weight Level % (g) Temp.
Use Manual water drainage This function allows you to empty the reservoir manually. When complete, the display will indicate that the residual water removal process is complete. 4. Shake the tube in order to remove any remaining water. 1. Rest the supplied jug (or other suitable container) on the open door. 2. Extract the tube from its seat and place the end in the jug (or the container). 3. Press the function knob to activate the residual water drainage into the jug (or container). 5.
Use 4. Extract the tube from its seat and insert its end in the jug or container until it reaches all the way to the bottom. EN Manual water fill This function allows you to manually fill the reservoir, if you want to perform multiple steam cooking cycles. 1. Fill the jug supplied (or container) with a sufficient amount of water for the cooking that you wish to perform. 2. Open the oven door. 3. Rest the jug or container on the open door.
Use When complete, the display will indicate that the water fill process is complete. 7. Return the tube to its original position, remove the jug/container of solution and close the door. When the door is closed, an automatic system will automatically draw in any residual water in the tube to avoid drips. A bubbling noise may be heard; this is completely normal. 6. Shake the tube in order to remove any remaining water. 8. Press the function knob to exit the function.
3.7 Secondary menu Child lock mode The appliance has a drop-down secondary menu allowing the user to: • Activate or deactivate the Child lock. • Activate or deactivate Showroom mode (which disables all the heating elements so that only the control panel works). • Activate or deactivate Eco-light mode. • Set the water hardness value. This mode allows the appliance to lock the controls automatically after one minute of normal operation without any intervention from the user.
Use Showroom mode (for exhibitors only) Low power (Eco-logic) mode This mode allows the appliance to deactivate all heating elements, while keeping the control panel active. This mode allows the appliance to limit the power used. Suitable for simultaneous use with further home appliances. HI: normal power. LO: low power. To use the appliance normally, set this mode to OFF. If the mode is active, the indicator light lights up on the display.
Use This mode allows the appliance to keep cooked food warm (at low temperatures) for around an hour after cooking finishes with a cooking cycle for which a duration has been set (if this is not manually interrupted). Water hardness setting mode The appliance is factory set for water of medium hardness. EN Keep Warm mode This mode allows you to set the water hardness value in order to optimise the descaling process.
Cleaning and maintenance 4 Cleaning and maintenance 4.1 Instructions Improper use Risk of damage to surfaces • Do not use steam jets to clean the appliance. • Do not use cleaning products containing chlorine, ammonia or bleach on parts made of steel or that have metallic surface finishes (e.g. anodizing, nickelor chromium-plating). • Do not use abrasive or corrosive detergents (e.g. scouring powders, stain removers and metallic sponges) on glass parts.
4.3 Cleaning the door Removing the door For easier cleaning it is recommended to remove the door and place it on a tea towel. To remove the door proceed as follows: 1. Open the door completely and insert two pins into the holes on the hinges indicated in the figure. 3. To reassemble the door, put the hinges in the relevant slots in the oven, making sure that grooved sections A are resting completely in the slots. Lower the door and once it is in place remove the pins from the holes in the hinges.
Cleaning and maintenance Removing the internal glass panes For easier cleaning the internal glass panes of the door can be removed. 1. Open the door. 2. Remove the internal glass pane by pulling the rear part gently upwards, following the movement indicated by the arrows (1). 3. Then, pull the front part upwards (2). This way, the 4 pins attached to the glass detach from their housings in the oven door. 5. Clean the external glass pane and the panes removed previously. Use absorbent kitchen roll.
Cleaning and maintenance 8. Centre and insert the 4 pins into their housings in the oven door by applying slight pressure. 4.4 Cleaning the inside of the oven For the best oven upkeep, clean it regularly after having allowed it to cool. Take out all removable parts. Clean the oven racks with warm water and non-abrasive detergents. Carefully rinse and dry damp parts.
Cleaning and maintenance Removing rack/tray support frames Removing the guide frames enables the sides to be cleaned more easily. To remove the guide frames: 1. Unscrew the frame fastening pins: 2. Pull the frame towards the inside of the oven to free it from the fastening pins. Vapor Clean Vapor Clean is an assisted cleaning procedure which facilitates the removal of dirt. Thanks to this process, it is possible to clean the inside of the oven very easily.
Cleaning and maintenance • Close the door. We recommend spraying approx. 20 times at the most. Vapor Clean cycle setting EN • Spray a water and washing up liquid solution inside the oven using a spray nozzle. Direct the spray against the side walls, upwards, downwards and towards the deflector. If the internal temperature is greater than that required for the Vapor clean cycle, the cycle will be stopped immediately and the message will appear on the display.
Cleaning and maintenance End of the Vapor Clean cycle 1. Open the door and wipe away the less stubborn dirt with a microfibre cloth. 2. Use a non-scratch sponge with brass filaments on hard to remove deposits. 3. In case of grease residues use specific oven cleaning products. 4. Remove the water left inside the oven. 5. For improved hygiene and to avoid food being affected by any unpleasant odours, we recommend that the oven is dried using a fan assisted function at 160°C for approximately 10 minutes.
Cleaning and maintenance 4. Open the oven door. 5. Rest the jug or container on the open door. 8. When the appliance has finished taking in water, shake the tube to remove any residual water. EN Note: the jug or container with the mixture must have a gross weight lower than 5 kg. 6. Extract the tube from its seat and immerse its end in the jug (or container) until it reaches all the way to the bottom. 9. Return the tube to its original position, remove the jug/container of solution and close the door.
Cleaning and maintenance When the cleaning process is complete, a buzzer will sound and the display will show the solution draining screen. 11. Rest the supplied jug (or other suitable container) on the open door. 12. Extract the tube from its seat and place the end in the jug (or the container). 13. Press the function knob to start the drainage of the solution into the jug (or container). 14. When this has finished, shake the tube to remove any solution residues. 15.
Cleaning and maintenance The presence of scale due to lack of descaling can compromise correct operation of the appliance in the long term. The following message will periodically appear on the appliance display, notifying you that you need to descale the evaporationtrayonthebaseoftheoven. 1. Open the door completely. 2. Pour approximately 250 ml of white vinegar into the evaporation tray, thus also covering part of the base of the oven. 3. Press the function knob to start the descaling function.
Cleaning and maintenance Manual descaling What to do if... When you wish to perform descaling in advance, you can run the function manually: 7. Press and turn the function knob to select the descaling function. The display is completely off: • Check the mains power supply. • Check that any circuit breakers upline of the appliance supply line are in the “ON” position. The appliance does not heat up: • Check whether it has been set in “showroom” mode (for further details see “Secondary menu”).
Cleaning and maintenance 4.5 Extraordinary maintenance 4. Slide out and remove the light bulb. EN Live parts Danger of electrocution • Unplug the appliance. Replacing the internal light bulb 1. Completely remove all accessories from inside the oven. 2. Remove the rack/tray support frames. 3. Remove the bulb cover using a tool (e.g. a screwdriver). Pay attention not to scratch the oven cavity enamel. Do not touch the halogen light bulb directly with your fingers, but wrap it in insulating material. 5.
Installation 5 Installation 5.1 Electrical connection Power voltage Danger of electrocution • Have the electrical connection performed by authorised technical personnel. • The appliance must be connected to earth in compliance with electrical system safety standards. • Disconnect the mains power supply. General information Check the grid characteristics against the data indicated on the plate.
Installation 5.3 Positioning Position of the power cable EN Heavy appliance Crushing hazard • Position the appliance into the cabinet cut-out with the help of a second person. Pressure on the open door Risk of damage to the appliance • Never use the oven door to lever the appliance into place when fitting. • Avoid exerting too much pressure on the oven door when open. Heat production during appliance operation Risk of fire • Check that the carcase material is heat resistant.
Installation Fastening bushings Appliance overall dimensions (mm) Remove the bushing covers on the front of the oven. Mount the appliance into the recess. Secure the appliance to the carcase using the screws. Cover the bushings with the previously removed covers.
Installation EN Mounting under worktops (mm) (side view) Make sure that the carcase rear/ bottom section has an opening of approx. 60 mm.
Installation Mounting into a column (mm) Make sure that the carcase top/ rear section has an opening approx. 35-40 mm deep.