Contents 1.1 1.2 1.3 1.4 1.5 1.6 1.7 General safety instructions Appliance purpose Manufacturer liability This user manual Identification plate Disposal How to read the user manual 2 Description 2.1 2.2 2.3 2.4 General Description Control panel Other parts Available accessories 3 Use 3.1 3.2 3.3 3.4 3.5 3.6 3.7 52 55 55 55 55 55 56 57 57 59 60 61 63 Instructions First use Using the accessories Using the oven Cooking advice Special functions Secondary menu 4 Cleaning and maintenance 4.1 4.2 4.3 4.
Instructions 1 Instructions 1.1 General safety instructions Risk of personal injury • During use the appliance and its accessible parts become very hot. Never touch the heating elements during use. • Protect your hands by wearing oven gloves when moving food inside the oven. • Never try to put out a fire or flames with water: Turn off the appliance and smother the flames with a fire blanket or other appropriate cover.
• Do not use or store flammable materials near the appliance. • Do not use aerosols in the vicinity of this appliance whilst it is in use. • Switch off the appliance immediately after use. Risk of damaging the appliance • Do not use abrasive or corrosive detergents (e.g. scouring powders, stain removers and metallic sponges) on glass parts. Use wooden or plastic utensils. • Do not use cleaning products containing chlorine, ammonia or bleach on parts made of steel or that have metallic surface finishes (e.g.
Instructions • Do not use the open door to rest pans or trays on the internal glass pane. • Never use the oven door to lever the appliance into place when fitting. • Avoid exerting too much pressure on the oven door when open. • Do not use the handle to lift or move the appliance. Installation and maintenance • This appliance must not be installed in a boat or caravan. • The appliance must not be installed on a pedestal. • Position the appliance into the cabinet cut-out with the help of a second person.
Instructions 1.2 Appliance purpose • This appliance is intended for cooking food in the home environment. Every other use is considered improper. • The appliance is not designed to operate with external timers or with remote-control systems. 1.
Instructions • Deliver the appliance to the appropriate recycling centre for electrical and electronic equipment waste, or return it to the retailer when purchasing an equivalent product, on a one for one basis. Our appliances are packaged in nonpolluting and recyclable materials. • Deliver the packing materials to the appropriate recycling centre. Plastic packaging Danger of suffocation • Do not leave the packaging or any part of it unattended. • Do not let children play with the plastic bags. 1.
Description 2 Description EN 2.
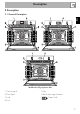
Description Models with pizza stone 1 Control panel 2 Oven light 3 Seal 4 Door 58 5 Fan 6 Rack/tray support frames 7 Pizza stone Frame shelf
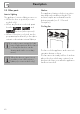
Description EN 2.2 Control panel 1 Programming knob 3 Function knob This knob can be used to select: • The cooking temperature • The duration of a function • Programmed cooking procedures • The current time • The turning on or off of the light inside the appliance. This knob can be used to: • Turn the appliance on and off • Select a function • Temporarily start or stop a function. 2 Display Press and hold the function knob down for around 3 seconds to immediately terminate any cooking operation.
Description 2.3 Other parts Shelves Interior lighting The appliance features shelves to position trays and racks at different heights. The insertion heights are indicated from the bottom upwards (see 2.1 General Description). The appliance’s interior lighting comes on: • When the door is opened (on some models only).
Description 2.4 Available accessories Oven tray (on some models only) EN Some models are not provided with all accessories. Rack Useful for collecting fat from foods placed on the rack above and for cooking sweets, biscuits, etc. Deep tray Useful for supporting containers with food during cooking. Tray rack (on some models only) Useful for collecting fat from foods placed on the rack above and for cooking pies, pizzas and baked desserts.
Description Pizza stone (on some models only) Specially designed for cooking pizza and similar dishes. Pizza spatula (on some models only) For easily placing the pizza on the pizza stone. Pizza stone cover (on some models only) To be placed in the housing on the base of the oven in place of the pizza stone when this is not being used. 62 Self-cleaning panels (on some models only) Useful for absorbing small grease residues.
Use 3.1 Instructions High temperature inside the oven during use Danger of burns • Keep the oven door closed during cooking. • Protect your hands by wearing oven gloves when moving food inside the oven. • Do not touch the heating elements inside the oven. • Do not pour water directly onto very hot trays. • Do not allow children to approach the appliance when it is in operation. Improper use Risk of damage to surfaces • Do not cover the bottom of the oven cavity with aluminium or tin foil sheets.
Use 3.3 Using the accessories Tray rack (on some models only) Racks and trays The tray rack has to be inserted into the tray. In this way fat can be collected separately from the food which is being cooked. Racks and trays have to be inserted into the side guides until they come to a complete stop. • The mechanical safety locks that prevent the rack from being taken out accidentally must face downwards and towards the back of the oven cavity.
Use Pizza spatula (on some models only) Always grip the pizza spatula by the handle when moving food to avoid the risk of burns. You are advised to dust the steel surface lightly with flour to make it easier to slide fresh products on and off, as they could stick to the steel due to their moisture content. 3.4 Using the oven Switching on the oven 1. Press the function knob to turn on the display. 2. Turn the function knob to the right or left to select the required function. 3. Press the programming knob.
Use When the preheating stage is over, the indicator light will remain lit steadily and a buzzer will sound to indicate that the food can be placed inside the oven. Cooking can be interrupted at any time by pressing and holding the function knob down for at least 3 seconds. List of cooking functions Eco This function is particularly suitable for cooking on a single shelf with low energy consumption. Ideal for cooking meat, fish and vegetables. It is not recommended for leavened foods.
Small grill (on some models only) Using only the heat released from the central element, this function allows you to grill small portions of meat and fish for making kebabs, toasted sandwiches and any types of grilled vegetable side dishes. Lower element (on some models only) The heat coming just from the bottom allows you to complete the cooking of foods that require a higher bottom temperature, without affecting their browning. Perfect for cakes, pies, tarts and pizzas.
Use Turbo (on some models only) The combination of fan assisted cooking and traditional cooking allows different foods to be cooked on several levels extremely quickly and efficiently, without odours and flavours mingling. Perfect for large volumes that call for intense cooking. (For multiple-level cooking, we recommend using the 1st and 4th shelves.
Use ON: When a function is activated, the display shows the parameters set such as temperature, duration and temperature reached. EN Display Clock indicator light Minute minder timer indicator light Programmed cooking indicator light Timed cooking indicator light Each time the programming knob is pressed during a function, the parameters will be cycled through in the following order.
Use Setting the time On the first use, or after a power failure, the message will flash on the appliance's display. To be able to start any cooking function, the current time must be set. 1. Turn the programming knob to set the displayed hour (keep the knob turned to produce a faster increase or decrease). 2. Press the programming knob. 3. Turn the programming knob to set the minutes (keep the knob turned to produce a faster increase or decrease). 4. Press the programming knob to complete the setting.
Timed cooking Timed cooking is the function which allows a cooking operation to be started and then ended after a specific length of time set by the user. Activation of timed cooking cancels any minute minder timer which may previously have been set. 1. After selecting a cooking function and temperature, press the programming knob three times. The display shows and the indicator light flashes. 2. Turn the programming knob to set the cooking time (from 00:01 to 13:00).
Use Programmed cooking Programmed cooking is the function which allows a cooking operation to be stopped automatically at an established time depending on the time set by the user, after which the oven will switch off automatically. 1. After selecting a cooking function and temperature, press the programming knob three times. The display shows and the indicator light flashes. 2. Turn the knob to set the cooking time (from 00:01 to 13:00). Keep the knob turned for a fast increase or decrease. 3.
3.5 Cooking advice General advice • Use a fan assisted function to achieve consistent cooking at several levels. • It is not possible to shorten cooking times by increasing the temperature (the food could be overcooked on the outside and undercooked on the inside). Advice for cooking meat • Cooking times vary according to the thickness and quality of the food and to consumer taste. • Use a meat thermometer when roasting meat, or simply press on the roast with a spoon.
Use Cooking information table Weight (Kg) Function Shelf Temperature (°C) Time (minutes) Lasagne Pasta bake 3-4 3-4 Static Static 1 1 220 - 230 220 - 230 45 - 50 45 - 50 Roasted veal Pork loin Sausages Roast beef Roast rabbit Turkey breast Roast pork neck Roast chicken 2 Turbo/Fan assisted 2 Turbo/Fan assisted 1.5 Fan with grill 1 Turbo/Fan assisted 1.5 Circulaire/Fan assisted 3 Turbo/Fan assisted 2-3 Turbo/Fan assisted 1.
Use Defrost by time This function allows you to defrost food on the basis of a selectable time. 1. Place the food inside the oven. 2. Press and turn the function knob to select the defrost by time function marked by the indicator light and the indicator light Defrost by weight This function defrosts foods on the basis of the type and weight of the frozen product. 1. Place the food inside the oven. 2.
Use 7. At the end of the defrosting function, STOP flashes on the display and a buzzer will sound that can be deactivated by opening the door or pressing/rotating one of the two knobs. proving (see “Programmed cooking”). Press the programming knob to make the desired changes. Pre-set parameters: dE Type Weight (g) Time (minutes) Meat 500 105 Fish 400 40 Fruit 300 45 Bread 300 20 Unless otherwise set, the proving will have a maximum duration of 13 hours.
Use This function results in the appliance operating in a particular way: • Cooking can proceed indefinitely, it is not possible to set any cooking duration. • No preheating will be performed. • The cooking temperature which can be selected varies between 60-100 °C. • Oven light disabled, any operation such as opening the door (where present) or manual activation with the knob will not activate the light. • The internal fan remains turned off. • Knob illumination and audible prompts remain disabled. 1.
Use 3.7 Secondary menu The appliance also has a drop-down secondary menu allowing the user to: • Activate or deactivate the Child lock. • Activate or deactivate Showroom mode (which disables all the heating elements so that only the control panel works). • Activate or deactivate Eco-Logic mode. • Activate or deactivate Eco-light mode. With the appliance in Stand-by status 1. Turn the programming knob to the right to activate the oven light. 2. Press and hold the programming knob down for at least 5 seconds.
Use Eco-logic mode: This mode allows the appliance to limit the power used. Suitable for simultaneous use with further home appliances. To use the appliance normally, set this mode to OFF. HI: normal power. LO: low power. EN Showroom mode (for exhibitors only): This mode allows the appliance to deactivate all heating elements, while keeping the control panel active. If the mode is active, the indicator light lights up on the display.
Use Keep warm This mode allows the appliance to keep cooked food warm (at low temperatures) after cooking finishes with a cooking cycle for which a duration has been set (if this is not manually interrupted), without altering the taste and smell obtained during cooking. Eco-light mode For greater energy savings, the light is automatically deactivated one minute from the start of cooking. To stop the appliance from automatically deactivating the light after one minute, set this mode to OFF.
Cleaning and maintenance 4.1 Instructions Improper use Risk of damage to surfaces • Do not use steam jets to clean the appliance. • Do not use cleaning products containing chlorine, ammonia or bleach on parts made of steel or that have metallic surface finishes (e.g. anodizing, nickelor chromium-plating). • Do not use abrasive or corrosive detergents (e.g. scouring powders, stain removers and metallic sponges) on glass parts. • Do not use rough or abrasive materials or sharp metal scrapers.
Cleaning and maintenance 2. Grasp the door on both sides with both hands, lift it forming an angle of around 30° and remove it. Removing the internal glass panes For easier cleaning the internal glass panes of the door can be removed. 1. Remove the internal glass pane by pulling the rear part gently upwards, following the movement indicated by the arrows (1). 2. Then, pull the front part upwards (2). This way, the 4 pins attached to the glass detach from their housings in the oven door. 3.
Cleaning and maintenance Removing rack/tray support frames Removing the rack/tray support frames enables the sides to be cleaned more easily. This operation should be performed each time the automatic cleaning cycle is used (on some models only). To remove the rack/tray support frames: 1. Pull the frame towards the inside of the oven cavity to unhook it from groove A. 2. Then slide it out of the seats at the back B. 3.
Cleaning and maintenance Removing self-cleaning panels and rack/ tray support frames (fitted only to some models) Removing the self-cleaning panels and the rack/tray support frames enables the sides to be cleaned more easily. To remove the rack/tray support frames: 1. Pull the frame towards the inside of the oven cavity to unhook it from groove A. 2. Then slide it out of the seats at the back B. 3. When cleaning is complete, repeat the above procedures to put the rack/tray support frames back in.
Cleaning and maintenance Remove in sequence the pizza stone cover (1) and the base (2) on which it is placed. The base has to be lifted a few millimetres, then pulled outwards. Cleaning the roof of the oven (on some models only - excluding pyrolytic models) High temperature inside the oven during use Danger of burns • The following operations must be performed only with the oven switched off and completely cool. Lift the end of the bottom heating element (3) a few centimetres and clean the oven base.
Cleaning and maintenance 4.5 Vapor Clean (on some models only) Vapor Clean is an assisted cleaning procedure which facilitates the removal of dirt. Thanks to this process, it is possible to clean the inside of the oven very easily. The dirt residues are softened by the heat and water vapour for easier removal afterwards. Improper use Risk of damage to surfaces • Remove any food residues or large spills from previous cooking operations from the inside of the oven.
Cleaning and maintenance Vapor Clean cycle setting If the internal temperature is greater than that required for the Vapor clean function, the cycle will be stopped immediately, will appear on the display and a buzzer will sound. Let the appliance cool down before activating Vapor Clean. 1. Press and turn the function knob to select the Vapor Clean function. 2. The duration of the Vapor Clean cycle will appear on the display. The duration and temperature parameters cannot be changed by the user. 3.
Cleaning and maintenance 4. At the end of the Vapor Clean function, STOP flashes on the display and a buzzer will sound that can be deactivated by opening the door or pressing/rotating one of the two knobs. Setting timed Vapor Clean It is possible to program the Vapor Clean start time, like any cooking function. 1. After selecting the Vapor Clean function, press the programming knob. The display will show the current time and the temperature, and the indicator light will come on. 2.
Cleaning and maintenance Pyrolytic cleaning is an automatic high-temperature cleaning procedure which causes dirt to dissolve. Thanks to this process, it is possible to clean the inside of the oven very easily. Pyrolytic function setting 1. Press and turn the function knob to select the Eco Pyrolytic or Pyrolytic function. EN 4.6 Pyrolytic (on some models only) Improper use Risk of damage to surfaces • Remove any food residues or large spills from previous cooking operations from the inside of the oven.
Cleaning and maintenance Pyrolytic cycle 1. Two minutes after the Pyrolytic cycle starts, the indicator light comes on to indicate that the door is locked by a device that prevents the door from being opened. It is not possible to select any function once the door lock device has been activated. 2. At the end of the Pyrolytic function, STOP flashes on the display and a buzzer will sound that can be deactivated by opening the door or pressing/rotating one of the two knobs. 3.
Cleaning and maintenance Setting of a programmed Pyrolytic cycle 4.7 Extraordinary maintenance It is possible to program the pyrolytic cycle start time like all other cooking functions. 1. After selecting the Pyrolytic function and setting the duration (except for Eco Pyrolytic), press the programming knob. The display will show the current time and the temperature, and the indicator light will come on. 2. Turn the programming knob to set the time you wish the Pyrolytic cycle to finish. 3.
Cleaning and maintenance Replacing the internal light bulb 4. Slide out and remove the light bulb. Live parts Danger of electrocution • Unplug the appliance. 1. Completely remove all accessories from inside the oven. 2. Remove the rack/tray support frames. 3. Remove the bulb cover using a tool (e.g. a screwdriver). Pay attention not to scratch the oven cavity enamel. Do not touch the halogen light bulb directly with your fingers, but wrap it in insulating material. 5.
Installation 5.1 Electrical connection Power voltage Danger of electrocution • Have the electrical connection performed by authorised technical personnel. • The appliance must be connected to earth in compliance with electrical system safety standards. • Disconnect the mains power supply. General information Check the grid characteristics against the data indicated on the plate. The identification plate bearing the technical data, serial number and brand name is visibly positioned on the appliance.
Installation 5.3 Positioning Position of the power cable Heavy appliance Crushing hazard • Position the appliance into the cabinet cut-out with the help of a second person. Pressure on the open door Risk of damage to the appliance • Never use the oven door to lever the appliance into place when fitting. • Avoid exerting too much pressure on the oven door when open. Heat production during appliance operation Risk of fire • Check that the carcase material is heat resistant.
Installation Fastening bushings Appliance overall dimensions (mm) EN 1. Remove the bushing covers inserted on the front of the appliance. 2. Mount the appliance into the recess. 3. Secure the appliance to the carcase using the screws. 4. Cover the bushings with the previously removed covers.
Installation Mounting under worktops (mm) Make sure that the carcase rear/ bottom section has an opening of approx. 60 mm.
Installation EN Mounting into a column (mm) Make sure that the carcase top/ rear section has an opening approx. 35-40 mm deep.