Contents 1.1 1.2 1.3 1.4 1.5 1.6 1.7 General safety instructions Appliance purpose Manufacturer’s liability This user manual Identification plate Disposal How to read the user manual 2 Description 2.1 2.2 2.3 2.4 General description Control panel Other parts Available accessories 3 Use 3.1 3.2 3.3 3.4 3.5 3.6 Instructions Cleaning the appliance Removing the door Cleaning the door glazing Vapor Clean: Assisted oven cleaning (on some models only) Extraordinary maintenance 5 Installation 5.1 5.2 5.3 5.
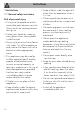
Instructions 1 Instructions 1.1 General safety instructions Risk of personal injury • During use the appliance and its accessible parts become very hot. Never touch the heating elements during use. • Protect your hands by wearing oven gloves when moving food inside the oven. • Never try to put out a fire or flames with water: Turn off the appliance and smother the flames with a fire blanket or other appropriate cover.
• DO NOT USE OR STORE FLAMMABLE MATERIALS NEAR THE APPLIANCE. • DO NOT USE AEROSOLS IN THE VICINITY OF THIS APPLIANCE WHILST IT IS IN USE. • DO NOT MODIFY THIS APPLIANCE. • Have qualified personnel carry out installation and assistance interventions according to the standards in force. • Do not try to repair the appliance yourself or without the intervention of a qualified technician. • Do not pull the cable to remove the plug. Risk of damaging the appliance • Do not use abrasive or corrosive detergents (e.
Instructions • Do not use plastic cookware or containers when cooking food. • Do not put sealed tins or containers in the oven. • Remove all trays and racks which are not required during cooking. • Do not cover the bottom of the oven cavity with aluminium or tin foil sheets. • Do not place pans or trays directly on the bottom of the oven cavity. • If you wish to use greaseproof paper, place it so that it will not interfere with the hot air circulation inside the oven.
• If the power supply cable is damaged, contact technical support immediately and they will replace it. • Always use any necessary/ required personal protective equipment (PPE) before performing any work on the appliance (installation, maintenance, positioning or movement). • Before performing any work on the appliance, switch off the power supply. • This appliance can be used up to a maximum altitude of 4,000 metres above sea level.
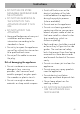
Instructions 1.4 This user manual This user manual is an integral part of the appliance and must therefore be kept in its entirety and within the user’s reach for the whole working life of the appliance. Read this user manual carefully before using the appliance. 1.5 Identification plate The identification plate bears the technical data, serial number and brand name of the appliance. Do not remove the identification plate for any reason. 1.
Instructions Plastic packaging Danger of suffocation • Do not leave the packaging or any part of it unattended. • Do not let children play with the plastic bags. 1.7 How to read the user manual This user manual uses the following reading conventions: Instructions General information on this user manual, on safety and final disposal.
Description 2 Description 2.
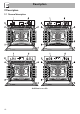
EN Description Multifunction models Models with pizza stone 1 Control panel 2 Oven light 3 Seal 4 Door 5 Fan 6 Rack/tray support frames 7 Pizza stone Frame shelf 49
Description 2.
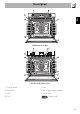
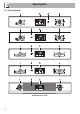
EN Description Models with pizza stone 1 Temperature knob This knob can be used to select the cooking temperature. Turn the knob clockwise to the required value between the minimum and the maximum. bottom upwards (see 2.1 General description). Cooling fan 2 Programmer clock Useful for displaying the current time, setting programmed cooking operations and programming the minute minder timer. 3 Thermostat indicator light It turns on to indicate that the oven is heating.
Description 2.4 Available accessories Deep tray Some models are not provided with all accessories. Rack Useful for collecting fat from foods placed on the rack above and for cooking pies, pizzas and baked desserts. Pizza stone (on some models only) Useful for supporting containers with food during cooking. Tray rack Specially designed for cooking pizza and similar dishes. Pizza spatula (on some models only) To be placed over the top of the oven tray; for cooking foods which may drip.
Description EN Self-cleaning panels (on some models only) Useful for absorbing small grease residues Pizza stone cover (on some models only) To be placed in the housing on the base of the oven in place of the pizza stone when this is not being used. The appliance accessories intended to come into contact with food are made of materials that comply with the provisions of current legislation. Original supplied and optional accessories can be requested to Authorised Assistance Centres.
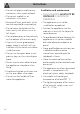
Use 3 Use 3.1 Instructions High temperature inside the oven during use Danger of burns • Keep the oven door closed during cooking. • Protect your hands by wearing oven gloves when moving food inside the oven. • Do not touch the heating elements inside the oven. • Do not pour water directly onto very hot trays. • Do not allow children to approach the appliance when it is in operation. Improper use Risk of damage to surfaces • Do not cover the bottom of the oven cavity with aluminium or tin foil sheets.
3.3 Using the accessories Tray rack Racks and trays The tray rack has to be inserted into the tray. In this way fat can be collected separately from the food which is being cooked. Racks and trays have to be inserted into the side guides until they come to a complete stop. • The mechanical safety locks that prevent the rack from being removed accidentally must face downwards and towards the back of the oven cavity.
Use 3.4 Using the oven With the appliance cold, remove the cover from the bottom and insert the pizza stone. Make sure that the stone is inserted correctly in the recess provided. For cooking use the special pizza function Pizza spatula (on some models only) Always hold the pizza spatula by the handle when moving food to avoid the risk of burns.
Static As the heat comes from above and below at the same time, this system is particularly suitable for certain types of food. Traditional cooking, also known as static cooking, is suitable for cooking just one dish at a time. Perfect for all types of roasts, bread and cakes, and in any case, particularly suitable for fatty meats such as goose and duck.
Use Turbo (on some models only) The combination of fan assisted cooking and traditional cooking allows different foods to be cooked on several levels extremely quickly and efficiently, without odours and flavours mingling. Perfect for large volumes that call for intense cooking. (For multiple-level cooking, we recommend using the 1st and 4th shelf.
Use If the time is not set, the oven will not switch on. On the first use, or after a power failure, the digits will be flashing on the appliance’s display. 1. Hold down the clock key for two seconds. The dot between the hours and the minutes flashes. 2. The time can be set via the value increase key and value decrease key . Keep the key pressed in to increase or decrease rapidly. 3. Wait 7 seconds. The dot between the hours and the minutes stops flashing. 4.
Use 7. Press the clock key programmer clock. to reset the It is not possible to set a cooking time of more than 10 hours. To cancel the set programming press and hold down the value increase and the value decrease keys at the same time and then turn the oven off manually. Programmed cooking is the function which allows a cooking operation to be started at a set time and then ended after a specific length of time set by the user. 1. Set the cooking time as described in the previous point “Timed cooking”.
Use 12. Press the and keys at the same time to reset the set program. It is not possible to set a cooking time of more than 10 hours. It is not possible to set a programmed cooking time of more than 24 hours. After setting, hold the menu key down for 2 seconds to display the cooking time remaining. Press the menu key again. The display shows the text and the remaining cooking time in sequence.
Use 3.6 Cooking advice Modifying the set data 1. Press the clock key . 2. Use the value increase and value decrease keys to set the number of minutes required. Deleting the set data 1. Press the clock key . 2. Hold down the value increase and value decrease keys at the same time. 3. Then switch off the oven manually if cooking is in progress. Selecting the buzzer The buzzer can have 3 tones. 1. Hold down the value increase value decrease time. 2. Press the clock key keys at the same .
Advice for cooking desserts/pastries and biscuits • Use dark metal moulds: They help to absorb the heat better. • The temperature and the cooking time depend on the quality and consistency of the dough. • To check whether the dessert is cooked right through: At the end of the cooking time, put a toothpick into the highest point of the dessert. If the dough does not stick to the toothpick, the dessert is cooked.
Use Cooking information table Weight (Kg) Function Shelf Temperature (°C) Time (minutes) Lasagne Pasta bake 3-4 3-4 Static Static 1 1 220 - 230 220 - 230 45 - 50 45 - 50 Veal roast Pork loin Sausages Roast beef Roast rabbit Turkey breast Roast pork neck Roast chicken 2 2 1.5 1 1.5 3 2-3 1.
Cleaning and maintenance 4.1 Instructions Improper use Risk of damage to surfaces • Do not use steam jets to clean the appliance. • Do not use cleaning products containing chlorine, ammonia or bleach on parts made of steel or that have metallic surface finishes (e.g. anodizing, nickelor chromium-plating). • Do not use abrasive or corrosive detergents (e.g. scouring powders, stain removers and metallic sponges) on glass parts. • Do not use rough or abrasive materials or sharp metal scrapers.
Cleaning and maintenance 2. Grasp the door on both sides with both hands, lift it forming an angle of around 30° and remove it. Removing the internal glass panes For easier cleaning the internal glass panes of the door can be removed. 1. Remove the internal glass pane by pulling the rear part gently upwards, following the movement indicated by the arrows (1). 2. Then, pull the front part upwards (2). This way, the 4 pins attached to the glass detach from their housings in the oven door. 3.
Cleaning and maintenance Removing rack/tray support frames Removing the rack/tray support frames enables the sides to be cleaned more easily. This operation should be performed each time the automatic cleaning cycle is used (on some models only). To remove the rack/tray support frames: 1. Pull the frame towards the inside of the oven cavity to unhook it from groove A. 2. Then slide it out of the seats at the back B. 3.
Cleaning and maintenance Removing self-cleaning panels and racks/trays support frames (fitted only to some models) Removing the guide frames enables the sides to be cleaned more easily. This operation should be performed each time the automatic cleaning cycle is used (on some models only). To remove the guide frames: Pull the frame towards the inside of the oven to unhook it from its groove A, then slide it out of the seats B at the back.
On pizza models only: Cleaning the pizza stone Remove in sequence the pizza stone cover (1) and the base (2) on which it is placed. The base has to be lifted a few millimetres, then pulled outwards. The pizza stone should be washed separately according to the following instructions: The stone must be cleaned after every use. Do not heat it again if it has any encrustations.
Cleaning and maintenance 4.5 Vapor Clean: Assisted oven cleaning (on some models only) overflow out of the cavity. Vapor Clean is an assisted cleaning procedure which facilitates the removal of dirt. Thanks to this process, it is possible to clean the inside of the oven very easily. The dirt residues are softened by the heat and water vapour for easier removal afterwards.
Cleaning and maintenance End of the Vapor Clean cycle 4. Open the door and wipe away the less stubborn dirt with a microfibre cloth. 5. Use a non-scratch sponge with brass filaments on hard to remove deposits. 6. In case of grease residues use specific oven cleaning products. 7. Remove the water left inside the oven. For improved hygiene and to avoid food being affected by any unpleasant odours, we recommend that the oven is dried using a fan assisted function at 160°C for approximately 10 minutes.
Cleaning and maintenance Replacing the internal light bulb 4. Slide out and remove the light bulb. Live parts Danger of electrocution • Unplug the appliance. 1. Completely remove all accessories from inside the oven. 2. Remove the rack/tray support frames. 3. Remove the bulb cover using a tool (e.g. a screwdriver). Pay attention not to scratch the oven cavity enamel. Do not touch the halogen light bulb directly with your fingers, but wrap it in insulating material. 5.
Installation 5.1 Electrical connection Power voltage Danger of electrocution • Have the electrical connection performed by authorised technical personnel. • The appliance must be connected to earth in compliance with electrical system safety standards. • Disconnect the mains power supply. General information Check the grid characteristics against the data indicated on the plate. The identification plate bearing the technical data, serial number and brand name is visibly positioned on the appliance.
Installation 5.3 Positioning Position of the power cable Heavy appliance Crushing hazard • Position the appliance into the cabinet cut-out with the help of a second person. Pressure on the open door Risk of damage to the appliance • Never use the oven door to lever the appliance into place when fitting. • Avoid exerting too much pressure on the oven door when open. Heat production during appliance operation Risk of fire • Check that the carcase material is heat resistant.
Installation Fastening bushings Appliance overall dimensions (mm) EN 1. Remove the bushing covers on the front of the appliance. 2. Mount the appliance into the recess. 3. Secure the appliance to the carcase using the screws. 4. Cover the bushings with the previously removed covers.
Installation Mounting under worktops (mm) Make sure that the carcase rear/ bottom section has an opening of approx. 60 mm.
Installation EN Mounting into a column (mm) Make sure that the carcase top/ rear section has an opening approx. 35-40 mm deep.
Installation 5.4 Instructions for the installer • The plug must be accessible after installation. Do not bend or trap the power cable. • The appliance must be installed according to the installation diagrams. • If the appliance does not work correctly after having carried out all the checks, contact your local Authorised Service Centre. • Once the appliance has been installed, please explain to the user how to use it correctly. Testing At the end of installation, carry out a brief inspection test.