Contents 1.1 1.2 1.3 1.4 1.5 1.6 1.7 General safety instructions Appliance purpose Manufacturer’s liability This user manual Identification plate Disposal How to read the user manual 2 Description 2.1 2.2 2.3 2.4 2.5 2.6 General Description Control panel Other parts Advantages of steam cooking Available accessories Other cooking containers 3 Use 3.1 3.2 3.3 3.4 3.5 3.6 Instructions Cleaning the appliance Removing the door Cleaning the door glazing Extraordinary maintenance 5 Installation 5.1 5.2 5.
Instructions 1 Instructions 1.1 General safety instructions Risk of personal injury • During use the appliance and its accessible parts become very hot. Never touch the heating elements during use. • Protect your hands by wearing oven gloves when moving food inside the oven. • Never try to put out a fire or flames with water: Turn off the appliance and smother the flames with a fire blanket or other appropriate cover.
• Switch off the appliance immediately after use. • DO NOT USE OR STORE FLAMMABLE MATERIALS NEAR THE APPLIANCE. • DO NOT USE AEROSOLS IN THE VICINITY OF THIS APPLIANCE WHILST IT IS IN USE. • DO NOT MODIFY THIS APPLIANCE. • Installation and servicing should be carried out by qualified personnel in accordance with current standards. • Do not try to repair the appliance yourself or without the assistance of a qualified technician. • Do not pull the cable to unplug the appliance.
Instructions • Do not use plastic cookware or containers when cooking food. • Do not put sealed tins or containers in the oven. • Remove all trays and racks which are not required during cooking. • Do not cover the bottom of the oven cavity with aluminium or tin foil sheets. • Do not place pans or trays directly on the bottom of the oven cavity. • If you wish to use greaseproof paper, place it so that it will not interfere with the hot air circulation inside the oven.
• If the power supply cable is damaged, contact technical support immediately and they will replace it. • Always use any necessary/ required personal protective equipment (PPE) before performing any work on the appliance (installation, maintenance, positioning or movement). • Before performing any work on the appliance, switch off the power supply. • This appliance can be used up to a maximum altitude of 4,000 metres above sea level.
Instructions 1.4 This user manual This user manual is an integral part of the appliance and must therefore be kept in its entirety and within the user’s reach for the whole working life of the appliance. Read this user manual carefully before using the appliance. 1.5 Identification plate The identification plate bears the technical data, serial number and brand name of the appliance. Do not remove the identification plate for any reason. 1.
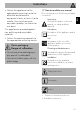
Instructions Plastic packaging Danger of suffocation • Do not leave the packaging or any part of it unattended. • Do not let children play with the plastic bags. 1.7 How to read the user manual This user manual uses the following reading conventions: Instructions General information on this user manual, on safety and final disposal.
Description 2 Description 2.
Description EN 2.2 Control panel 1 Timer knob 3 Temperature knob It allows you to use the minute minder timer or to perform manual cooking. This knob allows you to select the cooking temperature. Turn the knob clockwise to the required value, between the minimum and maximum setting. 2 Thermostat indicator light The indicator light comes on to indicate that the oven is heating up. It turns off as soon as it reaches the set temperature.
Description 2.3 Other parts 2.4 Advantages of steam cooking Shelves The steam cooking system cooks any type of food much more delicately. It is also ideal for defrosting foods rapidly, for heating up foods without hardening or drying them out, and for naturally removing salt from foodstuffs preserved with salt. The appliance features shelves to position trays and racks at different heights. The insertion heights are indicated from the bottom upwards (see ”General Description”). Cooling fan 2.
Description Useful for collecting fat from foods placed on the rack above and for cooking pies, pizzas and baked desserts. The appliance accessories intended to come into contact with food are made of materials that comply with the provisions of current legislation. 2.6 Other cooking containers • You may also use your own containers for cooking, as long as they are resistant to high temperatures. • For steam cooking, the use of metal containers is recommended.
Use 3 Use 3.1 Instructions High temperature inside the oven during use Danger of burns • Keep the oven door closed during cooking. • Protect your hands by wearing oven gloves when moving food inside the oven. • Open the appliance door carefully during or after cooking. • Take care because steam may not be visible at certain temperatures. • Do not touch the heating elements inside the oven. • Do not pour water directly onto very hot trays.
3.2 First use 3.3 Using the accessories 1. Remove any protective film from the outside or inside of the appliance, including accessories. 2. Remove any labels (apart from the technical data plate) from the accessories and from the oven cavity. 3. Remove and wash all the appliance accessories (see ”Direct Steam cooking information table”). 4. Heat the empty oven at the maximum temperature to burn off any residues left by the manufacturing process.
Use Tray rack List of cooking functions The tray rack has to be inserted into the tray. In this way fat can be collected separately from the food which is being cooked. Eco This function is particularly suitable for cooking on a single shelf with low energy consumption. It is recommended for all types of food except those that may produce a large amount of moisture (e.g. vegetables).
Static As the heat comes from above and below at the same time, this system is particularly suitable for certain types of food. Traditional cooking, also known as static cooking, is suitable for cooking just one dish at a time. Perfect for all types of roasts, bread and cakes, and in any case, particularly suitable for fatty meats such as goose and duck.
Use Direct Steam This function activates the central part of the lower heating element together with the circulaire heating element and fan, allowing the food to be cooked by the evaporation of the water in the tray. The fan evenly distributes the heat and steam that cooks the food delicately and keeps the appearance of the food and its nutrients unaltered. 3. Fill the tray with sufficient water for the cooking duration (see ”Direct Steam cooking information table”). 3.
4. 5. 6. 7. Put the cover back on the tray. Place the food on the oven tray. Place the tray with the food in the oven. Select the Direct Steam function using the function knob. 8. Select the cooking temperature and time using the appropriate knobs. If cooking has just been carried out with temperatures greater than 100°C, you must wait for the oven to cool in order to use the Direct Steam function. 4.
Use 3.6 Cooking advice General advice • Use a fan assisted function to achieve consistent cooking at several levels. • It is not possible to shorten cooking times by increasing the temperature (the food could be overcooked on the outside and undercooked on the inside). Advice for cooking meat • Cooking times vary according to the thickness and quality of the food and to consumer taste. • Use a meat thermometer when roasting meat, or simply press on the roast with a spoon.
Use Food Lasagne Pasta bake Weight (Kg) Function Shelf Temperature (°C) Time (minutes) 3-4 3-4 Static Static 1 1 220 - 230 220 - 230 45 - 50 45 - 50 Fan assisted Fan assisted Fan with grill Fan assisted Circulaire/Fan assisted Fan assisted Fan assisted Fan assisted 2 2 4 2 2 2 2 2 180 - 190 180 - 190 280 200 180 - 190 180 - 190 180 - 190 180 - 190 Veal roast 2 Pork loin 2 Sausages 1.5 Roast beef 1 Roast rabbit 1.5 Turkey breast 3 Roast pork neck 2 - 3 Roast chicken 1.
Use Direct Steam cooking information table Food Lasagne Pasta bake Weight (Kg) Water (ml) Shelf Temperature (°C) Time (minutes) 1.6 120 - 130 2 190 - 200 35 - 40 1.2 - 1.5 120 - 130 2 190 - 200 35 - 40 MEAT Roast turkey 1.5 180 2 190 - 200 80 - 90 Pork loin Roast rabbit (pieces) Spare ribs (attached) Leg of lamb (well done) 1.5 180 2 190 - 200 85 - 90 1 160 2 180 - 190 80 - 90 0.
Use Food Weight (Kg) Water (ml) 1 80 0.6 80 Temperature (°C) Time (minutes) 2 210 - 220 40 - 45 2 210 35 Shelf EN VEGETABLES Roast potatoes Mixed roasted vegetables REHEATING FOOD Pasta Sliced roasted meats / spare 0.3 100 - 110 2 120 15 - 25 0.5 100 - 110 2 120 15 - 25 Bread 0.5 100 - 110 2 120 15 - 25 Strudel 0.5 100 - 110 2 120 15 - 25 DESSERTS/PASTRIES Bundt cake Strudel Muffins Paradise cake Sponge cake Biscuits (0.
Cleaning and maintenance 4 Cleaning and maintenance 4.1 Instructions Improper use Risk of damage to surfaces • Do not use steam jets to clean the appliance. • Do not use cleaning products containing chlorine, ammonia or bleach on parts made of steel or that have metallic surface finishes (e.g. anodizing, nickelor chromium-plating). • Do not use abrasive or corrosive detergents (e.g. scouring powders, stain removers and metallic sponges) on glass parts.
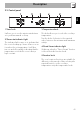
Cleaning the lower part 4.3 Removing the door It is recommended that you clean and dry the bottom of the oven after using the Direct Steam function: 1. Remove in sequence, the perforated cover (1), the evaporation tray (2) and the bottom (3); lift the bottom by a few millimetres and pull it outwards. For easier cleaning it is recommended to remove the door and place it on a tea towel. To remove the door proceed as follows: 1.
Cleaning and maintenance and once it is in place remove the pins from the holes in the hinges. 4.4 Cleaning the door glazing The glass in the door should always be kept thoroughly clean. Use absorbent kitchen roll. In case of stubborn dirt, wash with a damp sponge and an ordinary detergent. 3. Remove the intermediate glass pane by lifting it upwards. 4. Clean the external glass pane and the panes removed previously. Use absorbent kitchen roll.
Removing rack/tray support frames 4.5 Extraordinary maintenance Removing the rack/tray support frames enables the sides to be cleaned more easily. This operation should be performed each time the automatic cleaning cycle is used (on some models only). To remove the rack/tray support frames: 1. Pull the frame towards the inside of the oven cavity to unhook it from groove A. 2. Then slide it out of the seats at the back B. 3.
Cleaning and maintenance Replacing the internal light bulb 4. Slide out and remove the light bulb. Live parts Danger of electrocution • Unplug the appliance. 1. Completely remove all accessories from inside the oven. 2. Remove the rack/tray support frames. 3. Remove the bulb cover using a tool (e.g. a screwdriver). Pay attention not to scratch the oven cavity enamel. Do not touch the halogen light bulb directly with your fingers, but wrap it in insulating material. 5.
Installation 5.1 Electrical connection Power voltage Danger of electrocution • Have the electrical connection performed by authorised technical personnel. • The appliance must be connected to earth in compliance with electrical system safety standards. • Disconnect the mains power supply. General information Check the grid characteristics against the data indicated on the plate. The identification plate bearing the technical data, serial number and brand name is visibly positioned on the appliance.
Installation 5.3 Positioning Position of the power cable Heavy appliance Crushing hazard • Position the appliance into the cabinet cut-out with the help of a second person. Pressure on the open door Risk of damage to the appliance • Never use the oven door to lever the appliance into place when fitting. • Avoid exerting too much pressure on the oven door when open. Heat production during appliance operation Risk of fire • Check that the carcase material is heat resistant.
Installation Fastening bushings Appliance overall dimensions (mm) EN 1. Remove the bushing covers on the front of the appliance. 2. Mount the appliance into the recess. 3. Secure the appliance to the carcase using the screws. 4. Cover the bushings with the previously removed covers.
Installation Mounting under worktops (mm) Make sure that the carcase rear/ bottom section has an opening of approx. 60 mm.
Installation EN Mounting into a column (mm) Make sure that the carcase top/ rear section has an opening approx. 35-40 mm deep.
Installation 5.4 Instructions for the installer • The plug must be accessible after installation. Do not bend or trap the power cable. • The appliance must be installed according to the installation diagrams. • If the appliance does not work correctly after having carried out all the checks, contact your local Authorised Service Centre. • Once the appliance has been installed, please explain to the user how to use it correctly. Testing At the end of installation, carry out a brief inspection test.