Contents 1.1 1.2 1.3 1.4 1.5 1.6 1.7 General safety instructions Manufacturer liability Appliance purpose Disposal Identification plate This user manual How to read the user manual 2 Description 2.1 2.2 2.3 2.4 General Description Control panel Other parts Available accessories 3 Use 3.1 3.2 3.3 3.4 3.5 3.6 3.
Instructions 1 Instructions 1.1 General safety instructions Risk of personal injury • During use the appliance and its accessible parts become very hot. • Never touch the heating elements during use. • Keep children under eight years of age away from the appliance unless they are constantly supervised. • Children must never play with the appliance. • Never rest metallic objects such as knives, forks, spoons and lids on the appliance during use. • Switch off the appliance immediately after use.
For this appliance 1.4 Disposal • Ensure that the appliance is switched off before replacing the bulb. • Do not rest any weight or sit on the open door of the appliance. • Take care that no objects are stuck in the doors. This appliance must be disposed of separately from other waste (Directives 2002/95/EC, 2002/ 96/EC, 2003/108/EC). The appliance does not contain substances in quantities sufficient to be considered hazardous to health and the environment, in accordance with current European directives.
Instructions Our appliances are packed in nonpolluting and recyclable materials. • Deliver the packing materials to the appropriate recycling centre. Plastic packaging Danger of suffocation • Do not leave the packaging or any part of it unattended. • Do not let children play with the packaging plastic bags. 1.5 Identification plate The identification plate bears the technical data, serial number and brand name of the appliance. Do not remove the identification plate for any reason. 1.
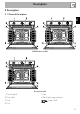
Description 2 Description EN 2.
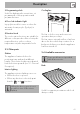
Description 2.2 Control panel Multifunction models Pyrolytic models 1 Temperature knob 2 Thermostat indicator light This knob allows you to select the cooking temperature and the Vapor Clean temperature (on some models only). Turn the knob clockwise to the required value, between the minimum and maximum settings. The indicator light comes on to indicate that the oven is heating up. It turns off as soon as it reaches the set temperature.
Description 3 Programming clock Cooling fan EN Useful for displaying the current time, set programmed cooking operations and program the timer. 4 Door lock indicator light In pyrolytic models it comes on when the automatic cleaning cycle (Pyrolysis) is activated. 5 Function knob The oven's various functions are suitable for different cooking modes. After selecting the required function, set the cooking temperature using the temperature knob.
Description Tray rack Rotisserie support To be used to support the rotisserie rod. To be placed over the top of the oven tray; for cooking foods which may drip. Rotisserie rod Oven tray Useful for collecting grease and fat dripping from foods placed on the rack above. Deep tray Useful for cooking chicken and all foods which require uniform cooking over their entire surface.
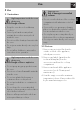
Use 3.1 Instructions High temperature inside the oven during use Danger of burns • Keep the oven door closed during cooking. • Protect your hands wearing heat resistant gloves when moving food inside the oven. • Do not touch the heating elements inside the oven. • Do not pour water directly onto very hot trays. • Do not allow children to get near the oven when it is in operation. High temperature inside the oven during use Danger of fire or explosion • Do not spray any spray products near the oven.
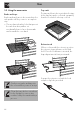
Use 3.3 Using the accessories Tray rack Racks and trays The tray rack has to be inserted into the tray. In this way fat can be collected separately from the food which is being cooked. Racks and trays have to be inserted into the side guides until they come to a complete stop. • The mechanical safety locks that prevent the rack from being taken out accidentally have to face downwards and towards the oven back.
Use Screw on the handle provided so that you can handle the rod with the food on it readily. 3.4 Using the oven Switching the oven on EN To switch the oven on: 1. Select the cooking function using the function knob. 2. Select the temperature using the temperature knob. Functions list Once you have prepared the rotisserie rod, place it on the the rotisserie support. Insert the rod into the hole A so that it connects with the rotisserie motor.
Use Fan-assisted bottom The combination of the fan with just the lower heating element allows cooking to be completed more rapidly. This system is recommended for sterilising or for finishing off the cooking of foods which are already well-cooked on the surface, but not inside, which therefore need a little more heat. Perfect for any type of food. In pyrolytic models, the special defrosting and proving functions are brought together under the same function.
Fan-assisted circular The combination of the fan and the circular element (incorporated in the rear of the oven) allows you to cook different foods on several levels, as long as they need the same temperatures and same type of cooking. Hot air circulation ensures instant and uniform distribution of heat. It will be possible, for instance, to cook fish, vegetables and biscuits simultaneously (on different levels) without mixing odours and flavours.
Use Advice for cooking with the Grill and the Fan-assisted grill Advice for defrosting and proving • Meat can be grilled even when it is put into the cold oven or into the preheated oven if you wish to change the effect of the cooking. • With the fan-assisted grill function, preheating the oven before grilling is recommended. • We recommend placing the food at the centre of the rack.
Use A Setting knob B Cooking start pointer Setting the time To set the time, pull out setting knob A and turn it clockwise. Manual cooking Timed cooking Timed cooking is the function which allows a cooking operation to be started and then ended after a specific length of time set by the user. 1. After selecting a cooking function and temperature, turn the setting knob A. 2. Turn the cooking start pointer B to the desired time indicated in the centre of the clock (0... 180 minutes). 3.
Use 3.7 Analogue (pyrolytic) programmer A Setting knob B Cooking start pointer C Cooking symbol window Setting the time To set the time, push in setting knob A and turn it anticlockwise. Manual cooking 1. Rotate setting knob A until the symbol appears in cooking symbol window C. 2. Pull out setting knob A, turn it clockwise to position the cooking start pointer B to the current time. 50 3. Turn setting knob A clockwise until the symbol appears in cooking symbol window C. 4.
3. Turn setting knob A clockwise until the desired cooking time (0... 180 minutes) is selected in the cooking symbol window C. 4. Select a function and cooking temperature with the appropriate knobs. Timed cooking will start at the set time. 5. When the set time has elapsed, all heating elements will turn off and a buzzer will sound. 6. To turn off the buzzer, turn the setting knob A clockwise to the symbol.
Use Cooking information table Food Runner Temperature position from (°C) the bottom 1 220 - 230 1 220 - 230 Weight (Kg) Function Lasagne Pasta bake 3-4 3-4 Static Static Roast veal Pork Sausages Roast beef Roast rabbit Turkey breast Roast pork neck Roast chicken 2 2 1.5 1 1.5 3 2-3 1.2 Turbo Turbo Fan with grill Turbo Circulaire Turbo Turbo Turbo 2 2 4 2 2 2 2 2 180 - 190 180 - 190 250 - 280 200 180 - 190 180 - 190 180 - 190 180 - 190 Pork chops Spare ribs Bacon Pork fillet Beef fillet 1.5 1.
Cleaning and maintenance 4.1 Instructions Improper use Risk of damage to surfaces • Do not use steam jets for cleaning the appliance. • Do not use cleaning products containing chlorine, ammonia or bleach on steel parts or parts with metallic finishes on the surface (e.g. anodizing, nickel- or chromium-plating). • Do not use abrasive or corrosive detergents on glass parts (e.g. powder products, stain removers and metallic sponges). • Do not use rough or abrasive materials or sharp metal scrapers. 4.
Cleaning and maintenance 2. Grasp the door on both sides with both hands, lift it forming an angle of around 30° and remove it. 3. To reassemble the door, put the hinges in the relevant slots in the oven, making sure that grooved sections A are resting completely in the slots. Lower the door and once it is in place remove the pins from the holes in the hinges. 4.7 Removing the internal glass panels For easier cleaning the door internal glass panels can be disassembled. 1.
4. Clean the external glass panel and the panels previously removed. Use absorbent kitchen roll. In case of stubborn dirt, wash with a damp sponge and neutral detergent. 4.8 Cleaning the inside of the oven 5. Refit the panels in the reverse order in which they were removed. 6. Reposition the internal glass panel. Take care to centre and insert the 4 pins into their housings in the oven door by applying slight pressure. Clean the oven racks with warm water and non-abrasive detergent.
Cleaning and maintenance Removing racks/trays support frames Removing the guide frames enables the sides to be cleaned more easily. This operation must be performed whenever the automatic cleaning cycle is performed (selected models only). Removing the guide frames. Pull the guide frames towards the inside of the oven so as to remove it from groove A, then unhook it from the attachment points B on the back. When cleaning is complete, repeat the above procedures to put the guide frames back in. 4.
Cleaning and maintenance Vapor Clean setting • Spray a water and washing up liquid solution inside the oven using a spray nozzle. Direct the spray against the side walls, upwards, downwards and towards the deflector. 2. Set a cooking time of 18 minutes using the cooking time procedure described in more detail in “Timed cooking”; 3. At the end of the Vapor Clean cleaning cycle, the timer will turn off the oven's heating elements and a buzzer will sound. 4.
Cleaning and maintenance End of the Vapor Clean cycle 5. Open the door and wipe away the less stubborn dirt with a microfibre cloth. 6. Use an anti-scratch sponge with brass filaments on tougher encrustations. 7. In case of grease residues use specific oven cleaning products. 8. Remove the water left inside the oven. 9. For improved hygiene and to avoid food being affected by any unpleasant odours, we recommend that the oven is dried using a fan-assisted function at 160°C for approximately 10 minutes.
Pyrolysis setting 1. Turn the function knob to symbol . 2. Turn setting knob A anticlockwise to set the duration of pyrolysis visible in the cooking symbol window C. Recommended pyrolysis duration: • Light dirt: 120 minutes. • Medium dirt: 150 minutes. • Heavy dirt: 180 minutes. 3. After selecting the pyrolysis time, the thermostat light will start flashing and the oven will begin to heat up. 4.
Installation Delayed pyrolysis 4.11 Extraordinary maintenance Pyrolysis can be programmed to start at a pre-set time. After setting the pyrolysis duration, pull setting knob A and turn it anticlockwise, positioning timed cooking pointer B at the start time desired. Removing and replacing the oven seal (pyrolytic models excluded) To remove the oven seal: • Unhook the clips located in the 4 corners and then pull the oven seal outwards.
Installation Replacing the internal light bulb 4. Slide out and remove the light bulb. EN Live parts Danger of electrocution • Unplug the appliance. 1. Completely remove all accessories from inside the oven. 2. Remove the rack/tray support frames. 3. Remove the bulb cover using a tool (e.g. a screwdriver). Pay attention not to scratch the oven cavity enamel. Do not touch the halogen light bulb directly with your fingers, but wrap it in insulating material. 5.
Installation 5 Installation 5.1 Electrical connection Power voltage Danger of electrocution • Have the electrical connection performed by authorised technical personnel. • The appliance must be connected to earth in compliance with electrical system safety standards. • Disconnect the mains power supply. General information Check the grid characteristics against the data indicated on the plate.
Installation 5.3 Positioning Position of the power cable EN Heavy appliance Crushing hazard • Position the appliance into the cabinet cutout with the help of a second person. Pressure on the open door Risk of damage to the appliance • Never use the oven door to lever the appliance into place when fitting. • Avoid exerting too much pressure on the oven door when open.
Installation Fastening bushings 1. Remove the bushing covers inserted on the front of the appliance. 2. Mount the appliance into the recess. 3. Secure the appliance to the piece of furniture using screws. 4. Cover the bushings with the previously removed covers.
Installation EN Mounting under worktops (mm) Make sure that the piece of furniture rear/bottom part has an opening of approx. 60 mm.
Installation Mounting into a column (mm) Make sure that the piece of furniture top/rear part has an opening approx. 35-40 mm deep.