Contents 1. INSTRUCTIONS FOR SAFE AND PROPER USE_______________ 29 2. INSTALLATION _________________________________________ 31 3. DESCRIPTION OF CONTROLS ____________________________ 35 4. USE OF THE OVEN ______________________________________ 41 5. AVAILABLE ACCESSORIES _______________________________ 42 6. COOKING HINTS ________________________________________ 43 7. CLEANING AND MAINTENANCE ___________________________ 49 8.
Introduction 1. INSTRUCTIONS FOR SAFE AND PROPER USE THIS MANUAL IS AN INTEGRAL PART OF THE APPLIANCE AND THEREFORE MUST BE KEPT IN ITS ENTIRETY AND IN AN ACCESSIBLE PLACE FOR THE WHOLE WORKING LIFE OF THE OVEN. WE ADVISE CAREFUL READING OF THIS MANUAL AND ALL THE INSTRUCTIONS THEREIN BEFORE USING THE OVEN. INSTALLATION MUST BE CARRIED OUT BY QUALIFIED PERSONNEL IN ACCORDANCE WITH THE REGULATIONS IN FORCE. THIS APPLIANCE IS INTENDED FOR DOMESTIC USES AND CONFORMS TO CURRENT REGULATIONS IN FORCE.
Introduction NEVER PUT INFLAMMABLE OBJECTS IN THE OVEN: THEY COULD BE ACCIDENTALLY CATCH LIGHT AND CAUSE FIRES. DURING USE THE APPLIANCE BECOMES VERY HOT. TAKE CARE NOT TO TOUCH THE HEATING ELEMENTS INSIDE THE OVEN. THE I.D. PLATE WITH TECHNICAL DATA, REGISTRATION NUMBER AND BRAND NAME IS POSITIONED VISIBLY ON THE OVEN DOOR FRAME. THE PLATE MUST NOT BE REMOVED. THE OVEN IS DESIGNED FOR USE BY ADULTS. DO NOT ALLOW CHILDREN TO GO NEAR OR PLAY WITH IT.
Instructions for the installer 2. INSTALLATION 2.1 Electrical connection Check that the mains voltage and power cable ratings are as per the information provided on the label attached to the oven door frame. This label must never be removed. It is obligatory for the electrical system to be earthed according to the methods required by safety rules. If a plug and socket connection is being used make sure that the plug and socket are compatible.
Instructions for the installer For operation on 220-240V∼: use an H05RR-F / H05RN-F type three-core cable (3 x 4 m2). For operation on 380-415V2N∼: use an H05RR-F / H05RN-F type four-core cable (4 x 2.5 mm2). For operation on 380-415V3N∼: use an H05RRF / H05RN-F type five-core cable (5 x 1.5 mm2). The cable end to be connected to the appliance must be provided with an ground wire (yellow-green) at least 20 mm longer.
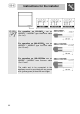
Instructions for the installer 2.2 Installing the oven The oven is designed for installation into any piece of furniture as long as it is heat-resistant. Proceed according to the dimensions shown in Figures 1, 2 and 3. For installing under a work top, follow the dimensions given in Figure 1-3. For installing under a work top beneath a hob with controls connected to the oven, ensure a minimum clearance from any side walls of at least 110 mm as shown in Figure 1.
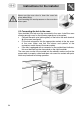
Instructions for the installer Never use the oven door to lever the oven into place when fitting. Avoid exerting too much pressure on the oven door when open. 2.3 Connecting the hob to the oven Once installed, the hob must be connected to the oven. Install the oven allowing enough room for the following operations to take place. • Connect the earth wire (yellow-green) of the hob to the earth terminal A of the oven (see figure).
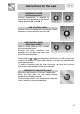
Instructions for the user 3. DESCRIPTION OF CONTROLS 3.1 Front control panel All the oven controls are grouped together on the front panel.
Instructions for the user FUNCTION CONTROL KNOB (static oven) Cooking temperature is selected by turning the knob clockwise to the desired setting, between 50° and 250°C. This knob allows selection of either the bottom( ) or top (grill) ( ) heating element. A further symbol at end of knob rotation permits to turn on the spit motor and the top grill heating element.
Instructions for the user THERMOSTAT KNOB (multifunction oven) Cooking temperature is selected by turning the knob clockwise to the desired setting, between 50° and 250°C. HOB CONTROL KNOB Used to control the temperature on the hob. Rotate clockwise to set to desired value (2 to 12). HOB CONTROL KNOB WITH DUAL ZONES Used to select heating zone in plates with dual heating zones. Rotating the knob clockwise from between 2 to 12 heats the inner zone within the small diameter.
Instructions for the user 3.2 Model with clock and minute minder 3.2.1 Adjusting the clock To set the correct time push or pull (according to the models) and turn clockwise the corresponding control knob “A”. 3.2.2 Minute minder To set the minute minder turn clockwise or anti-clockwise the corresponding control knob “A”, setting the indicator on the time you wish; consider that the minute minder can be programmed up to a maximum of 55 minutes.
Instructions for the user 3.3 Clock + timer with end of cooking Allows selection of manual cooking or to set timer and cooking time. Knob A must always be turned CLOCKWISE. Select function and cooking temperature before setting cooking time. 3.3.1 Adjusting the clock To set the correct time, PULL OUT knob A and turn it clockwise. 3.3.2 Manual cooking To use the oven with manual cooking, turn knob A clockwise until pointer B is aligned with . 3.3.
Instructions for the user 3.4 Analog Programmer 3.4.1 Regolazione dell'ora To set the correct time, pull out the knob A and turn it clockwise. Before setting temperature. programmer, select desired cooking mode and 3.4.2 Timed cooking Select the function and temperature required before setting the cooking duration. Now pull the knob A out and turn it clockwise to locate the minute minder hand C aligned with the hour hand. Now turn the knob A clockwise to set the cooking duration in the window B. 3.
Instructions for the user 4. USE OF THE OVEN Make sure that you have either turned the minute minder knob to the symbol or set a cooking time. If the timer knob is on 0, no heating elements will come on. 4.1 Warnings and general advice Before using the oven for the first time, pre-heat it to maximum temperature (250°C) long enough to burn off any manufacturing oily residues which could give the food a bad taste.
Instructions for the user 5. AVAILABLE ACCESSORIES The oven features 4 support positions for shelves and pans of different height. Some models do not feature all accessories. Chrome shelf: useful for holding cooking vessels. Grill mesh: for placing above grill pan to allow juices to drip into pan below . Roasting/Grill pan: to be used for roasting or grilling. Enamel tray: for baking cakes, pizza and oven desserts.
Instructions for the user 6. COOKING HINTS In fan-assisted mode preheating should be carried out at 30/40°C above the cooking temperature. This considerably shortens cooking times and reduces power consumption, as well as giving better cooking results. Keep the oven door closed during cooking 6.1 Traditional cooking (multifunction models) FUNCTION SWITCH THERMOSTAT SWITCH 50 ÷ 250°C This traditional cooking method, in which heat comes from above and below, is suitable for cooking food on a single level.
Instructions for the user Multiple cooking is possible as long as the cooking temperature of the different foods is the same. 6.3 Grill cooking FUNCTION SWITCH THERMOSTAT SWITCH . Permits rapid browning of foods. You are advised to place the pan in the highest position. When cooking small items for a short time the pan should be in the highest position. For larger items requiring longer cooking times, the pan should be lowered to avoid food being burned on top before being throughly cooked.
Instructions for the user 6.5 Delicate cooking (in some models only) FUNCTION SWITCH THERMOSTAT SWITCH 50 ÷ 250°C Ideal for pastries and cakes with a liquid surface and little sugar and moist desserts in moulds. Excellent results can also be achieved in completing cooking at the base and with dishes requiring heat in the lower area in particular. The pan is best inserted in the lowest position. 6.
Instructions for the user 6.7 Spit roasting (models with static oven) THERMOSTAT SWITCH Prepare the food on the spit rod and block fork screws A. Insert the frame B in the third level from the bottom. Remove handle D and position the spit rod with the handle holder E in the guide on frame B. Completely fit frame B until the tip of the spit rod fits into hole C on the back wall of the oven. Place an oven dish F on the bottom guide and pour in a little water to prevent smoke from forming.
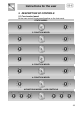
Instructions for the user 6.8 Recommended cooking table Cooking times, especially meat, vary according to the thickness and quality of the food and to consumer taste.
Instructions for the user FAN COOKING FIRST COURSES LASAGNE OVEN-BAKED PASTA CREOLE RICE MEAT ROAST VEAL ROAST PORK ROASTED BEEF FILLET OF BEEF ROAST LAMB ROAST BEEF ROAST CHICKEN ROAST DUCK ROAST TURKEY ROAST RABBIT ROAST HARE ROAST PIGEON FISH PIZZA BREAD TOAST DESSERTS CIAMBELLA FRUIT CAKE BRIOCHES SHORT PASTRY RICE CAKE APPLE CAKE PARADISE CAKE 48 SHELF POSITION ( 1 IS LOWEST) TEMPERATURE (°C) TIME IN MINUTES 2 2 2 190 - 210 190 - 210 190 - 220 20 - 25 25 - 30 20 - 25 2 2 2 2 2 2 2 2 2 2 2 2 2-
Instructions for the user 7. CLEANING AND MAINTENANCE Before carrying out any maintenance switch off the power supply to the machine. 7.1 Cleaning stainless steel To keep stainless steel in good condition it should be cleaned regularly after use. Let it cool first. 7.1.1 Ordinary Daily Cleaning To clean and preserve the stainless steel surfaces, always use only specific products that do not contain abrasives or chlorine-based acids.
Instructions for the user • • The oven should be operated at the maximum temperature for about 15/20 minutes after using specific products, to eliminate the residues deposited inside the oven. For easier cleaning, the door can be removed (see P. 8.2) 7.3 Self-cleaning liners (only on some models) The oven is equipped with continuous self-cleaning enamelled liners. These liners make the oven easier to clean and ensure its efficiency over time. 7.3.
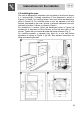
Instructions for the user 8. ADDITIONAL MAINTENANCE The oven may require additionaly maintenance or replacement of parts subject to wear such as seals, bulbs, and so on. The following instructions describe how to carry out these minor maintenance operations. Before any intervention, disconnect the power supply. 8.1 Replacement of light bulb Remove the bulb protector A by turning anticlockwise and change bulb B (in the 8-function model with front glass panel change the halogen bulb C) with a similar one.
Instructions for the user 8.2 Removing Raise levers on each hinge A to lock the hinges before attempting to remove the door. Hold the door on both sides with both hands near hinges B. Lift up the door forming an angle of about 45° and remove. To refit, slide the hinges A into slots in oven frame. Locate the grooves (figure C) over frame of oven in hinge cut out, lower the door and release the locking levers (figure B). 8.3 Oven door seal To permit thorough cleaning of the oven, the seal may be removed.