Contents 1.1 1.2 1.6 1.7 General safety instructions Appliance purpose Disposal How to read the user manual 2 Description 2.1 General description 2.2 Control panel 3 Use 3.1 3.2 3.3 3.4 3.5 3.6 3.7 3.8 Instructions Cleaning the surfaces Ordinary weekly cleaning Food stains or residues What to do if... 5 Installation 5.1 5.2 5.3 5.4 5.5 5.6 42 46 47 48 49 49 50 52 Instructions Preliminary operations Using the hob Special functions Auto-Vent 2.
Instructions 1 Instructions 1.1 General safety instructions Risk of personal injury • During use the appliance and its accessible parts become very hot. • Never touch the heating elements during use. • Never try to put out a fire or flames with water: Turn off the appliance and smother the flames with a fire blanket or other appropriate cover.
• Do not use or store flammable materials near the appliance or directly underneath the hob. • DO NOT USE AEROSOLS IN THE VICINITY OF THIS APPLIANCE WHILST IT IS IN USE. • Switch off the appliance immediately after use. • DO NOT MODIFY THIS APPLIANCE. • Always use any necessary/ required personal protective equipment (PPE) before performing any work on the appliance (installation, maintenance, positioning or movement). • Before performing any work on the appliance, switch off the power supply.
Instructions • All pans must have smooth, flat bottoms. • If any liquid does boil over or spill, remove the excess from the hob. • Take care not to spill acid substances such as lemon juice or vinegar on the hob. • Do not spill sugar or sweet mixtures on the hob during cooking. • Do not place materials or substances that could melt or catch fire (paper, plastic or aluminium foil) on the appliance while it is in use. • Place the cookware directly on the glass ceramic surface.
For this appliance • If cracks or fissures form, or if the glass ceramic cooking surface breaks, turn off the appliance immediately. Disconnect the power supply and call Technical Support. • Avoid hard, solid objects falling on the cooking surface. • Do not use the hob if the pyrolytic cycle is taking place inside any oven installed below. • Do not touch or clean the hob surface during operation or when the residual heat indicator lights are still on.
Instructions • In conformity with the provisions regarding electromagnetic compatibility, the electromagnetic induction cooking hob comes under group 2 and class B (EN 55011). • This appliance complies with the current standards and directives regarding safety and electromagnetic compatibility. However, people who wear pacemakers should keep a minimum distance of 20-30 cm between the pacemaker and the appliance when it is in operation. Contact the pacemaker manufacturer for further information. 1.
1.6 Disposal This appliance conforms to the WEEE European directive (2012/19/EU) and must be disposed of separately from other waste at the end of its service life. The appliance does not contain substances in quantities sufficient to be considered hazardous to health and the environment, in accordance with current European directives. To dispose of the appliance: • Cut the power supply cable and remove it along with the plug. Power voltage Danger of electrocution • Disconnect the mains power supply.
Instructions 1.7 How to read the user manual This user manual uses the following reading conventions: Instructions General information on this user manual, on safety and final disposal. Description Description of the appliance and its accessories. Use Information on the use of the appliance and its accessories, cooking advice. Cleaning and maintenance Information for proper cleaning and maintenance of the appliance.
Description 2 Description EN 2.
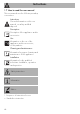
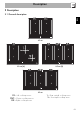
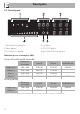
Description 2.2 Control panel 1 Special functions buttons 2 Timer display 3 Cooking zone display 4 Scroll bar 5 ON/OFF button 6 Auto-Vent 2.
Advantages of induction cooking The appliance is equipped with an induction generator for each cooking zone. Each generator located under the glass ceramic cooking surface creates an electromagnetic field which induces a thermal current in the base of the pan. This means the heat is no longer transmitted from the hob to the pan but created directly inside the pan by the inductive current.
Use 3 Use 3.1 Instructions High temperature Danger of burns • Protect your hands by wearing heatproof gloves during use. • Do not touch or clean the hob surface during operation or when the residual heat indicator lights are still on. • Do not put empty pans or frying pans on switched on cooking zones. • Keep children under the age of 8 away from the appliance when it is in use. • Activate the controls lock when you have children or pets which could reach the hob.
Use In order to remove any moisture that could have accumulated during the manufacturing process and for the electronic circuits and control keypad to work properly: 1. Remove the protective films from the external surfaces of the appliance and accessories. 2. Remove any labels (apart from the technical data plate). 3.3 Using the hob All the appliance’s control and monitoring devices are located together on the front panel. The induction hob is controlled by means of the Touch control sensor buttons.
Use Minimum pan diameter Make sure that the minimum diameter of the pans are those indicated in the following table, for both configurations. Configuration Ø minimum (cm) Ø recommended (cm) Single zone 11 18 Multizone 19 20* - 22 Zone 1 11 20 Zone 2 9 16 Recommended diameter for the 80 cm (B) model. Bear in mind the following: • Do not allow the pans to exceed the limits of the zones printed on the cooktop. • Do not cover the control panel.
Use symbol appears on the display, it means the pan is not suitable. Use only cookware with a perfectly flat bottom which is suitable for induction hot plates. Using cookware with an irregular bottom could jeopardise the efficiency of the heating system and prevent cookware from being detected on the hot plate. Make sure that the pans do not cover the control panel. Limiting the cooking duration The hob has an automatic device which limits the duration of use.
Use • When preparing dishes with long cooking times, you can save time and energy by using a pressure cooker, which also helps to retain vitamins contained in the food. • Make sure that the pressure cooker contains enough liquid as, if there is not enough and it overheats, this may cause damage to both the pressure cooker and the cooking zone. • If possible, always cover pans with a suitable lid. • Choose a pan suitable for the quantity of food to be cooked.
Use 2. Move your finger to the left or right on the scroll bar to select the power level, from The hob is fitted with a pan detection system that automatically selects the zones on which a suitable pan has been placed; this function is enabled by default and can be deactivated via the user menu. After switching on the hob: 1. Position a pan (suitable for induction cooking and not empty) on the cooking zone you wish to use.
Use Quick selection This function allows you to quickly set the cooking zones to the required power. After switching on the hob and having selected a cooking zone: 1. Place a finger on the scroll bar at approximately the required power level. After switching on the hob and having selected a cooking zone: 1. Place a finger on the left-hand side of the scroll bar. The display of the cooking zone used will turn on: the power value indicated is . 2.
Use Multizone function This function can be used to operate two cooking zones (front and rear) when using pans like fish kettles or rectangular pans. EN The Booster function can be activated quickly. • After switching on the hob, place your finger at the far right of the scroll bar of the cooking zone you wish to use. After switching on the hob: 1. Place a finger simultaneously on the buttons of two cooking zones one above the other.
Use The same parameters are set on both cooking zones. The Multizone function can only be activated between cooking zones that are vertically connected (zones indicated by “SX”, “CNT” and “DX” - see “General description”). This function automatically divides the power equally between both of the hot plates in use. Example of incorrect pan position It is not possible to activate the Double Booster function for the cooking zones on which the Multizone function is active.
Use Cooking guidelines Residual heat Power level Suitable for: 1-2 Reheating food, keeping small amounts of water on the boil, and whipping up sauces with egg yolk or butter. 3-4 Cooking solid or liquid food, keeping water on the boil, defrosting deep-frozen food, cooking 2- or 3-egg omelettes, fruit and vegetables, various cooking processes. 5-7 Stewing meat, fish and vegetables, simmering food, making jams etc. 8-9 Cooking or frying meat, fish, steaks and liver; browning meat, fish, eggs, etc.
Use To deactivate the Pause function: To deactivate the control lock: 1. Hold down the button . The pause symbol, which has just been pressed, starts to flash. 2. Press any button apart from the Pause button. 3. The pause function has now been deactivated and the previously set functions are restored. 1. press the button again for at least one second. • The cooking time limitation, the residual heat indicators and the control lock function remain enabled during the Pause function.
Warming Function This function allows you to keep cooked food warm or to keep water on the boil. To activate the Warming function, first turn on the hob, then: 1. Select a cooking zone. 2. Press the function. The button to activate the symbol appears on the display of the selected cooking zone. To deactivate the Warming function: 1. Select the cooking zone on which the function is active. 2. Press the button. 3.5 Auto-Vent 2.
Use 3.6 Additional functions Rapid heating Child lock This is useful to prevent functions being activated by mistake (e.g. by children). To activate the child lock, the appliance must be on, but with the zones deactivated: 1. Press and hold any cooking zone display. • The slider bar shows an animation. 2. Release the display and slide your finger on the bar from left to right. The child lock function is active and the symbol appears on the cooking zone displays.
2. Use the + and - buttons to select the required time. 2. Use the + and - buttons to modify or reset the timer. 3. After 10 seconds, the timer will start the new countdown or will be deactivated. Timed cooking • The first digit on the left is used to select the hours, the middle one to set the tens of minutes and the one on the right the minutes. Touch the timer display within 3 seconds of having switched on the appliance, otherwise it will deactivate and the appliance will have to be restarted. 3.
Use 5. Press any button to deactivate the buzzer. Recall Function This is used to restore some functions that have already been started after the appliance has been switched off unintentionally. A maximum of 9 hours and 59 minutes can be set. This function can be activated on multiple cooking zones at the same time. The flashing LED and time indicator refer to the next cooking zone to be switched off. Modifying or deactivating timed cooking To modify timed cooking during the countdown: 1.
3.7 User menu The user menu allows you to modify the operating characteristics of the appliance. 9 of the options can be modified. Each option is indicated on the display with the letter “U”, which alternates with a progressive number.
Use 6. Press the symbol to go back to selecting the options. A scroll bar appears in which each segment is associated with a menu option. 7. Press the segments of the scroll bar (except the first two) to select the available options. • The first segment on the left (option U0) is reserved for the power limitation procedure (for installer only). • For technical reasons, the second segment from the left (option U1) is disabled. Selecting this option will have no effect.
Use If automatic pan detection is disabled, the area must be switched on manually when a pan is placed on the hob. Option U7 specifies the length of the alarm when the timer has finished. 3 levels can be selected: • 0: alarm duration 120 seconds. • 1: alarm duration 10 seconds. • 2: alarm disabled. Option U8 allows you to activate the AutoVent 2.0 function in automatic mode. 8 levels can be selected.
Use 3.8 Error codes If the appliance malfunctions or operates incorrectly, the associated error code appears on the cooking zones display. The error codes always begin with “E..” or “Er..”, followed by a number. The following error codes can be corrected without having to contact the Technical Support Service. • Er03: Remove any materials or pans from the area of the front control panel.
Cleaning and maintenance 4.1 Instructions Improper use Risk of damage to surfaces • Do not use steam jets to clean the appliance. • Do not spill sugar or sweet mixtures on the hob during cooking. • Do not place materials or substances that could melt (plastic or aluminium foil). • Keep sensor buttons clean at all times and do not rest any object on them. • Do not use cleaning products containing chlorine, ammonia or bleach on parts made of steel or that have metallic surface finishes (e.g.
Cleaning and maintenance Changes in colour do not affect the operation and stability of the glass. These are not alterations to the material of the hob but just residues which have not been removed and have then carbonised. Shiny surfaces can form due to the bases of pans, especially aluminium ones, rubbing on the surface, and due to the use of unsuitable detergents. They are difficult to remove using conventional cleaning products. It may be necessary to repeat the cleaning process several times.
Installation 5 Installation 5.1 Electrical connection 60 cm and 80 cm (A) models: • 220-240 V / 380-415 V 2N~ • Have the electrical connection performed by authorised technical personnel. • Use personal protective equipment. • The appliance must be connected to earth in compliance with electrical system safety standards. • Disconnect the mains supply. • Do not pull the cable to unplug the appliance. • Use cables withstanding a temperature of at least 90°C.
Installation • 220-240 V 1N~ 5 x 2,5 mm² five-core cable For all types of connection, use the jumper provided. Fixed connection Fit the power line with an all-pole circuit breaker in compliance with installation regulations. The circuit breaker should be located near the appliance and in an easily reachable position. Run the power cable in the rear part of the unit. Make sure that it . does not come into contact with the lower part of the hob or a builtin oven below it.
4. Press the left of the scroll bar to decrease the power and the right to increase it. The Eco-Logic Advance function increases or decreases the power steps of 0.1 kW at each touch. To exit from the user menu: 1. Press for at least 2 seconds to save the modifications. 2. Press to exit without saving the modifications. In both cases, the hob will be switched off and will have to be switched back on. Table of power draws Model Minimum power (kW) Maximum power (kW) 60 cm 80 cm (A) 2.4 7.
Installation Semi-flush mounting Flush built-in model For this kind of hobs additional milling is needed in the recessed hole if you wish to install the hob flush with the work surface. L X Y 600 560 480 800 (A) 730 - 750 480 - 490 800 (B) 750 490 900 860 490 A B C D E min. min. min. min. 20÷60 50 460 750 50 Hob seal To prevent leakage of liquid between the frame of the hob and the countertop, place the adhesive seal provided along the entire outer edge of the hob before assembly.
Installation EN In the event the hob needs to be removed, cut the silicone using a cutter before attempting to remove it (C). 5.6 Mounting Over built-in oven unit If installed on top of an oven, the latter must be equipped with a cooling fan. The clearance between the hob and the kitchen units or other built-in appliances must be enough to ensure sufficient ventilation and air discharge.
Installation opens on rear Failure to install the double-layer wooden base exposes the user to possible accidental contact with sharp or hot parts. Ventilation The illustrations below show two examples of installation suitable for proper ventilation and one example of incorrect installation to be avoided. Spring clips To ensure the hob is fixed and centred as accurately as possible, the clips provided must be positioned as described below: 1.