
User manual


7
Simmer
The Simmer function can be used with all surface cooking
areas. Simmer can be used on more than 1 surface cooking
area at a time.
To Use
To Turn On:
1. Check that a surface cooking area has been selected.
2. Touch SIMMER. “A” will appear in the display, and the
indicator light next to Simmer will light.
The timer remains visible and can be set if desired.
To Turn Off:
Simmer can be turned off in 3 different ways:
1. Use the power slider to set to a heat level.
OR
2. Touch the surface cooking area OFF keypad.
OR
3. Select a different cooking function.
Melt + Hold
The Melt + Hold function can be used with all surface
cooking areas. Melt + Hold can be used on more than
1 surface cooking area at a time.
To Use
To Turn On:
1. Check that a surface cooking area has been selected.
2. Touch MELT + HOLD. “A” will appear in the display,
and the indicator light next to Melt + Hold will light.
The timer remains visible and can be set if desired.
To Turn Off:
Melt + Hold can be turned off in 3 different ways:
1. Use the power slider to set to a heat level.
OR
2. Touch the surface cooking area OFF keypad.
OR
3. Select a different cooking function.
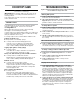
Bridge
(on some models)
A. Left side bridge
B. Right side bridge
The Bridge function can be activated when surface cooking
areas are on or when they are off. The Bridge function allows
you to use 2 cooking zones as an extra-large cooking zone.
To Turn On a Bridge:
1. Touch the desired Bridge keypad (left side bridge or right
side bridge).
The indicator light above the Bridge keypad will light. The
heat setting levels for the 2 surface cooking areas will
default to “0” and can be set from a minimum of “1” to a
maximum of “9.” Any timers that may be running for the 2
surface cooking areas will turn off, and 2 dashes “--” will
appear in the timer display.
2. Slide a finger on the Heat Level Slider to change the power
level up or down.
The selected heat level will show in the heat level display
for each surface cooking area using the bridge.
To Turn Off a Bridge:
1. Touch the Bridge keypad for the zone being used (left
side bridge or right side bridge).
The surface cooking areas will resume operation as 2
separate areas.
NOTE: Performance Boost cannot be used on the same
elements in combination with the Bridge function.
Pan Detection
If a pan is removed from a surface cooking area when it is
in use, the “no pan” indicator lights up. A flashing dash “-”
will also appear in the display along with an “alert” tone for 1
minute. If the pan is not correctly replaced within 1 minute,
the surface cooking area will switch Off.
If a Timer is running when a pan is removed the countdown
will pause.
Control Lock
The Control Lock avoids unintended use of the surface
cooking areas.
If Control Lock is activated when power to the cooktop is
off, the cooktop is locked out, and the surface cooking areas
cannot be turned on by the cooktop touch controls.
If Control Lock is activated when power to the cooktop is on,
all keypads are locked out except for the Power and On/Off
keypads.
To Lock Cooktop:
Touch and hold the CONTROL LOCK keypad for 3 seconds.
After 3 seconds, a tone will sound and the indicator light above
the Control Lock keypad will light, indicating that the cooktop
controls are in the lockout position.
If the cooktop is in use when Control Lock is activated, cooking
will proceed as normal and any timers that have been set will
continue their countdown.
To Unlock Cooktop:
Touch and hold the CONTROL LOCK keypad for 3 seconds.
Performance Boost Function
This function allows you to increase the heat setting level
above the maximum heat setting 9 for 10 minutes or less.
NOTE: Performance Boost is not available when the Bridge
function is activated.
A
B