MANUEL D’UTILISATION BATTEUR SUR SOCLE MANUAL DE INSTRUCCIONES BATIDORA DE PIE EN FR STAND MIXER ES INSTRUCTION MANUAL
Important information for the user Informations importantes pour l’utilisateur Información importante para el usuario Instructions / Instructions / Instrucciones Description / Description / Descripción Use / Usage / Uso Cleaning and maintenance / Nettoyage et entretien / Limpieza y mantenimiento Safety instructions / Directives de sécurité / Instrucciones de seguridad Information / Informations / Información Advice / Conseil / Recomendaciones
Dear Customer, Thank you for purchasing one of our appliances. Our products are unique because they combine iconic style with innovative technical solutions. They match perfectly with other products in our range and work equally well as a standalone design objects in your kitchen. We hope you enjoy using your new appliance! Cher client, merci beaucoup pour votre achat. Nos produits sont uniques car ils combinent une forte recherche esthétique avec une conception technique innovante.
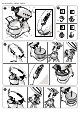
Model: SMF02 - SMF03 - SMF13 7 A 1 B 3 16 6 5 12 3 11 10 4 13 9 C D 8 15 2 14
EN IMPORTANT SAFEGUARDS WARNING: If the instructions contained in this manual are not followed precisely, fire or explosion may result causing property damage, personal injury or death. READ AND SAVE THESE INSTRUCTIONS Your safety and the safety of others are very important. We have provided many important safety messages throughout this manual and on the appliance. Read all the instructions before using the appliance and always obey all safety messages.
IMPORTANT SAFEGUARDS The safety messages will inform you of potential hazards, on how to avoid the risk of injury and what can occur if the instructions are not followed. IMPORTANT: Observe all codes and ordinances in force. WARNING: For your safety, the instructions contained in this manual must be followed to minimize the risk of fire or explosion and to prevent property damage, personal injury or death.
WARNING To reduce the risk of fire, electrical shock, personal injury, or damage when using the appliance, follow basic safety precautions, including the following: 1 Safety 1.1 Essential safety information. Follow all safety instructions in order to use the appliance safely: • Do not touch the plug with wet hands. • Make sure that the socket is always accessible so that the plug can be removed whenever necessary. • Do not immerse the appliance, the power cord or the plug in water or any other liquid.
IMPORTANT SAFEGUARDS • Make sure there are no foreign objects inside the appliance. • Immerse the whisks into the bowl containing the ingredients before starting the appliance. • This manual contains instructions for cleaning, maintenance and recommendations from the manufacturer to the customer. Any other interventions should be carried out by an authorized service center. • Instructions for cleaning of the appliance can be found in the "Cleaning and Maintenance" section.
1.4 Manufacturer's liability The manufacturer declines any liability for personal injury or damage to property caused by: • Use of the appliance other than the intended use • Not having read the user manual • Tampering with any part of the appliance • Use of non-original spare parts • Failure to comply with the safety instructions Please keep these instructions carefully. If the appliance is passed on to others, they should also be given this instruction booklet.
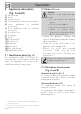
Description 2 Appliance description (Fig. A and B) 1) 2) 3) 4) 5) Motor head Body Speed selector Head raising/lowering release button Lower attachment for standard accessories 6) Front attachment hub for optional accessories 7) Front hub cover 8) Bowl base 9) Bowl** 10) Pouring shield* 11) Dough hook 12) Flat beater 13) Wire whisk 14) Flex edge beater* 15) Identification plate 2.1 Identification plate (Fig.
Description / Use Flex edge beater* (14) Stainless steel beater with flexible silicone edges. Useful for mixing doughs and soft batters. The removable edges guarantee even consistency throughout the process. Pouring shield* (10) For protecting against splattering and to facilitate the addition of ingredients when in use. Only suitable for use with the stainless steel bowl*.
Use Using the pouring shield* (10) • Fit the pouring shield onto the upper rim of the stainless steel bowl* after having inserted the bowl into its base, inserted the accessory into the lower attachment and after having lowered the head into the operating position. • Fit the pouring shield with the opening facing outwards so that ingredients can be added to the bowl without having to stop the mixer.
3.2 When finished (Fig. B and D) • Place the speed selector (3) in the "0" (OFF) position and remove the plug from the power socket. • Remove the pouring shield (10) from the bowl, if present. • Press the release button (4) to raise the head (1). • Push the accessory slightly upwards and turn it clockwise to release it from the pin. Remove the accessory from the lower attachment (5). • Remove the bowl (9) from its base by turning it counterclockwise to release it. 3.
Use 3.4 General advice • Never exceed the maximum speed and capacity indicated in the table in order to prevent damage to the appliance. • Turn on the appliance at a low speed until all the ingredients are mixed, then increase the speed according to the required operation. • When adding ingredients, always pour them onto the edge of the bowl and not directly onto the moving accessory. • Reduce the speed when you add dry or liquid ingredients to prevent splattering.
Recommendations for kneading • Make sure that the proportion of liquids in doughs is sufficient (at least 50-60% of the quantity of flour, by weight). Doughs which are too dry and therefore stiff can overload the motor. • If the appliance is struggling, switch it off, divide the dough into two parts and knead them separately. Bread/pizza dough and egg pasta dough • Start the appliance at speed 1 until the ingredients have been incorporated, then increase to speed 2.
Use 3.5 Recommended speeds The speed selector (3) indicates the most appropriate accessory to use with the selected speed. The speeds indicated in the table are approximate and can vary depending on the recipe and the interaction of the different ingredients used. Speed setting LOW 1-2 LOW 1-3 MEDIUM 4-7 HIGH 8 - 10 * Function COMBINING AND KNEADING Kneading - preparing leavened doughs (bread, pizza, egg pasta etc.), see “Bread/pizza dough and egg pasta dough". * COMBINING Combining ingredients.
Accessories and recommended speeds, maximum capacities Accessory Preparation Speed Time Min/max capacity Egg whites 8-10 2-3 min 2 - 12 (1) Cream 8-10 2-3 min 100 ml/1000 ml 1-7 3-4 min 2 kg total batter Pastry 1-7 3-4 min 2.6 kg total batter Bread/pizza dough 1-2 4 min Egg pasta dough 1-2 5-7 min Prepared batters cake or * (1) 1.8 kg total batter (max. 1.2 kg flour) 500 g total dough with 3 eggs Average egg size: 53-63 g The table should be considered a guideline only.
Cleaning and maintenance 4 Cleaning and maintenance This manual contains instructions for cleaning, maintenance and recommendations from the manufacturer to the customer. Any other interventions should be carried out by an authorized service center. Before cleaning, ALWAYS remove the plug from the power supply and allow the appliance to cool down. Never immerse the motor base (2) in water or other liquids.
4.1 What to do if... Problem Cause The motor has overheated. The plug is not properly inserted in the power socket. The motor does not start. The power defective. cord is No power. The head has been raised during operation. The appliance vibrates. Solution Disconnect the mixer from the power supply and allow the motor cool down. Insert the plug into the power socket. Do not use adapters or extensions. Check that the house main breaker is on.
Cleaning and maintenance Have the mixer checked and The lower attachment has adjusted at an Authorized come loose over time. Service Center. Move the speed selector to 0, press the button on the The accessories hit the rear of the appliance to raise sides of the bowl. The accessory or the bowl the head and check that the is not correctly locked into accessory is correctly locked position. into position in the lower attachment and the bowl is correctly locked into position on the base.