LAVABIANCHERIA WASHING MACHINE LAVE-LINGE WASCHMASCHINE LAVADORA WASAUTOMAAT LIBRETTO ISTRUZIONI IT INSTRUCTIONS MANUAL GB MANUEL D’INSTRUCTIONS F GEBRAUCHSANWEISUNG D MANUAL DE INSTRUCCIONES E GEBRUIKSAANWIJZING NL 1
GB 1. THE NEW WASHING SYSTEM This new washing machine is the outcome of years of research. The leading-edge design and the quality of the production processes used to manufacture this product ensure it will give you many years of excellent service. Its concept satisfies all current and future washing requirements. Its low water, power and detergent consumption help protect the environment and reduce running costs to a minimum. Water and power consumption has been reduced in all programmes.
2. SAFETY WARNINGS Attention! These warnings are given for safety reasons. Please read them carefully before installing and using the appliance. This manual forms an integral part of the appliance and must therefore be kept intact together with the machine. Before using the appliance, carefully read all the instructions contained in this manual. Installation must be performed by a qualified technician in compliance with the regulations in force.
Do not wash petrol-soaked garments in the washing machine. Make sure there are no inflammable items (e.g.: lighters, matches, etc.) in pockets before washing. If volatile fluids have been used to clean garments, make sure that the substances have been removed before loading them in the washing machine. Before loading garments for washing, make sure the pockets are empty, the buttons securely fixed and the zips closed. Do not wash frayed or torn garments.
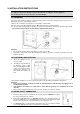
3. INSTALLATION INSTRUCTIONS Important ! The appliance must be installed by a specialised technician according to current regulations. The washing machine is very heavy. Take care when lifting it. 3.1 UNPACKING The inside of the machine comprises a moving assembly which is blocked for transport purposes by the screws (A) located at the rear of the washing machine. 1. Release the assembly by removing these screws with a 13 mm wrench. 2.
Attention! • If the water pipe is new or has not been used for a long time, let a certain amount of water run before attaching the inlet hose. This stops any deposits of sand and other impurities from clogging the filters used by the machine to protect the water inlet valves. 3.4 DRAIN CONNECTION 1.
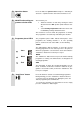
4. DESCRIPTION OF CONTROLS 4.1 CONTROL PANEL All the commands and controls of the appliance are assembled together on the front panel.
A Open door button Press the button to open the door. Chapter 5 – Washing instructions – explains how the door works and how to use it. B This knob lets you: ON-OFF and washing programme selection knob • switch the machine on and off by moving it in either direction from the OFF position (knob indicator vertical) • select washing temperatures within the various fabric sectors by turning it in both directions The knob does not move while the programme is running.
E Options buttons The options that may be available on the washing machine are shown below. Quick wash Button This button reduces the overall duration of the washing cycle. This option is used to wash small loads or less dirty washing in less time. The bleach stage is skipped when the Quick Wash button is pressed (for models with bleach function).
These LED's light up when the relative option button is pressed and indicate that the option has been selected. They remain on until the machine switches off or a different selection is made. F Options enabled LED's G Select spin speed or stop Press this button to select one of three spin speed levels, indicated by the spin speed and stop with tub full LED's.
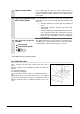
5. USING THE MACHINE 5.1 PREPARING THE WASHING 3. 4. Separate the washing according to the type and colourfastness of the fabrics. Wash whites and coloureds separately. Wash new coloured garments separately for the first time. A label is normally applied to garments giving information on how to clean them. A brief description of these labels is shown below. WASHING BLEACHING Machine wash at max. 90°C Machine wash at max. 60°C Do not bleach Bleaching allowed IRONING Machine wash at max.
5.3 PREPARING THE WASHING Where possible, save electricity by washing full loads divided by type of fabric. Introduce loose washing and alternate large items with small ones. For the first few times, weigh the loads of washing and then rely on your judgement. 5.4 LOADING THE WASHING 1. 2. 3. 4. Open the door and load the washing taking care to distribute it uniformly, loosely and not packed into the drum; alternate large items with small ones if possible.
5.6 DOSING POWDER DETERGENTS Normally dirty washing 1. Choose a programme without prewash. 2. Pour the total quantity of detergent indicated on the packs into compartment “2” of the detergent tray. Very dirty washing 1. Choose a programme with prewash. 2. Add ¼ of the recommended quantity of detergent into compartment “1” of the detergent tray and ¾ of the detergent into compartment “2”.
To switch on the machine and select programmes, proceed as follows: 1. 2. Turn the programme knob in either direction. The machine switches on and the “Start” programme phase LED lights up.
5.11 SELECTION OF OPTIONS Use the options buttons (indicated in chapter 4 – Description of controls) to enable machine options. A selected option is highlighted by the option LED located above the button in question. 5.12 STARTING THE WASHING PROGRAMME 1. 2. Before starting the selected programme, carefully close the door, open the water tap and add the detergent and additive. Press the “Start-Pause” button and the “Wash” programme phase LED lights up.
6. CLEANING AND MAINTENANCE Important – Before cleaning or servicing the machine, remove the plug from the socket. 6.1 EXTERNAL CLEANING • • • • • Regular and constant cleaning will keep your appliance looking like new. Clean the outer surfaces with soap and water and then dry thoroughly with a soft cloth. Clean parts in plastic with a damp cloth. Do not scratch with sharp objects and do not use solvents or abrasive products as these will damage the surface.
4. Pull out the drain hose “A”. Attention: if the hose is hot it means the water is hot or boiling. Place a tray on the floor and remove the plug “B” to drain the water. Depending on the quantity of water, it may be necessary to empty the tray several times. When no more water comes out, push the hose back in and screw back the plug “B”. 6. Unscrew the cover of the pump “D” by turning it anti-clockwise. Clean the pump body and remove any foreign bodies.
7. TROUBLESHOOTING This product complies with current safety regulations governing electrical equipment. For safety reasons, all technical inspections or repairs must be performed by qualified technicians in order to prevent hazardous situations for users. If the machine does not work, before calling the Service Centre and spending money unnecessarily, check that the operations indicated in this troubleshooting table have been performed.
11 The machine does not spin The unbalanced load sensor has triggered because the washing is not uniformly distributed inside the drum. If the washing is wet at the end of the cycle, distribute it well inside the basket and repeat just the spin cycle. 12 Draining water from the drum In the event of a power failure or a fault in the appliance, the water inside the drum can be drained as described in paragraph 6.
Temperature Max.
Temperature Max.