Contents 1. 2. 3. 4. Description of the controls _______________________________ 2 Operating instructions __________________________________ 10 Cleaning and maintenance ______________________________ 21 Troubleshooting ______________________________________ 26 Thank you for choosing one of our products. You are advised to read this manual carefully; it contains all the information you need use your dishwasher safely, correctly and in the most satisfactory manner.
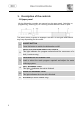
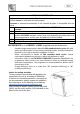
User instructions 1. Description of the controls 1.1 Upper panel All the dishwasher controls are grouped on the upper panel. Switching on, programming, switching off, etc. are only possible when the door is open. The panel shown is given as example: the form of the lights and buttons may vary depending on the model. 1 ON/OFF BUTTON Press this button to switch the dishwasher on/off.
User instructions SWITCHING ON, SETTING STARTING THE PROGRAM THE WASHING PROGRAM AND Press the ON/OFF button (1); the PROGRAM INDICATOR LIGHT (2) will come on; Keep pressing the PROGRAM SELECTION button (3) until the indicator light for the required program lights up; Select the required option (if any, depending on models); Close the door and after about 2" the program will start; while it is running, the corresponding LIGHT will flash (program running indicator).
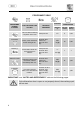
User instructions PROGRAMS TABLE PROGRAMME NUMBER & SYMBOL 1 SOAK 2 GLASS 3 ECO (*) EN 50242 4 HALF LOAD 5 SUPER DURATION LOAD CROCKERY AND CUTLERY PROGRAM PROGRESS Pans and dishes awaiting completion of the load Cold prewash Glass, china and mixed dishes with light dirt. Wash at 45°C Cold rinse Rinse at 55°C Dry Dishes with normal dirt, even with dried-on residues Cold prewash Wash at 45°C Rinse at 55°C Dry Half load of dishes with normal dirt, washed immediately after use.
User instructions NOTES AND REFERENCES Only run the soak program with half loads. Options cannot be used with the soak program. Enersave is activated automatically if the selected program is compatible with the option. * Standard programme under EN 50242. The ENERSAVE option must be enabled. ** See information sheet provided (1) Program consumption and duration figures have been measured in accordance with the EN 50242 standard.
User instructions 1.2 Wash programs Before starting a wash program check that: The water supply tap is open. The softener container contains regenerating salt. The correct amount of detergent has been added to the dispenser. The baskets have been correctly loaded. The spray arms are able to rotate freely and without obstruction. The dishwasher door is securely closed.
User instructions ENERSAVE OPTION This option further reduces energy consumption by opening the door at the end of the cycle for more effective drying. At the end of the wash an automatic device releases the door, which slowly opens by a few centimetres. This allows optimal drying even with low rinsing temperatures, for significant energy saving.
User instructions CANCELLING A PROGRAM IN PROGRESS Open the door, taking care to avoid splashes of water, and hold down the PROGRAM SELECTION (3) button for a few seconds until the indicator lights for programs 4 and 5 illuminate simultaneously (marked "end"). Close the door. After approximately 1 minute the dishwasher will advance to the end of cycle. CHANGING THE PROGRAM To change the program in progress, simply open the door and select a new program.
User instructions it was interrupted. This operation should only be carried out if strictly necessary, as it could cause problems in running the program. SWITCHING OFF At the end of the program the beeper sounds briefly and the lights of programs no. 4 and 5 (marked "end") flash. To switch off the dishwasher, open the door and press the ON/OFF button (1).
User instructions 2. Operating instructions Once the dishwasher has been correctly installed, prepare it for use as follows: Adjust the water softening system Add salt Add rinse aid and detergent 2.
User instructions Do not use table salt, as it contains insoluble substances which, over time, may damage the water softening system. The salt container should be refilled before starting the wash program. This way, the excess saline solution will be immediately removed by the water; prolonged presence of salt water inside the tank may lead to corrosion. Be careful not to confuse the salt and detergent packages; adding detergent to the salt container will damage the water softening system.
User instructions WATER HARDNESS TABLE WATER HARDNESS German degrees (°dH) French degrees (°dH) 0–6 0 – 11 7 – 10 SETTINGS H0 All lights off (no salt) 12 – 18 H1 One light on 11 – 15 19 – 27 H2 Two lights on 16 – 21 28 – 37 H3 Three lights on 22 – 28 38 – 50 H4 Four lights on 29 - 50 51 – 90 H5 Five lights on Contact your local water board for information on the hardness of your water supply. Default settings: H3 - 16-21°dH – 28-37°dF 2.
User instructions ADDING RINSE AID Rinse aid helps the dishes dry faster and prevents the formation of scale deposits and staining; it is automatically added to the water during the final rinse cycle. To add rinse aid: Open the door. Rotate the container cap anticlockwise by ¼ of a turn and remove it. Add the rinse aid until the container is full (approximately 140 ml). The optical level indicator on the side of the cap should be completely dark.
User instructions ADDING DETERGENT To open the detergent dispenser cap, lightly press the button P. Add the detergent and close the cap carefully. During the wash cycle, the dispenser will open automatically. 14 When a program with hot prewash is selected (see program table), extra detergent must be placed in the cavity G/H (depending on model). Use only detergents specially formulated for dishwashers. For optimal washing results it is important to use a good quality detergent.
User instructions The introduction of detergent into the rinse aid dispenser, even in liquid form, will damage the dishwasher. 2.3 General warnings and recommendations Before using the dishwasher for the first time, it is advisable to read the following recommendations concerning dish types and loading. There are generally no constraints on washing of domestic dishes, but in certain cases it is necessary to take their characteristics into account.
User instructions WARNING! Make sure that the dishes are securely in place so that they cannot tip over or obstruct the rotation of the spray arms during the wash cycle. Do not place very small objects in the baskets as these could fall and obstruct the spray arms or the pump. Containers such as cups, bowls, glasses and pots should always be loaded with the opening facing downwards and with any cavities at an angle, to allow the water to drain out.
User instructions 2.4 Using the baskets The dishwasher has a capacity of 10 place-settings, including serving dishes. LOWER BASKET Used for items with a heavier degree of soiling. All types and combinations of loads are permitted, provided that the dishes, pots and pans are arranged with all the soiled surfaces exposed to the water jets coming from the bottom. In some models the bottom basket is fitted with racks which can be lowered to make better use of the space available.
User instructions BOTTOM BASKET INSERTS Some models are equipped with bottom basket inserts which improve the drying of dishes. The inserts are supplied in the accessories bag; to use them, simply fit them into place as shown. CUTLERY BASKET The cutlery should be arranged in an orderly manner inside the basket, with the handles pointing downwards. Take care during loading to avoid injury from the knife blades.
User instructions UPPER BASKET It is recommended to load the upper basket with small or medium-sized items such as glasses, small plates and saucers, tea or coffee cups, shallow bowls and light objects made from heat resistant plastic. If the upper basket is used in the lowermost position, it can also be loaded with serving dishes, provided they are only lightly soiled. The basket is equipped with two tip-up cutlery supports which can be raised or lowered as required. See illustrations below.
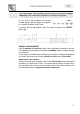
User instructions ADJUSTING THE UPPER BASKET The height of the upper basket can be according to requirements and the size of the dishes in the lower basket. system with 3 position settings (1 lowest, 3 highest). The basket is snapped into the position required, lifting both sides simultaneously. To return to the lowest position from any height, lift the basket to the highest position and then release.
User instructions LOWEST RELEASE MEDIUM HIGHEST 21
User instructions 3. Cleaning and maintenance Before carrying out any work, always unplug the appliance from the electrical supply or turn off the dual-pole dedicated switch. 3.1 General warnings and recommendations Avoid the use of acidic or abrasive detergents. Clean the outer surfaces and door-lining of the dishwasher regularly using a soft, damp cloth or with a normal detergent suitable for painted surfaces. Clean the door seals with a damp sponge.
User instructions CLEANING THE OSCILLATING BOTTOM SPRAY ARM ● Take hold of the bottom spray arm unit and pull it upward to release. ● Separate the oscillating arm A from the spray arm B. ● Turn the oscillating arm A upside down to release the toothed wheel C by pressing the teeth D and turning them anticlockwise. ● Extract the wheel C and wash all components under running water. Assemble the spray arm unit by reversing the sequence described above.
User instructions CLEANING THE FILTER UNIT The central filter should be cleaned regularly. To remove it, pull the spray arm assembly upwards. Turn the microfilter M anticlockwise to release and extract it, then lift the stainless steel filter F. Push the central filter H from below to extract it from the micro-filter. Separate the two parts of the plastic filter by pressing the body of the filter in the zone shown by the arrows. Remove the central filter by lifting it.
User instructions PROLONGED DISUSE: Run the soak program twice in succession. Unplug the power cord from the socket. Leave the door slightly open in order to prevent the formation of unpleasant odours inside the wash tank. Fill the rinse aid dispenser. Shut off the water supply tap.
User instructions If the dishes fail to dry or remain dull, check that: The rinse aid container is not empty The rinse aid dispenser setting is correct The detergent used is of good quality and has not lost its effectiveness (for example, through incorrect storage, with the box left open) If the dishes show signs of streaking, staining etc.
User instructions 4. Troubleshooting The dishwasher is capable of signalling a number of faults by the simultaneous illumination of multiple indicator lights; the meanings are given below: FAULT DESCRIPTION E1 Acquastop failure The anti-flooding system has been activated (for the relevant models only). The system is tripped in case of water leaks. Contact the after-sales service. E2 Safety level The system which limits the water level inside the dishwasher has been tripped.
User instructions FAULT DESCRIPTION Turbine flow-regulator malfunction (for the relevant models only) The appliance is not able to "measure" the amount of water loaded accurately. Interrupt the program and switch off the dishwasher. Switch the dishwasher back on, program it again and start the washing cycle. If the problem persists, contact the after-sales service. E7 E8 Alternate washing system malfunction Interrupt the program and switch off the dishwasher.