INSTRUCTION MANUAL DISHWASHER
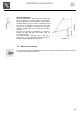
Contents 1. Safety and operating instructions __________________________ 26 2. Installation and hook-up _________________________________ 28 2.1 Water supply connection _____________________________________________________ 28 2.2 Electrical connection ________________________________________________________ 29 3. Description of the controls _______________________________ 30 3.1 Upper panel _______________________________________________________________ 30 3.
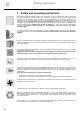
Safety instructions 1. Safety and operating instructions THIS MANUAL FORMS AN INTEGRAL PART OF THE APPLIANCE: IT MUST ALWAYS BE KEPT INTACT TOGETHER WITH THE DISHWASHER. BEFORE USING THE APPLIANCE, CAREFULLY READ ALL THE INSTRUCTIONS CONTAINED IN THIS MANUAL. INSTALLATION MUST BE PERFORMED BY A QUALIFIED TECHNICIAN, IN COMPLIANCE WITH THE REGULATIONS IN FORCE.
Safety instructions DO NOT USE APPLIANCES WHICH HAVE BEEN DAMAGED DURING TRANSIT! IF IN DOUBT, CONSULT YOUR DEALER. THE APPLIANCE MUST BE INSTALLED AND CONNECTED IN ACCORDANCE WITH THE INSTRUCTIONS PROVIDED BY THE MANUFACTURER OR BY A QUALIFIED TECHNICIAN. THE APPLIANCE IS INTENDED FOR USE BY ADULTS. DO NOT ALLOW CHILDREN TO COME NEAR OR PLAY WITH THE DISHWASHER. KEEP CHILDREN AWAY FROM DETERGENTS AND FROM THE OPEN DISHWASHER DOOR. THE PACKAGING MATERIALS (PLASTIC BAGS, POLYSTYRENE, METAL BARS, ETC.
Installation instructions 2. Installation and hook-up Remove the polystyrene basket retainers. Position the appliance in the desired place of installation. The back or sides of the dishwasher may be placed up against walls or other furniture units. If the dishwasher is installed near a heat source, fit the special insulating panel to prevent overheating and malfunction of the appliance.
Installation instructions DRAIN CONNECTION Insert the dishwasher’s drain hose into a drain pipe having a diameter of at least 4 cm, or alternatively, place it inside the kitchen sink using the plastic support provided, taking care not to crush or excessively bend the hose. It is important to prevent the hose from coming loose and falling. For this purpose, the plastic support is equipped with a hole for tying it to the wall or water tap.
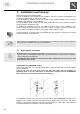
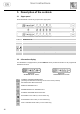
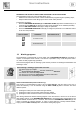
User instructions 3. Description of the controls 3.1 Upper panel All the dishwasher controls are grouped on the upper panel. 1 2 3 4 ON/OFF BUTTON PROGRAM SELECTION BUTTON DELAYED START BUTTON ECONOMY PROGRAM SELECTION BUTTON NO-DRYING CYCLE BUTTON (on some models only) 5 ECO DRYING CYCLE BUTTON (on some models only) 6 7 3.
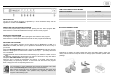
TABLE FOR CERTIFICATION BODIES SWITCHING OFF The end of the washing program is signalled by a short intermittent beep and the appearance of “P0” on the DISPLAY. ANNULLING THE PROGRAM IN PROGRESS To annul the program being carried out, after opening the door select program "P0". When the door is closed the dishwasher will skip to the end of the program.
TABLE OF PROGRAMS SETTING THE WASHING PROGRAM AND SWITCHING ON To select the most suitable program for the dishes to be washed refer to the table below, which indicates the most appropriate program according to dish type and degree of soiling.
User instructions DISABLING THE ACOUSTIC DEVICE AND ADJUSTING THE FILLING SYSTEM The dishwasher’s electronic control system allows you to: Disable the acoustic device which confirms all dishwasher programming and operating steps; • Adapt the dishwasher’s water filling system to the mains water pressure.
User instructions It is possible to place a cutlery basket inside the basket selected for the HALF LOAD program; the other basket must remain empty. WARNING: do not load dishes and cutlery into the non-selected basket, because the water spray will only reach the selected basket. TO SAVE ON ENERGY! … AND PROTECT THE ENVIRONMENT Always try to run the dishwasher fully loaded. • Do not wash the dishes in running water. • Use the washing program that is most appropriate for each type of load.
User instructions MOVING THE FACING PANEL To lower the facing panel and reveal the FRONT DISPLAY, proceed as follows: Make sure that the door is closed; • Push the facing panel down until the whole of the display is visible. To return the facing panel • to the normal position, push it back up.
User instructions 4. Operating instructions Once the dishwasher has been correctly installed, prepare for use as follows: Adjust the water softening system; • Add the regenerating salt; • Add the rinse aid and detergent. • 4.1 Using the water softening system The amount of scale contained in the water (water hardness index) can cause whitish staining on the dry dishes, which tend to become dull over time.
User instructions ELECTRONIC SETTING The value entered for this parameter establishes whether or not regeneration is to be carried out at the end of the washing cycle, on the basis of the table below.
User instructions WATER HARDNESS TABLE WATER HARDNESS German Degrees (°dH) French Degrees (°dF) 0510 23 30 36 - 4 9 22 29 35 41 0-7 8 - 15 16 - 37 38 - 50 51 - 60 61 - 70 SETTING Setting N. 1 NO SALT Setting N. 1 Setting N. 2 Setting N. 3 Setting N. 4 Setting N. 5 Contact your local water board for information on the hardness of your water supply. 4.
User instructions • • The amount of rinse aid must be increased if the washed dishes appear dull or feature circular stains. If, on the other hand, the dishes are sticky or have white streaks, it is necessary to reduce the rinse aid setting. ADDING THE DETERGENT To open the detergent dispenser cap, lightly press the button P. Add the detergent and close the cap carefully. During the washing cycle, the dispenser will be opened automatically.
User instructions • Also available are tablet detergents which state that that no salt or rinse aid is required. In some cases, these detergents might not give good results, especially with short and/or lowtemperature washing cycles. If performance problems (e.g. a white coating on the tank or dishes, poor drying, dirt on dishes at the end of the wash) are noted, users are advised to return to conventional products (granular salt, powder detergent and liquid rinse aid).
User instructions 4.3 General warnings and recommendations Before using the dishwasher for the first time, it is advisable to read the following recommendations concerning dish types to be washed and their loading. There are generally no constraints on the washing of domestic dishes, but in certain cases it is necessary to take their characteristics into account. Before loading the dishes into the baskets it is necessary to: remove coarse food remains: e.g. bones, fish-bones, etc.
User instructions 4.4 Using the baskets The dishwasher has a capacity of 12 place-settings, including serving dishes. LOWER BASKET The lower basket receives the full force of the lower spray arm, and should therefore be used for the “toughest” items with a heavier degree of soiling. All types and combinations of loads are permitted, provided that the dishes, pots and pans are arranged with all the soiled surfaces exposed to the water jets coming from the bottom.
User instructions CUTLERY BASKET This varies in shape according to the model and features either a single compartment or separate compartments. The cutlery should be arranged in an orderly manner inside the basket, with the handles pointing downwards. Take care during loading to avoid injury from the knife blades. The basket is suitable for all types of cutlery, except those long enough to interfere with the upper spray arm.
User instructions ADJUSTING THE UPPER BASKET The upper basket can be adjusted in two positions, according to the user’s needs and according to the height of the dishes in the lower basket. Proceed as follows Pull-out version: pull out the right-hand basket guide; • remove the stop, first releasing it as shown in the diagram; • push the guide to free the wheels; • fit the upper or lower pair of wheels into the guide, depending on the setting required; • return the stop to its original position.
User instructions 5. Cleaning and maintenance Before carrying out any work, always disconnect the appliance from the electrical power supply. 5.1 General warnings and recommendations Avoid the use of acidic or abrasive detergents. Clean the outer surfaces and door-lining of the dishwasher regularly using a soft cloth moistened with water or with a normal detergent suitable for painted surfaces. Clean the door gaskets with a damp sponge.
User instructions CLEANING THE FILTER UNIT It is advisable to periodically inspect the centre filter C and, if necessary, to clean it. To remove • the filter, grip the tabs, turn them anticlockwise and lift upwards; push the centre filter D from the underside to remove it from the micro-filter: • separate the two parts which make up the plastic filter by pressing the body of the filter in the • zone shown by the arrows; remove the centre filter by lifting it upwards.
User instructions TROUBLESHOOTING MINOR PROBLEMS In some cases it is possible to remedy minor problems by referring to the following instructions: If the program fails to start, check that: • • • • the dishwasher is connected to the electrical power supply; there is no power failure; the water tap is open; the dishwasher door is properly closed.
User instructions 6. Troubleshooting The dishwasher is equipped with a self-diagnostics system that is capable of detecting and signalling a number of possible faults. TABLE OF FAULTS DETECTED BY THE SELF-DIAGNOSTICS SYSTEM FAULT E1 E2 - E9 E3 E4 E5 E6 E7 E8 DESCRIPTION The anti-flooding system (where present) has been tripped. The water level limitation system has tripped. The appliance cannot heat the water. The temperature sensor is disconnected. The appliance cannot take in the water.
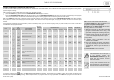
2 1 1 820 - 870 567 min. 567 598 60 2 52 0 75 - 165 130 60 1 90 3 Solo su alcuni modelli Certain models only Seulement sur certains modèles nur bei einige Modellen Sólo en algunos modelos alleen indien van toepassing 4 816-870 3 2 820870 4 6 5 min. 0,5 m max. 1,10 m 1/2” S N SF 3x16 3/4” 0,3-10 bar 0,3-10 bar 7 1,25 m 1,50 m 1,78 m 1,66 m min. 0,4 m 1,14 m 1,23 m 6 min. 0,00 m min.
7 8 LATO SUPERIORE BORD SUPERIEURE UPPER EDGE OBERKANTE SUPERFICIE INTERNA SURFACE INTERNE INNER SURFACE INNENFLACHE 9 8 10 9 Solo su alcuni modelli - Certain models only Seulement sur certains modèles - nur bei einige Modellen Sólo en algunos modelos - alleen indien van toepassing 11 12 10 Regolazione vite tensione molle (11) - Copertura foto con tappo in dotazione (12) Door spring Adjustement device (11) - Covering of hole using cap provided (12) Réglage des ressorts de la porte (11) - Couvertur