GEBRAUCHSANWEISUNG GESCHIRRSPÜLER
Inhaltsverzeichnis 1. Hinweise zur Sicherheit und zum Gebrauch __________________ 70 2. Installation und Inbetriebnahme ___________________________ 72 2.1 Anschluss ans Wassernetz ___________________________________________________ 72 2.2 Elektrischer Anschluss_______________________________________________________ 73 3. Beschreibung der Bedieneinrichtungen _____________________ 74 3.1 Die Bedienblende___________________________________________________________ 74 3.
Hinweise 1. Hinweise zur Sicherheit und zum Gebrauch DIESES HANDBUCH IST INTEGRALER BESTANDTEIL DES GERÄTS: ES MUSS STETS IN EINEM UNVERSEHRTEN ZUSTAND BEIM GERÄT AUFBEWAHRT WERDEN. VOR DEM GEBRAUCH DES GERÄTS SOLLTEN ALLE IN DIESEM HANDBUCH ENTHALTENEN INFORMATIONEN AUFMERKSAM GELESEN WERDEN. DIE INSTALLATION MUSS VOM FACHMANN IN EINKLANG MIT DEN GELTENDEN BESTIMMUNGEN AUSGEFÜHRT WERDEN.
Hinweise DAS GERÄT NICHT IN BETRIEB NEHMEN, WENN ES BEIM TRANSPORT BESCHÄDIGT WURDE. IM ZWEIFELSFALL DEN HÄNDLER ZU RATE ZIEHEN. DAS GERÄT MUSS NACH DEN ANWEISUNGEN DES HERSTELLERS ODER VON FACHPERSONAL INSTALLIERT UND ANGESCHLOSSEN WERDEN. DAS GERÄT IST FÜR DEN GEBRAUCH DURCH ERWACHSENE PERSONEN BESTIMMT. HALTEN SIE KINDER FERN UND ERLAUBEN SIE IHNEN NICHT, DAS GERÄT ALS SPIELZEUG ZU VERWENDEN. DIE REINIGUNGSMITTEL AUSSER DER REICHWEITE VON KINDERN AUFBEWAHREN.
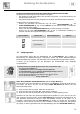
Anleitung für den Installateur 2. Installation und Inbetriebnahme Die Polystyrolteile zum Blockieren der Geschirrkörbe herausnehmen. Das Gerät am vorgesehenen Ort aufstellen. Der Geschirrspüler kann seitlich neben oder mit dem Rücken gegen Möbel oder Wände angeordnet werden. Wenn der Geschirrspüler neben einer Wärmequelle aufgestellt wird, muss eine Tafel aus wärmedämmendem Material zwischen Geschirrspüler und Wärmequelle angeordnet werden, um eine Überhitzung und Betriebsstörungen zu verhindern.
Anleitung für den Installateur ANSCHLUSS DES ABLAUFSCHLAUCHS Den Ablaufschlauch an ein Ablaufrohr mit einem Mindestdurchmesser von 4 cm anschließen; alternativ kann der Ablaufschlauch mit dem mitgelieferten Schlauchkrümmer an einem Spülbecken befestigt werden. Hierbei ist jedoch darauf zu achten, dass er nicht gequetscht oder zu stark gekrümmt wird. Man muss unbedingt darauf achten, dass sich der Schlauch nicht lösen und herabfallen kann.
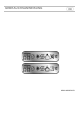
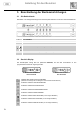
Anleitung für den Benutzer 3. Beschreibung der Bedieneinrichtungen 3.1 Die Bedienblende Alle Bedien- und Anzeigeeinrichtungen des Geschirrspülers befinden sich auf der oberen Bedienblende. 1 2 3 4 TASTE EIN/AUS TASTE PROGRAMMWAHL TASTE STARTVERZÖGERUNG TASTE SPARPROGRAMME TASTE OHNE TROCKNEN (nur bei einigen Modellen) 5 TASTE ÖKO-TROCKNEN (nur bei einigen Modellen) 6 7 3.
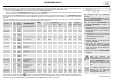
TABELLE FÜR PRÜFSTELLEN PROGRAMMENDE Das Programmende wird durch einen kurzen, in Abständen erfolgenden Signalton und das Erscheinen der Anzeige "P0" auf dem INFO-DISPLAY signalisiert. LÖSCHEN DES LAUFENDEN PROGRAMMS Um das laufende Programm zu löschen, muss nach dem Öffnen der Tür das Programm "P0" gewählt werden. Bei Schließen der Tür beendet der Geschirrspüler das Programm vorzeitig.
PROGRAMMTABELLE EINSTELLEN DES SPÜLPROGRAMMS UND EINSCHALTUNG Zur Wahl des am besten für das zu spülende Geschirr geeigneten Spülprogramms die nachstehende Tabelle zu Rate ziehen, in der die Art von Geschirr und der Verschmutzungsgrad berücksichtigt werden.
Anleitung für den Benutzer AUSSCHALTEN DES SIGNALTONS UND REGULIERUNG DES ZULAUFSYSTEMS Die elektronische Steuerung des Geschirrspülers ermöglicht: das akustische Signal abzuschalten, dass bei allen Programmier- und Funktionsschritten des • Geschirrspülers zu hören ist; das Wasserzulaufsystem des Geschirrspülers an den Druck des Wassernetzes anzupassen.
Anleitung für den Benutzer In den für die Funktion HALBE BELADUNG gewählten Geschirrkorb kann man einen Besteckkorb anordnen; der nicht gewählte Geschirrkorb muss hingegen leer gelassen werden. ACHTUNG: es hat keinen Zweck, Geschirr und Besteck in den nicht gewählten Geschirrkorb zu laden, da der Wasserstrahl nur den gewählten Geschirrkorb erreicht. SO KÖNNEN SIE ENERGIE SPAREN! … UND UMWELTBEWUSST HANDELN Verwenden Sie nach Möglichkeit den Geschirrspüler erst, wenn er voll beladen ist.
Anleitung für den Benutzer VERSCHIEBEN DER BEDIENBLENDE Gehen Sie folgendermaßen vor, um die Bedienblende abzusenken, damit das FRONTDISPLAY sichtbar wird: vergewissern Sie sich, dass die Tür geschlossen ist; • drücken Sie die Bedienblende nach unten bis das Display vollständig sichtbar ist. Führen • Sie die vorstehend genannten Schritte in entgegengesetzter Reihenfolge durch, um die Bedienblende wieder in die Normalposition zurückzubewegen.
Anleitung für den Benutzer 4. Gebrauchsanleitung Nach der ordnungsgemäßen Installation des Geschirrspülers für die Inbetriebnahme wie folgt vorgehen: Den Wasserenthärter einstellen; • Regeneriersalz einfüllen; • Klarspüler und Reiniger einfüllen. • 4.1 Gebrauch des Wasserenthärters Der im Wasser enthaltene Kalk (Wasserhärte) ist verantwortlich für weißliche Flecken auf dem trockenen Geschirr, das mit der Zeit matt zu werden neigt.
Anleitung für den Benutzer ELEKTRONISCHE EINSTELLUNG Der hierfür eingestellte Wert bestimmt, anhand folgender Tabelle, ob die Regenerierung am Ende des Spülprogramms erfolgt oder nicht.
Anleitung für den Benutzer WASSERHÄRTE-TABELLE WASSERHÄRTE Grad Deutsche Härte (°dH) Grad Französische Härte (°dF) 0510 23 30 36 - 4 9 22 29 35 41 0-7 8 - 15 16 - 37 38 - 50 51 - 60 61 - 70 EINSTELLUNG Position Nr. 1 KEIN SALZ Position Nr. 1 Position Nr. 2 Position Nr. 3 Position Nr. 4 Position Nr. 5 Die örtliche Wasserhärte beim Wasserversorgungsunternehmen erfragen. 4.
Anleitung für den Benutzer • • Die Klarspüler-Dosiermenge muss erhöht werden, wenn das gespülte Geschirr matt ist oder kreisrunde Flecken aufweist. Wenn das Geschirr hingegen klebrig ist oder weiße Streifen aufweist, muss die Dosiermenge reduziert werden. EINFÜLLEN DES REINIGERS Zum Öffnen der Reiniger-Verteilerkammer leicht auf die Taste P drücken. Den Reiniger einfüllen und den Deckel sorgfältig wieder schließen. Die Verteilerkammer öffnet sich während des Reinigens automatisch.
Anleitung für den Benutzer • Der Markt bietet zudem Reiniger in Tablettenform, die erklärterweise die Verwendung von Spülsalz oder Klarspülmittel überflüssig machen. Mit dieser Art Reiniger könnte in einigen Fällen nicht die gewünschte Wirkung erzielt werden, insbesondere, wenn sie für kurze Spülzyklen und/oder bei niedrigen Spültemperaturen eingesetzt werden. Sind Probleme in der Wirkung zu verzeichnen (z.B.
Anleitung für den Benutzer 4.3 Sicherheitshinweise und allgemeine Ratschläge Bevor man den Geschirrspüler zum ersten Mal benutzt, sollte man die nachstehenden Empfehlungen in Hinblick auf die Art des zu spülenden Geschirrs und dessen Anordnung lesen. Im Allgemeinen gibt es keine Einschränkungen bezüglich des Spülens von Haushaltsgeschirrs, doch in einigen Fällen sollten seine Eigenschaften berücksichtigt werden. Bevor man das Geschirr in den Körben anordnet, muss man: grobe Speisereste (z.B.
Anleitung für den Benutzer 4.4 Gebrauch der Geschirrkörbe Der Geschirrspüler hat ein Fassungsvermögen von 12 Maßgedecken einschließlich des Serviergeschirrs. UNTERKORB Der Unterkorb ist aufgrund der besonders intensiven Reinigungswirkung des unteren Sprüharms für das "schwierigste" und am stärksten verschmutzte Geschirr geeignet.
Anleitung für den Benutzer BESTECKKORB Er kann je nach Modell eine unterschiedliche Form und nur ein oder mehrere Fächer haben. Das Besteck muss gleichmäßig verteilt mit dem Griff nach unten im Besteckkorb angeordnet werden. Hierbei darauf achten, sich nicht an den Schneiden der Messer zu verletzen. Im Besteckkorb können alle Arten von Besteck angeordnet werden, mit Ausnahme von sehr langem Besteck, das den oberen Sprüharm blockieren könnte.
Anleitung für den Benutzer EINSTELLEN DES OBERKORBS Der Oberkorb kann je nach Bedarf und in Abhängigkeit von der Höhe des Geschirrs im Unterkorb in zwei verschiedenen Positionen verwendet werden.
Anleitung für den Benutzer 5. Reinigung und Pflege Vor jedem Eingriff muss das Gerät vom Stromnetz getrennt werden. 5.1 Sicherheitshinweise und allgemeine Ratschläge Keinesfalls Reinigungsmittel verwenden, die Scheuermittel oder Säure enthalten. Die Außenflächen und die Tür des Geschirrspülers müssen in regelmäßigen Zeitabständen mit einem weichen Tuch, das etwas mit Wasser oder einem handelsüblichen Reiniger für lackierte Oberflächen befeuchtet ist, gereinigt werden.
Anleitung für den Benutzer REINIGUNG DER FILTERGRUPPE Der mittlere Filter C sollte regelmäßig kontrolliert und gegebenenfalls gereinigt werden. Zum • Herausnehmen muss man die Zungen greifen, entgegen dem Uhrzeigersinn drehen und anheben. Von unten gegen den mittleren Filter D drücken, um ihn aus dem Mikrofilter zu lösen. • Die beiden Teile, aus denen der Kunststofffilter besteht, voneinander trennen; hierzu an der • von den Pfeilen angegebenen Stelle auf den Filterkõrper drücken.
Anleitung für den Benutzer SO BEHEBEN SIE KLEINE STÖRUNGEN In einigen Fällen kann man anhand der nachstehenden Hinweise bei geringfügigen Störungen selbst Abhilfe schaffen: Wenn das Programm nicht startet, sicherstellen, dass: • • • • der Geschirrspüler ans Stromnetz angeschlossen ist; kein Stromausfall vorliegt; der Wasserhahn geöffnet ist; die Gerätetür richtig geschlossen ist.
Anleitung für den Benutzer 6. Abhilfe bei Fehlfunktionen Der Geschirrspüler verfügt über ein Eigendiagnosesystem, dass eine Reihe von möglichen Fehlfunktionen erkennen und signalisieren kann. TABELLE DER VOM EIGENDIAGNOSESYSTEM ERKANNTEN FEHLFUNKTIONEN FEHLFUNKTION E1 E2 - E9 E3 E4 E5 E6 E7 E8 BESCHREIBUNG Eingriff des Überlaufschutz-Systems (wenn vorhanden). Eingriff des Systems, das den Wasserstand in dem Geschirrspüler begrenzt. Die Maschine wärmt des Wasser nicht. Temperatursonde nicht verbunden.
2 1 1 820 - 870 567 min. 567 598 60 2 52 0 75 - 165 130 60 1 90 3 Solo su alcuni modelli Certain models only Seulement sur certains modèles nur bei einige Modellen Sólo en algunos modelos alleen indien van toepassing 4 816-870 3 2 820870 4 6 5 min. 0,5 m max. 1,10 m 1/2” S N SF 3x16 3/4” 0,3-10 bar 0,3-10 bar 7 1,25 m 1,50 m 1,78 m 1,66 m min. 0,4 m 1,14 m 1,23 m 6 min. 0,00 m min.
7 8 LATO SUPERIORE BORD SUPERIEURE UPPER EDGE OBERKANTE SUPERFICIE INTERNA SURFACE INTERNE INNER SURFACE INNENFLACHE 9 8 10 9 Solo su alcuni modelli - Certain models only Seulement sur certains modèles - nur bei einige Modellen Sólo en algunos modelos - alleen indien van toepassing 11 12 10 Regolazione vite tensione molle (11) - Copertura foto con tappo in dotazione (12) Door spring Adjustement device (11) - Covering of hole using cap provided (12) Réglage des ressorts de la porte (11) - Couvertur