Contents 1.1 1.2 1.3 1.4 1.5 1.6 1.7 General safety instructions Identification plate Manufacturer liability Appliance purpose Disposal This user manual How to read the user manual 2 Description 2.1 2.2 2.3 2.4 2.5 General Description Cooking hob Control panel Other parts Available accessories 3 Use 3.1 3.2 3.3 3.4 3.5 3.6 3.7 3.8 3.9 Instructions Cleaning the appliance Removing the door Cleaning the door glazing Cleaning the inside of the oven Extraordinary maintenance 5 Installation 5.1 5.2 5.3 5.
Instructions 1 Instructions 1.1 General safety instructions Risk of personal injury • During use the appliance and its accessible parts become very hot. • Never touch the heating elements during use. • Keep children under eight years of age at a safe distance if they are not constantly supervised. • Children must never play with the appliance.
• Use wooden or plastic utensils. • Do not seat on the appliance. • Do not use steam jets for cleaning the appliance. • Do not obstruct ventilation openings and heat dispersal slots. • Never leave the appliance unattended during cooking operations where fats or oils could be released. • Never leave objects on the cooking surface. • Do not use the appliance to heat rooms for any reason. • Remove any food residues or large spills from previous cooking operations from the inside of the oven. 1.
Instructions • Consign the appliance to the appropriate selective collection centres for electrical and electronic equipment waste, or deliver it back to the retailer when purchasing an equivalent product, on a one for one basis. Our appliances are packed in nonpolluting and recyclable materials. • Consign the packing materials to the appropriate selective collection centres. Plastic packaging Danger of suffocation • Do not leave the packaging or any part of it unattended.
Description EN 2 Description 2.1 General Description 1 Cooking hob 2 Control panel 3 Oven light 4 Seal 5 Door 6 Fan 7 Storage compartment Rack/tray support frame shelf 2.
Description 2.3 Control panel 1 Temperature knob This knob allows you to select the cooking temperature. Turn the knob clockwise to the required value, between the minimum and maximum setting. 2 Indicator light The indicator light comes on to indicate that the oven is heating up. It turns off as soon as it reaches the set temperature. It flashes regularly to indicate that the temperature set inside the oven is kept constant.
Description Rotisserie support EN Reduction pan stand Useful when using small cookware. Rack To be used to support the rotisserie rod. Rotisserie handle Useful for supporting containers with food during cooking. Oven tray Useful for collecting fat from foods placed on the rack above. Useful for taking the rotisserie rod out of the oven. The accessories intended to come into contact with food are made of materials that comply with the provisions of current legislation.
Use 3 Use 3.1 Instructions High temperature inside the oven during use Danger of burns • Keep the oven door closed during cooking. • Protect your hands wearing heat resistant gloves when moving food inside the oven. • Do not touch the heating elements inside the oven. • Do not pour water directly onto very hot trays. • Do not allow children younger than 8 years old to come near the appliance when in operation.
Use • Do not spray any spray products near the oven. • Do not use or leave flammable materials near the oven or the storage compartment. • Do not use plastic kitchenware or containers when cooking food. • Do not put sealed tins or containers in the oven. • Do not leave the oven unattended during cooking operations where fats or oils could be released. • Remove all trays and racks which are not required during cooking. 3.
Use • 3. Once you have prepared the rotisserie rod, place it on the rotisserie support. Insert the rod into the hole so that it connects with the rotisserie motor. Make sure that the contoured part is placed correctly on the guide frame and remove the handle. Rotisserie rod 1. Prepare the rotisserie rod with the food using the clip forks provided. 4. To activate the rotisserie, turn the function knob to position 2. Screw on the handle provided so that you can handle the rod with the food on it readily.
Use The reduction pan stands have to be placed on the hob grids. Make sure they are properly placed. Correct positioning of the flamespreader crowns and burner caps EN Reduction pan stands Before lighting the hob burners, make sure that the flame-spreader crowns are correctly positioned in their housings with their respective burner caps. Make sure that the holes in the flame-spreader crowns are aligned with the igniters and thermocouples (A). 3.
Use 3.5 Using the oven Switching on the oven To switch on the oven: 1. Select the cooking function using the function knob. 2. Select the temperature using the temperature knob. 3.6 Functions list Static As the heat comes from above and below at the same time, this system is particularly suitable for certain types of food. Traditional cooking, also known as static cooking, is suitable for cooking just one dish at a time.
Fan + circulaire The combination of the fan and the circulaire heating element (incorporated in the rear of the oven) allows you to cook different foods on several levels, as long as they need the same temperatures and same type of cooking. Hot air circulation ensures instant and even distribution of heat. It will be possible, for instance, to cook fish, vegetables and biscuits simultaneously (on different levels) without odours and flavours mingling.
Use Advice for cooking desserts/pastries and biscuits • Use dark metal moulds: they help to absorb the heat better. • The temperature and the cooking time depend on the quality and consistency of the dough. • To check whether the dessert is cooked right through: at the end of the cooking time, put a toothpick into the highest point of the dessert. If the dough does not stick to the toothpick, the dessert is cooked.
Setting the time If the time is not set, the oven will not switch on. On the first use, or after a power failure, the digits will be flashing on the appliance's display. 1. Press the and keys at the same time. The dot between the hours and the minutes flashes. 2. The time can be set using or . Keep the key pressed in to increase or decrease rapidly. 3. Press the key or wait 5 seconds. The dot between the hours and the minutes stops flashing. 4.
Use 3. Use the or key to set the required minutes. 4. Wait approx. 5 seconds without pressing any key in order for the function to activate. The current time and the symbols and will appear on the display. 5. At the end of cooking the heating elements will be deactivated. On the display, symbol turns off, symbol flashes and the buzzer sounds. 6. To turn off the buzzer just press any key of the programmer clock. 7. Press keys and at the same time to reset the programmer clock.
Use EN Cooking information table Temperature Static Static Runner position from the bottom 1 1 220 - 230 220 - 230 45 - 50 45 - 50 2 2 1.5 1 1.5 3 2-3 1.2 Turbo Turbo Fan with grill Turbo Circulaire Turbo Turbo Turbo 2 2 4 2 2 2 2 2 180 - 190 180 - 190 260 200 180 - 190 180 - 190 180 - 190 180 - 190 90 - 100 70 - 80 15 40 - 45 70 - 80 110 - 120 170 - 180 65 - 70 Pork chops Spare ribs Bacon Pork fillet Beef fillet 1.5 1.5 0.7 1.
Cleaning and maintenance 4 Cleaning and maintenance 4.1 Instructions Improper use Risk of damage to surfaces • Do not use steam jets for cleaning the appliance. • Do not use cleaning products containing chlorine, ammonia or bleach on steel parts or parts with metallic finishes on the surface (e.g. anodizing, nickel- or chromium-plating). • Do not use abrasive or corrosive detergents on glass parts (e.g. powder products, stain removers and metallic sponges).
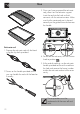
Igniters and thermocouples For correct operation the igniters and thermocouples must always be perfectly clean. Check them frequently and clean them with a damp cloth if necessary. Remove any dry residues with a wooden toothpick or a needle. 4.3 Removing the door 2. Grasp the door on both sides with both hands, lift it forming an angle of around 30° and remove it. 3.
Cleaning and maintenance 4.4 Cleaning the door glazing The glass in the door should always be kept thoroughly clean. Use absorbent kitchen roll. In case of stubborn dirt, wash with a damp sponge and an ordinary detergent. We recommend the use of cleaning products distributed by the manufacturer. 4.5 Cleaning the inside of the oven For the best oven upkeep, clean it regularly after having allowed it to cool. Take out all removable parts. 4.
5 Installation 5.1 Gas connection Gas leak Danger of explosion • After carrying out any operation, check that the tightening torque of gas connections is between 10 Nm and 15 Nm. • If required, use a pressure regulator that complies with current regulations. • At the end of the installation, check for any leaks with a soapy solution, never with a flame.
Installation 5 that is compliant with the standard in force. Connection with a flexible steel hose with bayonet fitting Carry out the connection to the gas mains using a flexible steel hose with bayonet fitting compliant with B.S. 669. Apply insulating material to the thread of the gas hose connector 4 and then tighten the adapter 3. Screw the assembly to the movable connector 1 of the appliance, placing the supplied seal 2 between them.
The room must be kept adequately ventilated in order to eliminate the heat and humidity produced by cooking: in particular, after prolonged use, you are recommended to open a window or to increase the speed of any fans. Extraction of the combustion products Connection to LPG Use a pressure regulator and make the connection on the gas cylinder following the guidelines set out in the standards in force.
Installation Air Combustion products Extractor fan 5.2 Adaptation to different types of gas Refit the knob and verify that the burner flame is stable. Turn the knob rapidly from the maximum to the minimum setting: the flame should not go out. Repeat the operation on all gas taps. In case of operation with other types of gas, the burner nozzles must be changed and the minimum flame adjusted on the gas taps. Replacing nozzles 1.
Installation Natural Gas G20 Rated heating capacity (kW) Nozzle diameter (1/100 mm) Pre-chamber (printed on nozzle) Reduced capacity (W) LPG G30/31 Rated heating capacity (kW) Nozzle diameter (1/100 mm) Pre-chamber (printed on nozzle) Reduced capacity (W) Rated capacity G30 (g/h) Rated capacity G31 (g/h) 5.3 Electrical connection Power voltage Danger of electrocution • Have the electrical connection performed by authorised technical personnel. • Use personal protective equipment.
Installation Fixed connection General information Fit the power line with an omnipolar circuit breaker in compliance with installation regulations. The circuit breaker should be located near the appliance and in an easily reachable position. This appliance may be installed next to walls, one of which must be higher than the worktop, at a minimum distance of 50 mm from the side of the appliance, as shown in figures A and C relative to the installation classes.
Assembling the skirt The skirt provided is an integral part of the product; it must be fastened to the appliance prior to installation. B - Class 2 subclass 1 The skirt must always be positioned and secured correctly on the appliance. 1. Unscrew the 2 nuts (B) on the back of the worktop. 2. Position the skirt above the worktop, taking care to align the pins (C ) with the holes (D). 3. Secure the skirt to the worktop by tightening screws (A).
Installation Positioning and levelling the appliance Heavy appliance Risk of damages to the appliance • Insert the front feet first and then the rear ones. After making the electrical and/or gas connections, level the appliance on the floor by means of its four adjustable feet. The appliance must be properly levelled to ensure better stability. Screw or unscrew the bottom part of the foot until the appliance is stable and level on the floor.