SW ...
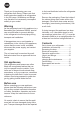
GB to the local distributor before the refrigerator is put to use. Thank you for purchasing your new refrigerator from Smeg. Please note that these instructions apply to all refrigerators in the SW range. Illustrations and fittings may therefore not necessarily correspond exactly to your model. Remove the packaging. Clean the inside of the cabinet using warm water with a mild detergent. Rinse with clean water and dry thoroughly (see cleaning instructions). Use a soft cloth.
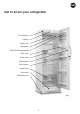
GB Get to know your refrigerator Control panel Lighting Bottle rack Nameplate Shelf with storage boxes Door shelf Glass shelf Sealing strip Door handle Crisper bins Kick plate Adjustable feet fig.
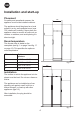
GB Installation and start-up Placement 600 600 For safety and operational reasons, the appliance must not be installed outdoors. 600 600 The appliance should be placed on a level surface in a dry, well ventilated room (max. 75% relative air humidity). Never place the appliance close to sources of heat such as cookers or radiators, and avoid placing it in direct sunlight. Room temperature The climate class is stated on the nameplate (see fig. 1 on page 3 and fig. 17 on page 13).
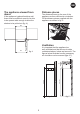
GB The appliance viewed from above Distance pieces The distance pieces on the rear of the appliance ensure sufficient air circulation. Fit the distance pieces supplied with the appliance as shown in fig. 5. If the appliance is placed beside a wall, there must be sufficient room for its door to be opened wide enough to allow the shelves to be pulled out (fig. 4). 600 fig. 5 Ventilation fig.
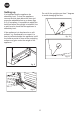
GB Setting up Do not tilt the upright more than 7 degrees to avoid damaging the floor. It is important that the appliance be absolutely level. To level the appliance, remove the kick plate below the door and screw the adjustable feet up or down (figs 8-9). If necessary, it is possible to adjust the back feet before the upright is installed. Use a spirit level to check that the appliance is absolutely level. >7º If the appliance is to be placed on a soft surface, e.g.
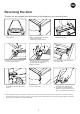
GB Reversing the door The door can be changed from right-hinged to left-hinged and vice versa as follows: 1. Lay the appliance on its back with the door uppermost. 2. Remove the upper hinge. 3. Move the plastic plugs to where the upper hinge was fitted. 4. Lift off the door and lay it aside. 5. Remove the kick plate by pulling it outwards and upwards. 6. Loosen lock nut with the fork wrench enclosed and move the pin. 7. Remove the lower hinge.
GB Electrical connection The appliance is intended for connection to alternating current. The required voltage (V) and frequency (Hz) are stated on the nameplate inside the appliance. Power must be connected via an independent wall socket outlet. Technical data This appliance complies with CE marking regulations, directives and standards. Low Voltage Directive 73/23/EEC. EMC Directive 89/336/EEC.
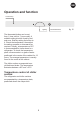
GB Operation and function Control lamp 7 0 1 6 2 5 Lighting The thermostat button can be set from 1 (less cold) to 7 (more cold). A suitable setting must be found by trial and error. Start by setting the button to 4. Check the temperature, then adjust the setting upwards or downwards as required. Usually, a temperature of 5°C is recommended for items stored in a refrigerator. To check the temperature, place a thermometer in a glass of water positioned in the centre of the cabinet for 12 hours.
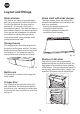
GB Layout and fittings Glass shelves Glass shelf with slide damper The shelves are made of tempered glass and can be repositioned within the cabinet. To move the shelves, the door must be opened 90°. To remove a shelf, pull it forwards and lower it. The shelf can then be removed and placed in the desired position. From the top and downwards, the shelves are suitable for storing bakery products, ready-made meals, dairy products, meat products and sliced meat.
GB Defrosting, cleaning and maintenance Automatic defrosting Stainless steel or aluminium doors are best cleaned using a care spray and soft cloth. Various suitable products are available from most household appliance distributors. The refrigerator is defrosted automatically. Defrost water runs through a pipe and is collected in a tray above the compressor where the heat generated by the compressor causes it to evaporate. The defrost water tray should be cleaned at intervals.
GB Fault finding Fault Possible cause Remedy No control lamps are lit. The appliance is switched off. Press the on/off switch. Power failure; the fuse is blown; the appliance is not plugged in correctly. Check that power is connected. Reset the fuse. Water collects on the glass shelves. Items of food at the back of the shelves are in contact with the rear wall of the cabinet, thus causing condensation to run onto the shelf. Move the rearmost items forwards.
GB Spare parts and service Spare parts When ordering spare parts, please state the type, serial and production numbers of your appliance (see fig. 1 on page 3 and fig. 17). This information is given on the nameplate on the rear of the appliance. The nameplate contains various technical information, including type and serial numbers.
GB Disposal Environmental regulations on disposal must also be observed. When disposing of the appliance you should contact your local authority technical department who will inform you of how collection and recycling of such units take place in your area. This appliance is marked according to the European directive 2002/96/EC on Waste Electrical and Electronic Equipment (WEEE).