User Manual Istruzioni per l’uso Fridge Freezer UKC3170P Frigo-Con‐ gelatore
CONTENTS Safety information Safety instructions Operation First use Daily use 2 3 5 5 5 Hints and tips Care and cleaning Troubleshooting Installation Technical information 6 8 9 11 16 Subject to change without notice. SAFETY INFORMATION Before the installation and use of the appliance, carefully read the supplied instructions. The manufacturer is not responsible if an incorrect installation and use causes injuries and damages. Always keep the instructions with the appliance for future reference.
• • • • • • • Do not use mechanical devices or other means to accelerate the defrosting process, other than those recommended by the manufacturer. Do not damage the refrigerant circuit. Do not use electrical appliances inside the food storage compartments of the appliance, unless they are of the type recommended by the manufacturer. Do not use water spray and steam to clean the appliance. Clean the appliance with a moist soft cloth. Only use neutral detergents.
electrician to change the electrical components. • The mains cable must stay below the level of the mains plug. • Connect the mains plug to the mains socket only at the end of the installation. Make sure that there is access to the mains plug after the installation. • Do not pull the mains cable to disconnect the appliance. Always pull the mains plug. Use WARNING! Risk of injury, burns, electrical shock or fire. • Do not change the specification of this appliance. • Do not put electrical appliances (e.
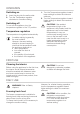
OPERATION Switching on 1. Insert the plug into the wall socket. 2. Turn the Temperature regulator clockwise to a medium setting. Switching off To turn off the appliance, turn the temperature regulator to the "O" position. Temperature regulation The temperature is regulated automatically. A medium setting is generally the most suitable.
Storage of frozen food When first starting-up or after a period out of use, before putting the products in the compartment let the appliance run at least 2 hours on the higher settings. In the event of accidental defrosting, for example due to a power failure, if the power has been off for longer than the value shown in the technical characteristics chart under "rising time", the defrosted food must be consumed quickly or cooked immediately and then re-frozen (after cooling).
• A whirring and pulsating sound from the compressor when refrigerant is pumped. • A sudden cracking noise from inside appliance caused by thermic dilatation (a natural and not dangerous physical phenomenon). • A faint click noise from the temperature regulator when the compressor switches on or off. Hints for energy saving • Do not open the door frequently or leave it open longer than absolutely necessary.
CARE AND CLEANING WARNING! Refer to Safety chapters. General warnings CAUTION! Unplug the appliance before carrying out any maintenance operation. This appliance contains hydrocarbons in its cooling unit; maintenance and recharging must therefore only be carried out by authorized technicians. every time the motor compressor stops, during normal use. The defrost water drains out through a trough into a special container at the back of the appliance, over the motor compressor, where it evaporates.
Defrost the freezer when the frost layer reaches a thickness of about 3-5 mm. 1. Switch off the appliance, or pull out electrical plug from the wall socket. 2. Remove any stored food, wrap it in several layers of newspaper and put it in a cool place. WARNING! Do not touch frozen goods with wet hands. Hands can freeze to the goods. 3. Leave the door open. In order to speed up the defrosting process, place a pot of warm water in the freezer compartment.
Problem There is too much frost and ice. Water flows into the refrigerator. The temperature in the appliance is too low/too high. Possible cause Solution Many food products to be frozen were put in at the same time. Wait some hours and then check the temperature again. The room temperature is too high. Refer to climate class chart on the rating plate. Food products placed in the appliance were too warm. Allow food products to cool to room temperature before storing.
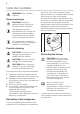
Problem Possible cause Solution There is no cold air circulation in the appliance. Make sure that there is cold air circulation in the appliance. If the advice does not lead to the desired result, call the nearest Authorized Service Centre. Replacing the lamp CAUTION! Disconnect the plug from the mains socket. 1. At the same time, with the fingers expand up and down the transparent cover and unhook it in the direction of the arrows. 1 2.
Some functional problems might occur for some types of models when operating outside of that range. The correct operation can only be guaranteed within the specified temperature range. If you have any doubts regarding where to install the appliance, please turn to the vendor, to our customer service or to the nearest Authorised Service Centre. Electrical Connection CAUTION! Any electrical work required to install this appliance should be carried out by a qualified electrician or competent person.
CAUTION! Refer to the assembly instructions for the installation. Door reversibility 1. Loosen and remove the upper pin and the spacer. 2. Remove the upper door. 3. Loosen the middle hinge. 9. Install the door. 10. Tighten the spacer and the upper pin. Do a final check to make sure that: • All screws are tightened. • The magnetic seal adheres to the cabinet. • The door opens and closes correctly. If the ambient temperature is cold (i.e. in Winter), the gasket may not fit perfectly to the cabinet.
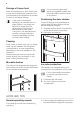
7. Attach the appliance to the niche with 4 screws. 2 I 1 I 4. Push the appliance in the direction of the arrows (2) against the cupboard on the opposite side of the hinge. 5. Adjust the appliance in the niche. Make sure that the distance between the appliance and the cupboard frontedge is 44 mm. The lower hinge cover (in the accessories bag) makes sure that the distance between the appliance and the kitchen furniture is correct.
Ha C D E E Hc B 10. Install the vent grille (B). 11. Attach the hinge covers (E) to the hinge. 12. Connect the appliance laterally to the kitchen furniture sidewall. 13. Disconnect the parts (Ha), (Hb), (Hc) and (Hd). 16. Open the appliance door and the kitchen furniture door at an angle of 90°. 17. Insert the small square (Hb) into guide (Ha). 18. Put together the appliance door and the furniture door and mark the holes. 8 mm Hb Ha Hc Ha Hd Hb 14.
22. Press the part (Hd) on the part (Hb). 8 mm Hb K Ha Hd 20. Place the small square on the guide again and fix it with the screws supplied. 21. Align the kitchen furniture door and the appliance door by adjusting the part (Hb). Do a final check to make sure that: • All screws are tightened. • The sealing strip is attached tightly to the cabinet. • The door opens and closes correctly.
The technical information are situated in the rating plate, on the external or internal side of the appliance and in the energy label. ENVIRONMENT CONCERNS Recycle the materials with the symbol . Put the packaging in applicable containers to recycle it. Help protect the environment and human health and to recycle waste of electrical and electronic appliances. Do not dispose appliances marked with the symbol with the household waste.
INDICE Informazioni per la sicurezza Istruzioni di sicurezza Uso dell'apparecchiatura Primo utilizzo Utilizzo quotidiano 18 19 21 22 22 Consigli e suggerimenti utili Pulizia e cura Risoluzione dei problemi Installazione Dati tecnici 23 24 26 29 34 Con riserva di modifiche. INFORMAZIONI PER LA SICUREZZA Leggere attentamente le istruzioni fornite prima di installare e utilizzare l'apparecchiatura.
• • • • • • • • Verificare che le aperture di ventilazione, sia sull'apparecchiatura che nella struttura da incasso, non siano ostruite. Non usare dispositivi elettrici o altri mezzi artificiali non raccomandati dal produttore allo scopo di accelerare il processo di sbrinamento. Non danneggiare il circuito refrigerante. Non utilizzare apparecchiature elettriche all'interno dei comparti di conservazione degli alimenti, ad eccezione di quelli consigliati dal costruttore.
Collegamento elettrico ATTENZIONE! Rischio di incendio e scossa elettrica. • L'apparecchiatura deve disporre di una messa a terra. • Verificare che i dati elettrici riportati sulla targhetta dei dati corrispondano a quelli dell'impianto. In caso contrario, contattare un elettricista. • Utilizzare sempre una presa elettrica con contatto di protezione correttamente installata. • Non utilizzare prese multiple e prolunghe. • Accertarsi di non danneggiare i componenti elettrici (ad es.
Smaltimento ATTENZIONE! Rischio di lesioni o soffocamento. • Staccare la spina dall'alimentazione elettrica. • Tagliare il cavo di rete e smaltirlo. • Rimuovere la porta per evitare che bambini e animali domestici rimangano chiusi all’interno dell’apparecchiatura. • Il circuito refrigerante e i materiali di isolamento di questa apparecchiatura rispettano l'ozono. • La schiuma isolante contiene gas infiammabili.
PRIMO UTILIZZO Pulizia dell'interno Prima di utilizzare l'apparecchiatura per la prima volta, lavare l'interno e gli accessori con acqua tiepida e sapone neutro per eliminare il tipico odore dei prodotti nuovi, quindi asciugare accuratamente. AVVERTENZA! Non usare detergenti corrosivi o polveri abrasive che possano danneggiare la finitura. UTILIZZO QUOTIDIANO ATTENZIONE! Fare riferimento ai capitoli sulla sicurezza.
Non spostare il ripiano in vetro sopra il cassetto delle verdure e il ripiano delle bottiglie per garantire la corretta circolazione dell'aria. Produzione di cubetti di ghiaccio Questa apparecchiatura è dotata di una o più vaschette per la produzione di cubetti di ghiaccio. Non usare strumenti metallici per estrarre le vaschette dal vano congelatore.
• non introdurre alimenti o liquidi caldi nel vano frigorifero • coprire o avvolgere gli alimenti, in particolare quelli con un gusto o un aroma forte • disporre gli alimenti in modo da garantire un'adeguata circolazione dell'aria Consigli per la refrigerazione Consigli utili: • Carne (tutti i tipi): deve essere avvolta in sacchetti di polietilene e collocata sul ripiano di vetro, sopra il cassetto delle verdure. • La carne conservata in questo modo deve essere consumata entro uno o due giorni.
Avvertenze generali AVVERTENZA! Prima di qualsiasi intervento di manutenzione, estrarre la spina dalla presa. Questa apparecchiatura contiene idrocarburi nell’unità di raffreddamento, pertanto le operazioni di manutenzione e ricarica devono essere eseguite esclusivamente da personale autorizzato. Gli accessori e i componenti dell’apparecchiatura non sono lavabili in lavastoviglie.
È normale che sui ripiani del congelatore e intorno allo scomparto superiore si formi, col tempo, uno strato di brina. Quando tale strato raggiunge uno spessore di circa 3 - 5 mm, è necessario procedere allo sbrinamento del vano congelatore. 1. Spegnere l'apparecchiatura o estrarre la spina della presa a parete. 2. Rimuovere i surgelati, avvolgerli in alcuni strati di carta di giornale e riporli in un luogo fresco. ATTENZIONE! Non toccare il cibo congelato con le mani bagnate.
Problema Causa possibile Soluzione La lampadina non si accende. La lampadina è in modalità stand-by. Chiudere e riaprire la porta. La lampadina è difettosa. Fare riferimento alla sezione "Sostituzione della lampadina". La temperatura impostata non è corretta. Fare riferimento al capitolo "Uso dell'apparecchiatura". Sono stati introdotti insieme molti alimenti da surgelare. Attendere alcune ore e ricontrollare la temperatura. La temperatura ambiente è troppo alta.
Problema Causa possibile Soluzione La temperatura degli alimenti è troppo alta. Prima di introdurre gli alimenti, lasciarli raffreddare a temperatura ambiente. Sono stati introdotti molti alimenti contemporaneamente. Introdurre gli alimenti un poco alla volta. Lo spessore dello strato di brina supera i 4 - 5 mm. Sbrinare l'apparecchiatura. La porta viene aperta frequentemente. Aprire la porta solo se necessario. L'aria fredda non circola correttamente all'interno dell'apparecchiatura.
INSTALLAZIONE Luogo d'installazione Installare l'apparecchiatura in un luogo asciutto, ben ventilato, la cui temperatura ambiente corrisponda alla classe climatica indicata sulla targhetta dei dati del modello: Classe climatica Temperatura ambiente SN Da +10°C a +32°C N Da +16°C a +32°C ST Da +16°C a +38°C T Da +16°C a +43°C In alcuni modelli potrebbero verificarsi delle anomalie se non si rispettano le temperature indicate.
spina in dotazione, utilizzare un fusibile di ricambio da 13 amp di tipo conforme alle norme ASTA (BS 1362.) ATTENZIONE! Se la spina tagliata è inserita in una presa da 13 amp, si corre il rischio di forti scosse elettriche. Verificare che venga smaltita in modo sicuro. Requisiti di ventilazione Il flusso d'aria dietro l'apparecchiatura deve essere sufficiente. 5 cm min. 200 cm2 4. 5. 6. 7. Rimuovere la porta. Rimuovere il distanziale inferiore. Svitare con una chiave il perno inferiore.
Eseguire un controllo finale per accertarsi che: • Tutte le viti siano serrate. • La guarnizione magnetica aderisca all’apparecchiatura. • La porta si apra e si chiuda correttamente. Se la temperatura ambiente è bassa (ad esempio in inverno), è possibile che la guarnizione non aderisca perfettamente all'apparecchiatura. In tal caso, attendere che aderisca naturalmente.
4 mm 44 mm 9. Applicare i cappucci (C, D) ai coprigiunti e ai fori delle cerniere. 7. Fissare l'apparecchiatura nella nicchia con 4 viti. C D E I E B I 8. Rimuovere la parte appropriata del copricerniera (E). Accertarsi di rimuovere la parte DESTRA per la cerniera di destra, o la parte SINISTRA per quella di sinistra. 10. Installare la griglia di sfiato (B). 11. Applicare i copricerniera (E). 12. Collegare l'apparecchiatura lateralmente alla parete laterale del mobile da cucina. 13.
ca. 50 mm 8 mm 90° 21 mm 90° K Ha ca. 50 mm 21 mm 15. Spingere la parte (Hc) sulla parte (Ha). Ha 20. Riapplicare il quadratino sulla guida e fissarlo con le viti in dotazione. 21. Allineare l'anta del mobile da cucina e la porta dell'apparecchiatura regolando la parte (Hb). Hc 16. Aprire la porta dell'apparecchiatura e l'anta del mobile da cucina con un'angolazione di 90°. 17. Inserire il quadratino (Hb) nella guida (Ha). 18.
• La porta si apra e si chiuda correttamente. DATI TECNICI Dati tecnici Dimensioni nicchia di incasso Altezza mm 1780 Larghezza mm 560 Profondità mm 550 Tempo di risalita Ore 22 Tensione Volt 230 - 240 Frequenza Hz 50 I dati tecnici sono riportati sulla targhetta dei dati applicata sul lato esterno o interno dell'apparecchiatura e sull'etichetta dei valori energetici. CONSIDERAZIONI SULL'AMBIENTE apparecchiature che riportano il simbolo insieme ai normali rifiuti domestici.
222371835-A-192015