Instructions for use
Manuals
Brands
Smeg Manuals
Domestic Appliances
UKFL164A
9
10
11
12
13
14
15
16
17
18
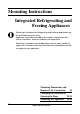
Mounting Instructions
15
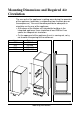
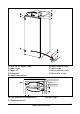
Fig. 1
Fig. 2
Fig.3
Fig. 4
Fig. 5
Fig. 6
1
...
...
16
17
18