Memory Mode In Mem Mode, text appears on the display as you type. Text is being automatically saved so it can be recalled, reviewed, edited and/or printed. In memory mode, 24,000 characters or approximately 10 pages of double spaced text can be stored. You can create one file that uses all of the memory or share that memory to create several different files. You can erase files that are no longer needed to make more room in memory.
Accessing Memory Mode To begin using Mem Mode, slide the Mode Selector to Mem to create a file. (Set margins and tabs in Type Mode, if necessary.) The display illustrated below appears. End of Page Pitch Line File: RETURN to Enter/CURSOR 1. Impression Keyboard 20000 for Directory Type a name for the document you are creating using up to twentyfour (24) characters, and press Return.
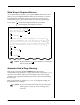
Word Wrap & Required Returns As you enter text into memory, do not press Return at the end of a line unless you need a Required Return at the end of short lines or want to insert blank lines in the text. When you print out your text, it will automatically wrap to the next line when it reaches the right margin. For example: R shows where Required Returns are needed. shows Returns automatically inserted.
Required Page Ends Page End Code + Back Space There are times that you may require a page ending other than that set automatically by the Memory Typewriter. For instance, you may be at the end of a chapter or want to end a page after indented text. 1. Press Return when you wish to begin a new page. 2. Press Code + Page End (Back Space). The Required Page End symbol ( ) appears in your text. During printing, the unit will pause to allow you to insert a new sheet of paper.
Entering Stop Codes While entering text, at the appropriate location, press Code + Stop (S). The Stop Code symbol ( ) appears on the display. Code + S Stop NOTE: Stop Codes are treated like individual characters and can be deleted and inserted. Printing with Stop Codes During printing, the unit will halt at each Stop Code. The display prompts: Insert Text 1. Type in the variable text or change the printwheel. This text appears on the display so corrections can be made before printing. 2.
Text Enhancements You can enhance your text in Mem Mode as in Type and Line Modes. Bold Print Code + B Bold Type Text Code + 1. Press Code + Bold (B). A beep is heard, and the bold symbol ( ) appears on the display. 2. Type text. 3. To turn off bold print, press Code + Bold (B). No beep is heard, and the symbol ( ) appears. B NOTE: Symbols within text are treated like characters and may be deleted using correct.
All Underscoring All Code This feature automatically underscores both words and spaces as you type. 1. Press Code + All (4). A beep is heard, and the Underscore All symbol ( ) will appear on the display. 2. Type your text. + 4 Type Text All Code 3. $ ` Press Code + All (4) to deactivate Auto Underscore All. No beep is heard, and the ( ) symbol appears on the display. $ ` + 4 Centering Text 1. Press Code + Auto Center (2). The cursor moves to the center of the margins.
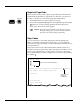
Indented Paragraph To indent a paragraph, set “temporary left margins.” When text prints, the paragraph will be automatically indented. Below is an example of a paragraph indented five spaces. National Accounting Seminar Marvelous Paper Products will participate in the National Accounting Seminar. We will focus on our new computerized accounting program. Those attending will include one Sales Account Executive from each of our Sales Districts, two System Consultants, and two Field Service Technicians.
Correcting Errors You can remove and/or correct characters, words, or entire lines of text. IMPORTANT: After making corrections and insertions, reformat your text before printing. (see “Reformatting Text.”) Inserting Text You can insert any number of words or paragraphs into your text as long as there is memory available. 1. Position cursor at the location where you wish to insert text. 2. Press Code + Insert (-/_). The cursor becomes a blinking rectangle indicating that you are in Insert Mode. 3.
LineEraser You can erase an entire line of text when creating or editing stored documents. Code + ® WordEraser LineEraser 1. Position cursor on any character on the line to be erased. 2. Press Code + WordEraser (LineEraser). Character Swap Character Swap allows you to reverse the order of adjacent characters. For example, if you typed “Teh,” you could reverse the “h” and the “e,” to produce “The.” Character Swap will transpose lower-case and uppercase letters without changing the case.
Reformatting Text After making changes to your text, you should reformat before printing in order to realign text within the established margin settings. You can reformat your text when editing or when closing your file. To reformat while editing: 1. Reformat Code After changing text, press Code + Reformat (9). The Status Line prompts: + ( § 9 Reformatting. 2. Resume working on your text, if necessary.
Copy, Move, and Delete Blocks of Text When you are editing a document, you may want to copy, move or delete blocks of text. You can delete, move, or copy blocks of text within the same file, and you can also copy text from one file to another file. After deleting, moving, or copying blocks of text, your document will be automatically reformatted. NOTE: This feature does not operate in Draft Copy Mode or Forms Layout. Deleting a Block of Text Position Cursor 1.
Moving a Block of Text 1. 2. Position the cursor on the first character or space in the block of text you want to move. 4. Move the cursor to the immediate right of the last character or space in the block to be moved. 6. Position the cursor on the first character or space to the immediate right of where you want the copy moved. + + = Position Cursor Mark Code Press Code + Mark (+ / = ) again to mark the end of the block. A right caret (>) appears to the left of the cursor.
Canceling a Block Move, Copy or Delete If you decide not to move, copy or delete text after you have marked it: 1. Position cursor on either caret or anywhere inside the area marked by carets. 2. Press Code + Mark (+ / = ). The procedure is canceled and text remains as it was originally. Copying a Block of Text into Another File Position Cursor Mark Code + + = Position Cursor Mark Code Code + + You can copy a block of text up to 4000 characters from one file into another file.
Search Features You can quickly locate all occurrences or one particular occurrence of a word or phrase in text using the Search feature. If you choose, you can then edit or change the text. Using the Search and Replace feature, you can locate and automatically replace all or specific occurrences of a word or phrase in text. The cursor searches from its current position forward. Therefore, be sure the cursor is located before the word or phrase you are searching for before you activate Search.
Searching for Stop Codes and Page Ends 1. Press Code + Stop (S) for a Stop Code or Code + Page End (Back Space) for a Page End when the Status Line prompts: Search? 2. Press Return. 3. The Status Line prompts: Replace? Y/N Position Cursor Search Code + ) ¶ 0 Type Search Word/ Phrase Search and Replace You can search for and replace a specific occurrence of a word or phrase or you can choose to automatically replace all occurrences.
9. Press Y to replace word/phrase. The Status Line prompts: Reformatting then Reformatting Complete The cursor remains at the end of replaced word. Press N to replace that occurrence. The cursor will remain on the unchanged word/ phrase so that you can insert or delete text if desired. 10. Press Code + Next (N) to search for more occurrences.
Forms Layout Forms Layout allows you to quickly and easily fill out pre-printed forms you use frequently. If you often type on pre-printed forms, you know how frustrating it can be to line up text and type in the spaces provided. Instead of lining up text every time you use a form, you can create a form file that will remember the way you filled out a form. Using Forms Layout, you create a file, which remembers the precise locations of text.
Notice that the “Library Fund Drive” text is automatically inserted on each form while Stop Codes are entered in areas where text will be varied each time the form is filled out. When the form file is recalled for use, any text in the file will automatically align and printed on the correct line, and the print hammer will align and pause for you to enter text where required. Aligning Text and Stop Codes Do not use the platen knob to adjust the paper because the alignment will be incorrect.
5. Press Spacebar twice to move the cursor to Form, and press Return. The display illustrated below will appear. The cursor will be in the first typing position. End of Page Line: Pitch 6.00 Line Space: Impression Keyboard 8.00 This display gives line and space locations of your print hammer in decimal format. 6. Automatically insert your form. IMPORTANT: Precisely align the paper at the left paper alignment mark, and use auto insert; otherwise alignment may be incorrect during printing.
Editing a Form File If you realize that you have made a mistake when entering Stop Codes or text in a form, you can go back and edit the form file. 1. Recall the form file as you would any other document. Only one line of text will be displayed at a time. 2. Automatically insert the pre-printed form. Make sure the form is aligned with the paper alignment mark. 3. Press Advance, then a curosr key to move through the entries. 4. Make corrections, using Correct, WordEraser, and LineEraser.
5. Press Return to select Print. The print hammer will move to the first location and type in text. If a Stop Code is in this location, the Status Line will prompt: Insert Text and the Stop Code symbol ( ) appears. 6. Type text at Stop Codes. Text will appear on the display. To make corrections, use Correct. 7. Press Code + P or Return to continue. Once you advance to the next position on the form, you cannot correct prior information until the form is completely filled in.
4. Press Spacebar to move the cursor to Draft, and press Return. The display illustrated below appears, and the cursor is located in the first typing position. End of Page File: Pitch Line Impression Keyboard File Name 5 5. Type text. Text will appear on the display and print on your paper at the same time. Use Correct, WordEraser, and LineEraser to correct errors. Errors will be corrected on the display and on the paper at the same time. 6. Continue entering text until the document is complete.
Erase a File Mem When you no longer need a file, you can erase it to make more memory available. Select Name of File 1. Slide the Mode Selector to Mem Mode. The display prompts: End of Page Reloc Impression Keyboard 20000 for Directory 2. Type the name of the file you wish to erase, or press Code + the desired file name appears on the display. 3. Press Return. The display illustrated below appears, and the cursor is on Print.
Copy a File 1. Mem Move the Mode Selector to Mem Mode. The display prompts: End of Page Pitch Line File: RETURN to Enter/CURSOR Impression Keyboard 20000 for Directory 2. Type the name of the file to be copied or press Code + desired file name appears on the display. 3. Press Return. The display illustrated below appears, and the cursor is under print. End of Page Pitch Line Impression until the Select Name of File Return Reloc Keyboard Print Edit Erase Copy Half Space 4.
Append Files You have stored text in two separate files. This feature enables you to join these two files together. Appending files does not erase the original file, but you may wish to erase the original file when the append procedure is completed. A thesis statement is the Ordering ideas means to put them into a logical sequence. Order is very important because it shows the reader your line of reasoning thereby adding meaning to the information.
Printing You can print a document and you can print a list of the documents currently stored in your Memory Typewriter. Printing a Document You can print your text just after closing a file or just after recalling it. To print, either recall a file or close the file you are currently using. When the display illustrated below appears, follow the instructions. End of Page Pitch Line Impression Keyboard Print Edit Erase Copy 1. Insert paper using the Automatic Paper Insert feature. 2.
Printing the File Directory You can print the file name and the first 40 characters of each file stored in memory. 1. Slide the Mode Selector to Mem or close the file you are currently using. 2. Press Code + P. Printing begins immediately. The Status Line prompts: Printing. Each file name with text prints on a separate line. To Halt Printing 1. Press any key (except the Code key). Printing will stop at the end of the current line. The Status Line prompts: Code + P to CONTINUE 2.