;; ;; W
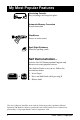
My Most Popular Features Correcting Cassette Easy to change and snap into place. Automatic Memory Correction Instant correction. WordEraser Erases an entire word. Spell-Right Dictionary Identifies spelling errors. Self Demonstration... Activate this Self Demonstration Program and discover my most popular features. This built-in Demo is easy to use. Follow the instructions below. Code + Z Demo 1. Insert Paper. 2. Press and hold Code while pressing Z. 3. Release both.
Table of Contents Hardware Basics Enhanced Text Typewriter Diagram ....................................... 5 Setting Up ........................................................ 6 Paper Support ............................................. 7 Turning the Typewriter On ...................... 7 Inserting Paper ........................................... 7 Automatically Ejecting Paper .............. 8 Platen Knob/Variable Line Spacer ..... 8 Selecting Volume Control .........................
Cleaning ......................................................... 37 Printwheel ................................................. 37 Platen ......................................................... 37 Cover/Keyboard/Sound Shield ............ 37 Check Points .................................................. 38 Obtaining Service ......................................... 38 Shipping Instructions ................................... 39 Stabilizing the Carrier Mechanism ........ 39 Packing the Typewriter ......
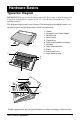
Hardware Basics Typewriter Diagram IMPORTANT: Be sure to save all packing materials. If you move or ship the typewriter, it should be repacked in the original carton. To secure the unit for transport, see “Care and Maintenance.” This diagram depicts only basic features. For information on coded features, see specific chapters or Quick Reference Guide on back cover. 1. Handle 2. Keyboard Cover/ Paper Support 3. Sound Shield 4. Power Switch 5. Typing Scale 6. Platen Knob/Variable Line Spacer 7. Keyboard 8.
Setting Up Before you can use your typewriter, you must remove the packing materials from the carrier mechanism. This is essential to the proper functioning of your typewriter. Do not turn the unit on until you have released the carrier mechanism (10). Follow the steps listed below using the typewriter diagram for reference. The numbers on the diagram correspond to those in the instructions. 1. Remove keyboard cover (2) from the typewriter. The cover also functions as a paper support. (See “Paper Support.
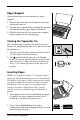
Paper Support Your keyboard cover also functions as a paper support. 1. Remove the cover from the keyboard if you have not already done so. II II • •• • II • • • • II • 2. Turn the cover upside down and align the tabs with the slots behind the paper alignment mark (8). • • • II •••• II • • • • II • • • • II • • • • II •••• II • • • • II II 3. Slide the tabs into the slots to provide an angled paper support for your typing page.
3. Advance the paper by using the Index Up/Down feature or Return key. 4. Push the paper release lever (11) back, and straighten the paper if necessary. Return lever to original position. Automatically Ejecting Paper Code Shift Paper Out When you reach the end of a page you can automatically eject your paper by pressing Code + Right Shift/Paper Out key. The paper begins ejecting immediately. NOTE: The platen may rotate a few seconds after ejecting paper.
Selecting Volume Control The typewriter will sound a beep when you activate certain features or type a word the unit does not recognize (see “The Dictionary”). You can adjust the volume of these beeps by pressing and holding Code while pressing the V key until the volume setting you wish is reached or the volume is turned off. When turned off, no beeps will be heard. The volume has been set to a medium level at the factory. Each time you turn your typewriter on, it will be reset for the medium volume.
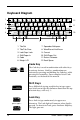
Keyboard Diagram Tab S 1 ! @ # $ % ¢ & * ( ) + 1 2 3 4 5 6 7 8 9 0 = Q Tab 2 Tab C Lock 3 W ^ ç A S E R ` D F Caps Lock Y ¿ G U ~ [ H J I Find Z X Demo Abbr Shift 4 T é Paper In C B N Bold Margin L R Code O P D. Tab P. End K L M , 1 : ; . . , 7 2 § 11 ¶ ' ? / 8 Reloc Shift Paper Out Correct 9 1. Tab Set 7. Spacebar/Halfspace 2. Tab/Tab Clear 8. WordEraser/LineEraser 9. Correct 3. Lock/Caps Lock 4. Shift/Paper In 10.
Indicator Light The Shift Lock light will flash to indicate an error condition. See the chart below on how to deactivate it. Reason To Stop The typewriter sound shield is not closed properly. Snap sound shield shut. The typewriter has received an incorrect command. Press either Shift or Code. You typed an error or a word not in the dictionary (if activated). Correct word or type a space. Refer to the appropriate section in this manual for proper instructions.
Format Each time you turn on your typewriter, a preset format is activated. It is set for general typing purposes. These settings remain active until you change them. Margins and Tabs Margins Margins are preset depending on your pitch setting. They are: Position Desired Left Margin 10 Pitch (Pica) 12 Pitch (Elite) 15 Pitch (Micro) Left Margin 12 14 18 Right Margin 72 86 108 Changing Margins When you need to change the margins, follow the instructions below: 1.
Tabs You can set up to eight tabs, either regular or decimal. Tabs may be set outside of margins. Regular Tab Decimal Tab Stop This is a Regular Tab 123.56 12.47 2.09 Regular Tabs Position Print Hammer Regular tabs justify text at the tab stop. To set a regular tab: Tab S 1. Position print hammer to desired location. 2. Press Tab S. Unit beeps. Decimal Tabs Decimal tabs are used to align numbers with the decimal point. To set a decimal tab: Position Print Hammer O Code D.Tab 1.
Tab Tab C Type Text Using Tabs Once tabs are set, they can be used as you are typing your text. 1. Press Tab (Tab C) to tab location. 2. Type text. If using a decimal tab, type the numbers preceding the decimal point. The carrier moves to the left for each number you type. If you make a mistake, press Tab to start again. 3. Type the decimal point. The numbers print to this point. 4. Type the numbers following the decimal point.
Pitch Your typewriter has been designed with triple pitch capabilities. To set the Pitch: Press Code + Tab Set for 10 Pitch. Press Code + 1 for 12 Pitch. 10 Code 10 Pitch Code Press Code + 2 for 15 Pitch. Unit beeps when selecting pitch. NOTE: Your typewriter is set at 10 pitch. Change the printwheel if you select another pitch. Changing pitch in the middle of a line erases Correction Memory. However, after the new pitch is selected, Correction Memory begins again.
Impression Control Code L Light M Code Medium H Code Impression control is the force used by the print mechanism to strike the paper. When you turn the typewriter on, impression control is set at medium. You can change to light or heavy impression. It is recommended that you select heavy impression when typing stencils or carbons and when using Script or Orator printwheels. For normal typing, use medium impression. To set impression control: Press Code + L for light impression.
Auto Indent Your typewriter can set a temporary left margin. In the example below, the second paragraph automatically indents twelve spaces. Section V: This section evaluates the Bold Print feature. Research indicates that boldfaced text is a popular and frequently used feature on the typewriter. It improves the appearance of letters and documents... Setting Temporary Indents 1. Press Spacebar or Tab to position print hammer to indent location. Position Print Hammer K Code Ind 2. Press Code + Ind (K).
Correcting Text While you are creating text, there are several ways to correct errors. You can remove characters, words, or entire lines of text. IMPORTANT: Bold or Auto Underscore must be reactivated prior to correcting characters with those enhancements or correction will not occur. On-Line Correction The typewriter can automatically correct all characters in a one-line memory buffer. You can also correct characters no longer in this Correction Memory buffer with an extra step.
WordEraser ® Key Position Print Hammer Use WordEraser for erasing word(s) in Correction Memory. 1. Position the print hammer on any character of the right most word to be corrected, and then press WordEraser. If you press WordEraser while between words, the word to the left of the space will be deleted. 2. Type correction. WordEraser LineEraser Type Correction Code Return 3. Press Code + Reloc (Return) if necessary to relocate. The unit beeps.
Half Space The Half Space feature is used when making corrections when you omit a character or type one too many. When the Half Space feature is activated, the typing position moves a half space to the right. Regular spacing returns when the Half Space feature is deactivated. NOTE: When you activate the Half Space feature, the character Correction Memory is erased. The typewriter remembers the half spaced characters until the Half Space feature is deactivated.
Character Swap ® Character Swap allows you to correct immediately adjacent transposed letters. For example, you can quickly change “Teh” to “The” and “Ad og” to “A dog.” The characters must be in the Correction Memory; that is, they must be on the current line of text. Characters will maintain upper or lower case status when swapped. Characters and spaces can also be swapped. Bold and Underscore must be activated if swapping characters with these enhancements. To use Character Swap: 1.
Word Swap ® Word Swap allows you to reverse the order of two words or group of alpha characters immediately adjacent to one another on a line within Correction Memory. For example: To or be not to be To be or not to be Words that are transposed must be separated by a single space. Characters such as a hyphen (-) and apostrophe (’) are considered part of a word. If you use any other symbol at the end of a word or between words (such as a number, punctuation, etc.
Off-Line Correction You can use the Off-Line Correction feature to correct several characters on previous lines. IMPORTANT: If End of Page Option is activated, do not use the platen knob when positioning the print hammer on the line where the error is located as the line count may be inaccurate. To correct an error not in the Correction Memory: 1. Press Code + Up (6), Down (7), or Return to position the print hammer on the line containing the incorrect character. 2.
Enhanced Text You can enhance your text by using Bold, Auto Center, Underscore, or a different Typestyle or Pitch. IMPORTANT: Bold and Auto Underscore must be activated before correcting characters having these enhancements. Bold Code B This feature is used for highlighting text. To use Bold: Bold 1. Press Code + Bold (B). Unit beeps. 2. Type text. 3. Press Code + Bold (B) to deactivate Bold.
Center Auto Center This feature automatically centers text between current margins. To use Auto Center: 1. Press Code + Center (0). Unit beeps. The carrier moves to the center. ) Code 0 Type Text Return 2. Type the text. The carrier will back space in half space increments for each character typed. Reloc 3. Press Return. Text types onto the page automatically centered. 4. Press Return again to move to the next line and return to normal margins.
Typing Subscripts Sub Code * 8 1. Press Code + Sub (8). The typing position moves down 1⁄2 line. 2. Type the subscript. The carrier returns to the original line. NOTE: If you superscript or subscript more than one character, you must repeat steps 1 and 2 above. If you decide not to type a superscript or subscript after activating the feature, press Correct to return to the original line.
Spell-Right ® Dictionary Spell-Right Dictionary is an electronic dictionary which instantly signals misspelled words. WordFind finds misspelled words. The Dictionary Each time your typewriter is turned on, the dictionary is activated. It beeps to alert you of a possible misspelling. NOTE: A group of letters will be considered a word if it is followed by a space, carrier return, tab, index up, index down, subscript, superscript, pitch change, number or any non-alpha character.
Hyphens If a word is hyphenated and the hyphen is followed by a carrier return, the dictionary will continue from one line to the next. Example: “Congratulations on the purchase of your new electronic typewriter.” The word “electronic” would be checked. Only the root words of hyphenated words and words followed by an apostrophe ( ’ ) or apostrophe S ( ’s ) will be checked – not the placement of hyphens or uses of apostrophes. Examples: Mother-in-law (would be accepted.
Spell-Right 1. Type text as usual. When you misspell a word or type one that is not found in the dictionary, a twotoned beep is heard, and the Shift Lock light flashes. 2. Press Correct or WordEraser. The corrected word will also be checked. Turning Off / On Spell-Right To turn the dictionary off: Press Code + Code D Code F (D). No beep is heard. To turn it back on: Press Code + (D) again. A beep is heard.
Other Features Your typewriter also has Index Up/Down, and Auto Return. Index Up/ Index Down Up Code Code ¢ 6 Down & 7 This feature moves the paper up or down in increments equal to the current line space setting. This feature is useful to maintain accurate line spacing when correcting errors on different lines. Also, it is necessary to use this feature instead of the platen knob when End of Page Warning is activated so the unit can keep track of lines. To use Index Up/Down: 1.
Abbreviation Feature The Abbreviation feature allows you to quickly insert a pre-programmed word or phrase into your document. For example, if you frequently find yourself typing “Best Regards,” you can insert its abbreviation, and the unit will type the phrase. A list of all the abbreviations available follows the instructions. You may use Bold, Underline, or Caps Lock to enhance this text if you activate it before inserting the abbreviation.
Abbreviation Lists General Words and Phrases (Labels in upper or lower case accepted) AM Air Mail AP Appendix AN Any help you can give me will be greatly appreciated AS as soon as possible BI Bibliography CM Certified Mail CF Confidential DI Distribution DH Do not hesitate at any time to call on me ED EDUCATION: EM EMPLOYMENT: EF Enclosed you will find EN Enclosures FX Facsimile FE For example, HC Handle with Care ND Have a nice day IE I am enclosing AC I appreciate your cooperation LR I look forward to you
RR Return receipt requested TD Thanksgiving Day Salutations and Closings Months and Days AF BR CG CO CY MI MR DM RS MS SM GY HB HH KR MC JA FB AU SE OC NO DE MO TU WD TS FR SA SN RY SC SY VS VT VB VR YV YT Affectionately, Best regards, Congratulations Cordially, Cordially yours, Dear Miss Dear Mr. Dear Mr. and Mrs. Dear Mrs. Dear Ms.
Care and Maintenance H SERIES H Right Ribbon System ® Correctable H Ribbon Cassette and Correcting Cassette WARNING: Use Smith Corona brand “H” Series supplies. Use of non-Smith Corona (brand or manufactured) supplies or accessories will not (except as noted below) void this warranty. THE WARRANTY WILL BE VOID if the typewriter is damaged or rendered wholly or partially inoperable as a result of using a non-Smith Corona supply or accessory item(s).
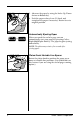
Removing the Ribbon Cassette Replace the ribbon cassette when a different colored portion begins to unwind from it. 1. Tilt sound shield toward you. 2. Grasp cassette on both sides. 3. Lift cassette STRAIGHT up and out. Inserting the Ribbon Cassette 1. Turn the gear wheel on the bottom of the cassette in the direction indicated to tightly wind the cassette. 2. Turn the cassette over with the name face up and the ribbon toward the print hammer. 3.
Inserting a New Correcting Cassette 1. Turn appropriate gear wheel on bottom of the correcting cassette in direction indicated by arrows to wind tightly. 2. Hold correcting cassette (using both hands as shown) with the Smith Corona name facing up. 3. Guide correcting tape between the printwheel and typing guide and position left gear wheel on left mount and right gear wheel on right mount. 4. Snap correcting cassette securely in place.
Inserting a Printwheel 1. Drop printwheel between print hammer and typing guide with type style name facing you. 2. Push the print hammer release lever back until the print hammer mechanism snaps into place. 3. Replace the ribbon cassette and correcting cassette. 4. Return the sound shield to its original position. The unit should automatically reinitialize. If this does not occur, check to make sure the sound shield is closed securely and, if necessary, turn your unit off and then on again.
Check Points If your typewriter does not function properly, check the following: ✔ Is the typewriter plugged into a live socket? ✔ Is the typewriter switched on? ✔ Is the sound shield completely closed? ✔ Are the printwheel, ribbon cassette and the correcting cassette properly installed? ✔ Have the ribbon or correcting cassette been used up? ✔ Is the carrier completely disengaged? ✔ Are compatible ribbon and correcting cassettes installed? ✔ Is the print hammer in a locked position? ✔ Has a foreign obje
Shipping Instructions IMPORTANT: When the machine is to be shipped for any reason, the carrier mechanism inside the typewriter must be stabilized to prevent movement. The typewriter as a whole must be properly protected from shipping and handling hazards. Use original packing material to pack the unit. Stabilizing the Carrier Mechanism 1. Unplug the unit. 2 Tilt the sound shield toward you. 3. Select a rubber band to secure the print mechanism. 4.
Packing the Typewriter Pack the typewriter in the original materials, if possible: 1. Place both foam end-caps on the unit. 2. Insert the unit into the box, and tape it shut. 3. In large letters, address the package for shipment to the nearest service location. Remember to include your return address, and retain your shipping receipt. If you do not have the original packing materials: 1. Use box slightly larger than the typewriter. 2. Place the unit in a large plastic bag. 3.
Supplies and Accessories Smith Corona produces the following Supplies and Accessories. WARNING: Use Smith Corona “H” Series supplies which have been designed specifically for this product. Use of non-Smith Corona supplies may render the unit inoperable. Correctable Film Ribbon Cassettes For UNMATCHED SHARPNESS AND CLARITY, use Smith Corona black Correctable Film Ribbon Cassettes and “lift off” errors with Smith Corona Lift-Off Correcting Cassettes.
Start-Rite ® Start-Rite .................................................................................................................. 63503 3 Printwheels (Presidential 12, Tempo 10, Script 10/12) 4 Correctable Film Ribbon Cassettes 1 Lift-Off Correcting Cassette Start-Rite II ..............................................................................................................
Important Papers Safe Operating Recommendations To avoid unnecessary operator injury or damage to the machine, please review the following recommendations. USE THE CORRECT VOLTAGE to avoid electrical short circuiting, overheating or shocks. If in doubt, check the electrical rating label affixed to the unit. Smith Corona does not recommend attaching your unit to any power source other than that which is indicated on the original electric rating label of the machine.
Product Consumer Warranty Limited Warranty 90 Day Warranty Smith Corona warrants this typewriter against defects in material or workmanship for a period of 90 days from the date of original purchase for use, and agrees to repair or, at our option, replace any defective unit without charge for either parts or labor. Proof of Purchase will be required.
FCC The following information is provided to you in accordance with the rules and regulations of the United States Federal Communications Commission.
Quick Reference Guide Function Abbreviation Auto Return Bold Center Caps Lock Character Swap Clear One or All Tabs Corrects Character(s), On-line Corrects One Character, Off-line Corrects Word(s) On-line Dictionary Double Line Spacing End of Page Warning Erase one line of text LineEraser Forward Correct Half Space Heavy Impression Control Indent Keyboard II (^ ˜ `) Left Margin Light Impression Control Medium Impression Control Moves Carrier to Tab Locations Manual Underscore 11⁄2 Line Spacing Paper Insert P