Wine Cabinet Manual We know you don’t want to read through this manual, but trust us, there is good information in here.
IMPORTANT SAFETY PRECAUTIONS To reduce the risk of fire, electrical shock, or injury when using your appliance, follow these basic precautions: IF YOU READ NOTHING ELSE IN THIS MANUAL, PLEASE READ THIS Risk of child becoming trapped in wine cooler, beverage cooler, other refrigeration unit, or large boxes. Junked or abandoned appliances, boxes and other containers are still dangerous, even if they will “just sit in the garage for a few days”.
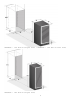
What’s in the box? • • • Instruction manual Keys Spare parts (hopefully you won’t need these) I received my wine cabinet, now what? Your wine cabinet was designed to be built into kitchen or bar cabinets or it will work just fine as a stand alone appliance. Your choice. You should place your wine cabinet on a flat, solid floor that is strong enough to support it when it is fully loaded (300-700 lbs). To level your wine cellar, adjust the front leveling leg at the bottom of the wine cabinet.
Step 3. Using a Philips head screwdriver, push on the screw at the top of the door to make sure it’s protruding through the hole as far as possible and screw in to the appropriate hole on the handle. Do not fully tighten the screw into the handle at this point as it will make attaching the lower portion of the handle difficult. Once the upper screw is screwed into the handle, screw the bottom portion into the handle.
RW428SR – 166 Bottle Single Zone / RW428DR - 166 Bottle Dual Zone RW490SR - 183 Bottle Single Zone 6
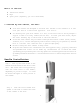
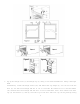
REVERSE THE DOOR SWING Before you begin: Tape down shelves to avoid movement during the process • These instructions are based on a wine refrigerator assembled with a right hinged door. • The door of this appliance can be hung to open on the left or right side. To reverse the door swing of your cellar and open from the opposite side, please follow the instructions and diagram below. • Save all extra hinges in case you need to change the direction of the door swing in the future.
1. Pry up the hinge cover (1) and hinge cap (2) using a flat head screwdriver. Using a Phillips head screwdriver, loosen the hinge screws (3a) and remove the top hinge (4). You can now lift the door (5) off the bottom hinge and set it off to one side. Be careful not to lose the washer (11) between the bottom hinge and the door. You will need this later. Also remove lock hole cap (6) and screws (7) and (8) from the top of the door.
a small flat head screwdriver. 2. Using a Phillips head screwdriver, loosen screws (3b) to remove the hinge support rod (9) at the bottom of the door. Rotate the door 180O so that the top is now the bottom and vice versa. Attach the bottom hinge support rod (9) to the bottom corner of the door and attach with screws (3b). 3. Using a flat head screwdriver, pry off the bottom hinge cover (12). Using a Phillips head screwdriver, loosen and remove screws (3c) and (13) and bottom hinge (10). 4.
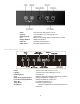
Power: Lighting: Power/Lighting: °C/°F: Display Window: Temp. Up: Temp. Down: Turns the wine cellar system on or off. Turns the interior wine cellar light on or off. Unlock button. Alters the temperature display to Fahrenheit or Celsius. Displays temperature. Increases temperature by 1°. Decreases temperature by 1°. Dual Zone Control Panel: Power: Lighting: Power/Lighting: °C/°F: Upper Zone Display Window: Lower Zone Display Window: Temp. Up: Temp.
Best way to store bottles Your cabinet was designed to store a maximum number of bottles. We recommend that you observe the tips below to optimize loading. • Disperse the bottles evenly to avoid concentrating weight in one place. Bottles must not touch either the back of the cabinet or the step at the bottom. • Make sure that the bottles are not all grouped together either at the top or bottom of the cabinet. • Only pull out one shelf at a time. Never attempt to pull more than one..
your compressor and cause damage. Do not do this. Also protect the outside of the appliance with a blanket or similar item. What to do if something goes wrong? Many common issues with your wine cellar can be solved very easily. Try the troubleshooting tips below should you experience any problems. PROBLEM POSSIBLE CAUSE Wine cellar does not operate. Not plugged in. The appliance is turned off. The circuit breaker tripped or a fuse has blown out. Wine cellar is not cold enough.
SMITH & HANKS WARRANTY INFORMATION WITH PROOF OF SALE, the following warranty coverage applies when this appliance is correctly installed, operated and maintained according to all supplied instructions. FOR ONE YEAR from the date of sale this appliance is warranted against defects in material or workmanship. A defective appliance will receive free repair or replacement at option of Smith & Hanks.
by the use of detergents, cleaners, chemicals or utensils other than those recommended in all instructions supplied with the product. 9. Damage to or failure of this appliance resulting from natural or other catastrophe, such as flood, fire or storm. 10. Damage to or failure of parts or systems resulting from unauthorized modifications made to this appliance. 11.