
Installation Manual


WWW.SMITTYBILT.COM
For Technical Support/Warranty Information please call 310-762-9944
Smittybilt, 400 West Artesia Blvd, Compton, CA 90220
Installation Instructions
Winch Quick Connect Kit
Part # 35220 (8’)
Part # 35210 (24’
)
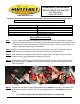
Parts Included (Part# 35220)
Qty
Part
s Included (Part# 35210)
Qty
3’ Winch Quick Connect Wire 1 3’ Winch Quick Connect Wire 1
8’ Quick Connect Wire 1
24’ Quick Connect Wire 1
Connector Cover 2 Connector Cover 2
Cable Tie 5 Cable Tie 10
On/Off Switch and Bracket 1
Winch Quick Connector (3ft.)
Note: The 3 ft. cable is intended to be attached to the winch only. The 8 ft. (Part#35220) is used for
power from the winch connect to the battery in the engine compartment. The 24 ft. (Part#35210)
is intended to be used to winches that are mounted in the rear of a vehicle. The Red cable is the
positive cable and the Black cable is the Negative.
Step 1: Install the 3’ connect plug on the winch before bolting the winch down. This will take place of
what typically is a long red and black cable that connects to the vehicles battery.
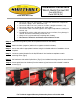
Step 2: Most winches have a separate control box with a black plastic cover. Remove the cover from
control box base.( Using manufacturers instructions) (Fig A)
Step 3: Remove the long red cable from the solenoid and install the red cable from the 3’ plug into the
same location. (Fig B, C) Note: Use caution when doing this in order not to damage any other
wires or terminals.
(Fig A) (Fig B) (Fig C)
Step 4: Remove the long battery negative cable attached to the bottom of the motor. (If installed) The
black cable from the 3’ connector will go to the negative terminal on the bottom of the motor.
(Fig D)
Please read instructions entirely before installing/using this part.