
Installation Manual

Smittybilt, 400 West Artesia Blvd, Compton, CA 90220
TOOLS REQUIRED
- Phillips Screwdriver
- 4mm Wrench
WWW.SMITTYBILT.COM
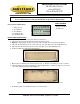
INCLUDED COMPONENTS
1 – Grille (1 piece)
5 – 90°L Brackets
9 – 80°L Brackets
14 – Phillips Screws
28 – M4 Flange Nuts
INSTALLATION INSTRUCTIONS
1. Inspect product and check components with items listed above.
2. Pop Hood, remove plastic shroud at the top and set fasteners aside.
3. Optional: Using factory instructions, remove the entire front grille shell (as pictured in all Figures).
4. Attach the five 90°L Brackets to the screws on the top side of the grille, secure them with flange nuts.
5. Attach the nine 80°L Brackets to the left screws of the grille, secure them with flange nuts.
6. Position the Grille onto grille shell cavity (Figure 2).
7. Mark locations for drilling on the shell through the holes of L Brackets. Then drill holes on those locations.
8. Attach the Grille to the shell by inserting the screws through the tabs of L Brackets and holes on the shell,
secure them with Flange Nuts provided (Figure 3).
9. Reinstall the plastic shroud with the fasteners removed in Step 2.
Figure 1 – Included Hardware
Figure 3 – Rear view of vehicle’s shell; Grills attached with Metal Brackets and Flange Nuts
Figure 2
–
Front View of positioning Grille
Installation Instructions
M1 Wire Mesh Grille
(Part #615832)
09-on Ford F-150
NOTE: Carefully read entire instructions thoroughly before attempting to install this part.
It is recommended to have this part installed by an experienced shop/mechanic.