
Installation Manual

Note: Check with OEM towing specifications and operation before towing anything with your vehicle.
NOTE: Carefully read entire instructions thoroughly before attempting to
assemble and/or install this product.
Section One
1 Remove factory rear bumper or bumperettes.
2 On all models the inner two holes will not line up with the factory holes and will need to be drilled.
3 Mount bumper on your vehicle and fasten with included bolts using only the outside holes. Make sure
bumper is positioned correctly and tighten bolts snug. Use the inner bracket holes as a template; mark the
holes on the frame. Now remove bumper and set to the side.
4 Caution: Use Extreme care and caution before drilling. Make sure to check backside of frame
for hazards and obstructions. Using a 7/16” bit, drill the marked holes. (Figure 1)
(Figure 1) Section Two
5. Position bumper against rear vehicle frame. Attach driver and passenger side rear brackets using
(1) 12 x 30mm bolt, (2) 12mm flat washers, (1) 12mm lock washer, (1) 12mm nut, at each of the eight
mounting holes. Note: Do not tighten completely at this time.
6. Using (1) 12 x 30mm bolt, (1) 12 mm flat washer, (1) 12mm lock washer for each hole, mount
the bottom brackets of the bumper to the bottom hole in the vehicle frame.(Tighten all hardware now)
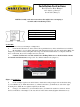
Parts Included Qty
Rear Bumper 1
12 mm Nut 8
12 mm Flat Washer 14
12 x 30mm Hex Head Bolt 8
Installation Instructions
Rock Crawler Rear Bumper
1987-2006 Jeep Wrangler
Part # 76611 (Bumper)