Owner’s Manual Digital Electric Smoker For Models: 3616DEW / 3616DEWS THIS IS YOUR ASSEMBLY, CARE & USE MANUAL WITH IMPORTANT WARNING & SAFETY INFORMATION. PLEASE SAVE THESE INSTRUCTIONS.
WARNING THIS MANUAL CONTAINS IMPORTANT INFORMATION NECESSARY FOR THE PROPER AND SAFE USE OF THIS UNIT. READ AND FOLLOW ALL WARNINGS AND INSTRUCTIONS BEFORE USING SMOKER AND DURING USE. FAILURE TO FOLLOW THESE WARNINGS AND INSTRUCTIONS PROPERLY COULD RESULT IN PERSONAL INJURY OR DEATH. CARBON MONOXIDE HAZARD BURNING WOOD CHIPS GIVES OFF CARBON MONOXIDE, WHICH HAS NO ODOR AND CAN CAUSE DEATH. DO NOT BURN WOOD CHIPS INSIDE HOMES, VEHICLES, TENTS, GARAGES OR ANY ENCLOSED AREAS.
IMPORTANT SAFEGUARDS When using electrical appliances, basic safety precautions should always be followed including the following: • For outdoor use only. Do not operate in an enclosed areas (example, porch or garage). • Unit MUST be on the ground. Do not place unit on tables or counters. Do NOT move unit across uneven surfaces. • Do not lift unit by rear handle. • Do not plug in the electric smoker until fully assembled and ready for use. • Use only an approved grounded electrical outlet.
Congratulations on your purchase of your new Smoke Hollow® Digital Electric Smoker. With proper set-up, operation and maintenance, this appliance will provide you with years of delicious food and cooking enjoyment. IMPORTANT When you un-pack your smoker, remove all parts and packaging material from the box and inside the smoker. Make sure you have all the items on the parts list. Carefully check the unit and make sure there is no damage.
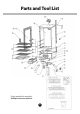
Parts Tool List List Parts and and Tool Tools needed for assembly: Phillips head screwdriver 55
Parts and Tool List Note: For assistance, including missing or damaged parts, call toll free 1- 866-475-5180 from 8:30 am - 4:30 pm Central Time, Monday - Friday Part # 3616DEW 3616DEWS 1 2 3 4 5 6 7 8 9 10 11 12 13 1 2 3 4 5 6 7 8 28 10 11 12 13 14 15 16 17 18 19 20 21 22 23 24 25 26 29 30 31 32 14 15 16 27 18 19 20 21 22 23 24 25 26 29 30 31 32 Part Name Quantity Rear-Left Leg Front Leg R-Clip Axle Pin Wheel Rear-Right Leg Grease Tray Power Box Assembly Lower Cabinet Front Panel Heat Tent Cable C
SmokerAssembl Smoker Assembly Step 3 Locate: SmokerAssembly Locate: • Cabin Step 1 • Upper Cabinet • Control Panel Assembly• Contro • Cable Cover - Long Locate: • Cable • (12) ST4.2 x 8 Self Tapping Step 3 • Cabinet (16) Screws • 12pcs • Control Panel Assy (15) • Cable Cover (14) Screw • 12pcs ST4.
SmokerAssembly SmokerAssembly Smoker Assembly Step 4 Locate: • Rear Handle (13) Locate: Locate: 4pcs M6x16mm Screws (C • Rear• Handle Step 2 Step 4 • Rear Handle (13) • (4) M6 x M6x16mm 16 Screws Screws (C) • 4pcs Rear Vent Knob Rear Vent Knob ToolsTools Needed: Needed: Phillips Screwdriver Phillips Screwdriver Tools Needed: Phillips Screwdriver Procedure: Rear Handle Rear Procedure: Use (4) M6x16mm Screws to Use Procedure: (4) M6x16mm Screws to assemble Rear Handle Useassemble (4) M6x16mm Screws
Smoker Assembly SmokerAssembly SmokerAssembly Step44 Step Step 4 Rear-Right Leg Rear-Left Leg Rear Vent Rear Vent Knob Knob Front Leg Tools Needed: Tools Needed: Phillips Screwdriver Tools Needed: Phillips Screwdriver Phillips Screwdriver Front Leg Procedure: Procedure: Use (8) M6x16mm Screws to Procedure: Use (8) M6x16mm to Use (8) M6x16mm toLeg, Rear‐ assemble the 2Screws FrontScrews assemble the 2 Front assemble Legs to the Leg, Left Legthe and Rear‐Right LegRear‐ to Left Leg and Rear‐Right Leg L
Screws (B) Tools Needed: Phillips Screwdriv W Smoker Assembly SmokerAssembly o o d StepStep 6 6 C h i o p o d C h i p B o x B o x R ails R ails W o o Wd To Ph Procedure: Locate: Locate: • Lower Cabinet•(29), CableCabinet Lower Cover‐short (11) Use (4) ST4.2x8mm Self‐tapp • Cable Cover - Short 4pcs ST4.2x8mm Self‐tapping assemble the Cable Cover‐Sh Screws (B) • (4) ST4.2 x 8 Self-Tapping Screws Lower Cabinet as shown.
Step 7 Locate: Tools Needed: • 10pcs Grid Supports (22) None • Heat Tent (10) & Water Pan Procedure: (21) & Water Pan Support ( Tools Needed: Assemble (5) Grid Supports in the NoneProcedure: holes in the left sideAssemble of the (5) Grid Suppo smoker. Repeat procedure Locate:the holes in the left side of th Procedure: (10) Grid Supports for the right •side making sure thethe proc smoker.
StepStep 8 8 Smoker Assembly LocateLocat : • 4 pcs Cook • 4p ToolsNToolsN eeded None None Locate: • (4) Cooking Grids Step 8 Tools Needed: None ProcedProcedu ure: Place thePlace (4) Coo k the Procedure: the Coo king Grid the Cook Place the (4) Cooking Grids into wnas . shown. the Cooking Gridsho Supports shown. Make sure the angled Make sure the sur ang Make portion of the grid is slid in first. grid is slid in first .
Smoker Assembly SmokerAssembly ASSEMBLY OF YOUR SMOKER IS NOW COMPLETE. ASSEMBLY OF YOUR SMOKER IS NOW COMPLETE. FOR YOUR SAFETY, FOLLOW ALL SAFE GUARDS FOR YOUR SAFETY, FOLLOW ALL SAFE GUARDS AND INSTRUCTIONS. AND INSTRUCTIONS.
Seasoning Instructions SEASON YOUR SMOKER PRIOR TO ITS FIRST USE. SOME SMOKE MAY APPEAR DURING THIS TIME. THIS IS NORMAL DURING THE SEASONING PROCESS. 1. Make sure water pan is in place with NO WATER. 2. Set the temperature to 275°F, set the time for 3 hours and turn the smoker on. 3. To complete the seasoning process, add wood chips to the wood chip pan during the last 45 minutes. Caution: Never overfill the wood chip box. Make sure the wood chip box lid closes completely on the wood chip box. 4.
Important Facts for Using Smoker • Maximum temperature setting is 300°F (149°C). • Do NOT move unit across uneven surfaces. • Rear handle is NOT for lifting. • Wood chip box lid MUST be in place when using smoker. This minimizes the chance of wood flare ups. • Wood chips must be used in order to produce smoke and create the smoke flavor. • Check grease tray often during cooking. Empty grease tray before it gets full. Grease tray may need to be emptied periodically during cooking.
Operatin : Operating Instructions oo 0o Control Panel Functions The POWER button powers the unit on. When the power cord is plugged in, the green LED light will flash indicating the unit has power. When the POWER button is pushed the unit will turn on and the light will stay on. The TIME button allows you to set your sm left to smoke during any smoke program When the FAST SMOKE button is pressed the LED will light solid with pressing the button one time. After y while the program is in operation.
Operating Instructions 1. Plug the power cord into a GFI Outlet. The green indicator light for POWER will turn on indicating there is power to the smoker. 2. Fill water pan half full with water or your choice of liquid. 3. Fill the wood chip box with wood chips. Refer to the section “How to use the wood chip box” on page 14 4. Press the “TEMP” button to set the desired temperature inside the smoker. - Press the UP or DOWN button to increase or decrease temperature. 5.
Troubleshooting Guide Troubleshooting Guide SYMPTOM CAUSE SOLUTION No Power to controller Not plugged into outlet Plug into power source House breaker tripped Reset breaker Bad connection at controller Unplug connection and reconnect. Reference how to access/replace controller instructions Bad connection at PCB Unplug connection and reconnect. Reference (Power Control Board) how to access/replace PCB instructions Faulty PCB (Power Control Board) Call OLPI for replacement.
Troubleshooting Guide Troubleshooting Guide SYMPTOM CAUSE SOLUTION Cabinet Temp is inaccurate Perform meat probe calibration test Reference Meat Probe calibration test instructions. Meat probe has a +/‐ 5°F (2.78°C) tolerance. Perform cabinet calibration test Reference cabinet calibration test instructions. Cabinet temp has a +/‐ 15°F (8.33°C) tolerance on avg. Faulty controller Call OLPI for replacement.
Smoking Tips Types of wood to use for smoke: • Always use a hardwood that has been seasoned for at least 6 months. • We recommend using Pecan, Hickory , White Oak, Apple, Alder or Mesquite. • Never use any resin woods like Pine or Cedar. Note: It is not necessary to soak the wood prior to smoking because hard woods have natural moisture in the wood that will release in the smoker as it heats up.
Smoking Techniques Smoked Pork Tenderloin PORK FISH POULTRY BEEF Take outside wrapper off of meat and wash thoroughly in cold water. Place tenderloin on a paper towel to soak up excess water. Rub your favorite pork rub on the loin (we recommend Head Country Pork seasoning). Preheat smokers to 225 degrees and place loin in the center of the smoker. Cook until internal meat temperature reaches 165 degrees.
Smoking Techniques Smoked Halibut PORK FISH POULTRY BEEF Select a nice fresh ¾” thick filet. Wash filet thoroughly in cold water and lay on paper towel until water is not visible. Melt a whole stick of butter in the microwave and sprinkle a liberal amount of Dill weed in the melted butter. Lay filets on aluminum foil and fold a lip around edges to contain the butter. With a basting brush, brush melted butter and dill weed mixture on both sides of the fish filet.
Cold Smoking Recipes Smoked Cheddar Cheese Ingredients Brick of Cheddar Cheese (Old or Aged cheddar is preferred - substitute Gouda or Fontina for a change of flavor. Preparation Place cheese on racks and load into your Smoke-Tronix smoker by Smoke Hollow®. Smoking Method 1. 2. 3. 4. 5. Fill the wood chip box with your favorite wood chips. Open the back and lower vents completely. Push the fast smoke button and set your time, temp and probe if desired.
Limited Warranty This Smoke Hollow ® smoker is guaranteed against broken or damaged parts at time of purchase. All parts carry a 1-year limited warranty. Paint is guaranteed to be free of defects for 90 days except for rust, which may appear after repeated use. This warranty does not cover damage or issues related to neglect, abuse, or modifications to the product. Repair labor is not covered.