
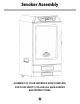
Installation Guide

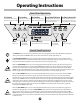

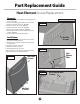

Heat Element Access/Replacement
Tools Needed: Phillips Screwdriver
Rear Handle
(2 screws)
Rear Panel
(17 screws)
Part Replacement Guide
Installation:
9. Place new heat element into smoker and secure with
(4) screws previously removed.
10. Push wires back onto tabs of new heat element from
back of smoker
11. Reattach rear panel - (17) screws
12. Reattach rear vent - (6) screws
13. Reattach Rear Handle - (2) screws
14. Place water pan and cooking grids back into smoker.
15. Plug smoker back into an electrical outlet
Heat Element Bracket
(4 screws)
Heat
Element
Wires
Figure A1
Figure A4
Figure A3
Rear Vent
(6 screws)
Figure A2
Removal:
1. Make sure smoker is turned OFF and is unplugged from
the electrical outlet
2. Remove all cooking grids and water pan from smoker
3. Remove rear handle - (2) screws - (Figure A1)
4. Remove rear vent - (6) screws - (Figure A2)
5. Remove back panel - (17) screws - (Figure A1)
6. Remove wires from Heat Element - (Figure A3)
7. Remove (4) screws from element bracket from inside
smoker - (Figure A4)
8. Remove heat element from inside smoker
20