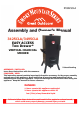
IM3425CLA 3425CLA/3495CLA EASY ACCESS Two Drawer* VERTICAL CHARCOAL SMOKER * Patent Pending ASSEMBLER / INSTALLER: Leave these instructions with the consumer. CONSUMER / USER: This instruction manual contains important information necessary for the proper assembly and safe use of this appliance. Read and follow all warnings and instructions before assembling and using this appliance. Follow all warnings and instructions when using this appliance. Keep this manual for future reference. DANGER: 1.
STATEMENT OF COMMITMENT Congratulations and thank you for your purchase of our Great Outdoors Smoky Mountain Smoker. We are pleased tht you have recognized the value of the design, function and quality of components used in the product. We are committed to producing quality products that your family will enjoy for years to come.
DO NOT use this smoker in a manner other than its intended purpose. It is not intended for commercial use. It is NOT intended to be installed or used in or on a recreational vehicle and/or boats. The smoker is not be used as a heater. Keep a fire extinguisher accessible at all times. The use of alcohol, prescription or non-prescription drugs may impair the user’s ability to properly assemble or safely operate the smoker. This smoker is for outdoor use only, in a well-ventilated area.
WARNING Use caution when operating the door while in operation. Keep hands, face and body safe from hot steam or flare ups. DO NOT wear loose clothing while operating the smoker. Tie back long hair while operating the smoker. ALWAYS wear fully-covering shoes while operating the smoker. Allow the smoker and its components to cool completely before conducting any routine cleaning or maintenance. NEVER use glassware, plastic or ceramic cookware on or in your smoker.
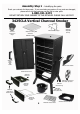
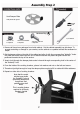
Assembly Step 1 - Identifying the parts Check your contents for these parts. If you are missing any parts or if any parts are damaged, please call our toll-free customer service line to order parts: 1-800-321-3473 DO NOT RETURN YOUR SMOKER TO THE RETAILER. PLEASE CALL US FIRST.
Assembly Step 1 - Continued Check your contents for these parts. If you are missing any parts or if any parts are damaged, please call our toll-free customer service line to order parts: 1-800-321-3473 DO NOT RETURN YOUR SMOKER TO THE RETAILER. PLEASE CALL US FIRST.
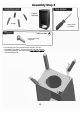
Assembly Step 2 Vent Damper Plate with plastic tab guard Phillips Head Screwdriver Hardware Bag E 1/2” Wrench #10-24 nut 2 required #10-24 lock washer 2 required #10-24 x 5/8” bolt 2 required 1. Remove all loose inner packages from inside cabinet. Set the cabinet assembly top side down. To prevent scratching or damage to your smoker, set the cabinet on a padded surface like cardboard or carpet. 2. Set the damper plate on the side of the cabinet and align it with the corresponding “butterfly” holes.
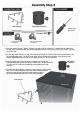
Assembly Step 3 Cabinet Assembly 4 Legs Phillips Head Screwdriver Hardware Bag 1/4-20 x 5/8” bolts 8 required 1. For each leg, line up the holes and insert the bolts. Nuts are pre-welded to the cabinet. The back legs bolts should be inserted and securely tightened. Then the front legs bolts should be inserted and securely tightened.
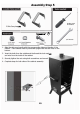
Assembly Step 4 Meat Hanger Adjustable Chimney Phillips Head Screwdriver Hardware Bag 1/4-20 x 1/4” bolt 1 required D 1/4-20 x 5/8” bolts 3 required 1. Turn the smoker upright. Ideally, it needs 2 people to lift the smoker up. Carefully tilt the cabinet on the side legs, grasp the empty hole for the adjustable chimney and pull up gently until smoker is upright on all four legs. 2.
Assembly Step 5 Phillips Head Screwdriver 2 Side Carry handles Hardware Bag F 1/2" Wrench 1. Align the side carry handle with the corresponding holes on the side of the cabinet. Then handles must be positioned upright with the bolt holes on the bottom. 2. Insert the bolts from the outside and the thread the lock washers and nuts from the inside of the cabinet. 3. Securely tighten the nuts using both screwdriver and wrench. 4. Complete steps for both sides of the cabinet assembly.
Assembly Step 6 Water pan drawer with Nylon Plastic handle Hardware Bag 1/4-20 nut 4 required 1/4-20 lock washer 4 required Phillips Head Screwdriver Charcoal Pan drawer with Nylon Plastic handle G 1/4-20 x 5/8” bolt 4 required 1/2” Wrench 1. Align the drawer handle bracket holes to match the holes in the front panel of the drawers. 2. Insert the bolts from the outside and the thread to the lock washers and nuts from the inside of the drawers. 3.
Assembly Step 7 Water Pan Drawer Charcoal Pan Drawer NOTE: No tools or hardware are required for this step. 1. Insert cooking grids into available rack positions and grease pan as shown. 2. Place charcoal grate in charcoal pan and position complete on drawer frame as shown. Slide charcoal pan drawer into cabinet. 3. Position water pan on drawer frame as shown, and then slide water pan drawer into cabinet.
Assembly Step 8 Phillips Head Screwdriver Nylon Plastic Door handle Hardware Bag H 1/2” Wrench 1/4-20 nut 2 required 1/4-20 lock washer 2 required 1/4-20 x 5/8” bolt 2 required 1. Align the door handle with the corresponding holes on the front of the cabinet door. 2. Insert the bolt through hole in door handle bracket and then thread the lock washers and nuts from the inside of the door.. 3. Securely tighten the nuts using both screwdriver and wrench.
Assembly Step 9 Hardware Box Name-plate Temperature Gauge 2 wingnuts 2 flat washers NOTE: No tools or hardware are required for this step. 1. Insert the Temperture Gauge mounting pins through the mounting holes in the front of the door panel. 2. From the inside of the door, securely attach flat washer and wingnut to each mounting pin.
Assembly Step 10 /RFDWH WKHVH SDUWV Ash Holder 1R WRROV RU KDUGZDUH DUH UHTXLUHG IRU WKLV VWHS Slide the ash holder into the bottom rack position as shown. Make sure it is seated properly.
LIGHTING PROCEDURES: Before you light your smoker, it is recommended that you choose our igniting substances carefully. Use only lighting fluid specifically designed for outdoor charcoal or wood lighting. For best flavor, we recommend using NON-TOXIC lighting fluids. Or, for even better results and ease of lighting, you can use a wax lighting block or electric charcoal starter.
OPERATING INSTRUCTIONS PRE-USE PROCEDURES: Before you cook food in our smoker, it is important to “season” your smoker. Seasoning seals the paint and interior of your smoker to enhance flavoring, durability and overall peformance. This is also referred to as the “break-in” process. If your smoker requires any touch-up paint on the inside of the cabinet, the only time you should apply paint to the inside is before the seasoning process.
ADDING WOOD CHIPS To add wood chips before smoking, fill the wood chip box with your choice of flavoring hardwood chips. The amount and type of wood you use is entirely up to you. One full filling of the wood chip box is typically enough for several hours of smoking. Once the wood chip box is filled, place the lid on top of the wood chip box and set the box into the correct location of the smoker.
COOKING INSTRUCTIONS: * Fill the wood chip box with flavoring wood chips and place the box with lid on, inside the smoker as instructed in the assembly section of this instruction manual. Refer to the section that explains flavoring wood for recommended use of flavoring wood. * Please the water pan inside the smoker as instructed in the assembly section of this instruction manual. Carefully fill the water pan with water (or marinade) up to 1” (25mm) below the water pan rim.
TEMPERATURE CHART Here is a chart for measuring properly cooked meat temperature: (USDA Standard) CAUTON The below temperatures are measured with a meat probe thermometer. The heat indicator on the door of the smoker SHOULD NOT be used as an accurate meat temperature reading.
AFTER USE SAFETY WARNING Use caution when lifting or moving the smoker to avoid strains or back injury. Two (2) people are recommended to lift or move the smoker. DO NOT place cover on smoker if the smoker is still hot. DO NOT store the smoker near gasoline or other combustible liquids or where combustible vapors may be present. Keep the area around the smoker clear of combustible material or vapors. DO NOT store this smoker in an area accessible to children or pets.
AFTER USE CARE AND MAINTENANCE CAUTION: All care and maintenance procedures are to be performed only while the smoker is turned off and completely cooled. To clean, remove the water pan, wood chip box and cooking racks from the smoker. Clean with hot, soapy water and rinse and dry thoroughly. You may prefer to coat the water pan cooking racks lightly with cooking oil or cooking spray. If your heat indicator seems to be out of calibration.
The Great Outdoors® Smoky Mountain Series™ smoker is guaranteed against broken or damaged parts at the time of purchase. All parts carry a 1-year limited warranty except the water bowl, which is guaranteed to be free of defects for 90 days. Paint is guaranteed to be free of defects for 90 days except for rust, which may appear after repeated use. This warranty does not cover damage or issues related to neglect, abuse, or modifications to the product. Repair labor is not covered.