
Instructions / Assembly

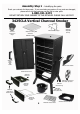


Phillips Head
Screwdriver
Meat Hanger
Adjustable
Chimney
Cabinet top
Assembly Step 4
Meat Hanger
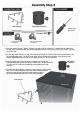
1. Turn the smoker upright. Ideally, it needs 2 people to lift the smoker up. Carefully tilt the cabinet on
the side legs, grasp the empty hole for the adjustable chimney and pull up gently until smoker is upright
on all four legs.
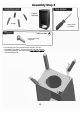
2. Set the Adjustable Chimney on top of the cabinet and align the 3 thread tabs from the underneath with
the corresponding holes. The nuts for the bolts are pre-welded to the bottom of the chimney base.
Position Adjustable Chimney knob so the adjustment now is on the right side.
3. Reaching inside the cooking chamber, thread a bolt through the
corresponding opening and into the pre-welded nuts. Thread each bolt
1/2 way until all 3 bolts are threaded and then tighten each bolt
securely.
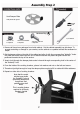
4. To attach the Meat Hanger, position the Meat Hanger into the metal
tabs on the underneath part of the top of the cooking chamber.
Make sure that the bolt end of the Meat Hanger matches
up with the attached thread tab. Insert bolt and tighten
.
9
Hardware Bag
D
Adjustable Chimney
1/4-20 x 5/8” bolts
3 required
1/4-20 x 1/4” bolt
1 required