SB4 RECUMBENT BIKE
INDEX IMPORTANT SAFETY NOTICE …………………………………………………………………… P. 2 ASSEMBLY TOOLS & HARDWARE LIST ………………………………………………………. P. 3 ASSEMBLY INSTRUCTIONS ……………………………………………………………………... P. 4 - 8 COMPUTER INSTRUCTIONS …………………………………………………………………….. P. 9 - 16 COMPLETE PARTS LIST ………………………………………………………………………….. P. 17 - 18 EXPLODED DIAGRAMS …………………………………………………………………………… P.
IMPORTANT SAFETY INFORMATION WARNING: Before starting any exercise program, it is recommended that you consult your physician, especially for persons with pre-existing health problems. Before using the new equipment, please review this manual to learn about the features, functions, and safety operations.
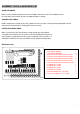
ASSEMBLY TOOLS & HARDWARE LIST OPEN THE BOXES Make sure to inventory all the parts that are included in the boxes. Check The Hardware Chart for a full count of the number of parts included for proper assembly. GATHER YOUR TOOLS Before starting the assembly of your unit, gather the necessary tools. Having all of the equipment at hand will save time and make the assembly quick and hassle-free. CLEAR YOUR WORK AREA Make sure that you have cleared away a large enough space to properly assemble the unit.
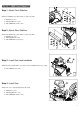
ASSEMBLY INSTRUCTIONS Step 1 - Attach Front Stabilizer Attach Front Stabilizer (7) to Base Frame (1) and secure with: 2 – M8 Washers (157 ) 2 – M8 Spring Washers ( 118 ) 2 – M8 x 90MM Allen Screws ( 123 ) Step 2 - Attach Rear Stabilizer Attach Rear Stabilizer (8) to Base Frame (1) and secure with: 2 – M8 Washers ( 157 ) 2 – M8 Spring Washers (118) 2 – M8 x 90MM Allen Screws (123 ) Step 3 - Install Seat Lock Handlebar Attach the Seat Lock Handlebar ( 6 ) onto the Seat Lock handlebar base ( 61 ) using: 2 –
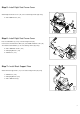
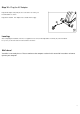
Step 5 - Install Right Seat Frame Cover Attach Right Seat Frame Cover ( 22 ) to the Seat Carriage Frame (56) using: 2 – M5 x 25MM Screws ( 132 ) Step 6 - Install Right Seat Frame Cover Place Seat Handlebar (3) on top of Seat Carriage Frame (56). Connect the Lower Hand Pulse Wire ( 94 ) to the Middle Hand Pulse wire (93).
Step 8 – Install Seat Back Pivot Cover Attach the Seat Back Pivot cover ( 17 ) to the Seat Carriage Frame (56) using: 4 – M6 x 12MM Round Allen Head Bolt ( 127 ) Step 9 – Install Seat Back Attach the Mesh Seat Back ( 18 ) to the Back Support Tube (16) using: 4 – M5 x 20MM Screws ( 144 ) Step 10 – Install Seat Frame Adjust Knob Attach the Seat Frame Adjust Knob (20) to the Gas Strut ( 71).
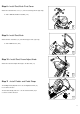
Step 12 - Install Handlebar Post Connect the Upper Computer Wire ( 90 ) to the Lower Computer Wire ( 91 ) and the Upper Hand Pulse Wire ( 92 ) to the Middle Hand Pulse Wire ( 91 ). Attach Handlebar Post ( 2 ) to the Main Frame (1) using: 4 – M8 Washer ( 157 ) 4 – M8 Spring Washers ( 118 ) 4 – M8 x 15MM Round Allen Head Bolt ( 120 ) Note: Be careful not to damage or pinch wires when Handlebar Post is installed.
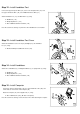
Step 16 – Plug the AC Adaptor Plug the AC adaptor lead (164) into the socket at the rear end of your Recumbent Bike as shown. Plug the 6V 1000mA A.C. Adaptor into a suitable mains supply. Leveling: After completing the installation, if the floor or equipment is not even, turn the Adjustable Lever Knob (14) on the Front/Rear Foot ( 7 & 8 ) to the desired level in order to balance the frame. Well done! Your bike is now ready for use.
COMPUTER INSTRUCTIONS DISPLAY CONSOLE OVERVIEW The things you should know before exercise A. Input Power Plug in the adaptor to the equipment then the computer will produce a beep sound and turn on the computer at the Manual mode. B. Program select and setting value 1. Use the UP or DOWN keys to select program mode and then press ENTER to confirm your exercise mode. 2. At the Manual mode, the computer will use the UP or DOWN keys to set up your exercise TIME, DISTANCE, CALORIES, PULSE. 3.
9. TARGET HEART RATE (TARGET PULSE): The heart rate you should maintain is called your Target Hear Rate in beats per minute. 10. PULSE RECOVERY: During the START stage, leave the hands holding on grips or leave the chest transmitter attached and then press “PULSE RECOVERY” key, all function displays will stop except “TIME”. Time starts counting from 00:60 - 00:59 - - to 00:00. As soon as 00:00 is reached, the computer will show your heart rate recovery status with the grade F1.0 to F6.0. 1.
PROGRAM 2 to PROGRAM 13 is the preset programs. Users can exercise with different level of loading in different intervals as the profiles show. Users may exercise in any desirous of resistance level (Adjusting by UP/DOWN keys during the workout) with a period of time or a number of calories or a certain distance. Operations: 1. Use UP/DOWN keys to select one of the above programs from P2 to P13. 2. Press the ENTER key to enter your workout program. 3.
4. At program 22, the TARGET PULSE will flash and you can press UP or DOWN keys to set your TARGET PULSE between 80 to 180. The default TARGET PULSE is 120. 5. The TIME will flash and you can press UP or DOWN keys to set your exercise TIME. Press ENTER key to confirm your desired TIME. 6. The DISTANCE will flash and you can press UP or DOWN keys to set your target DISTANCE. Press ENTER key to confirm your desired DISTANCE. 7.
9. Press START/STOP key to begin exercise. Operation guide: 1. Sleep Mode: The computer will enter the sleep mode when there is no signal input and no keys be pressed after 4 minutes. You can press any key to wake up the computer. 2. 3. BMI (Body Mass Index): BMI is a measure of body fat based on height and weight that applies to both adult men and women. BMR (Basal Metabolic Rate): Your Basal Metabolic Rate (BMR) shows the number of calories your body needs to operate.
PROGRAM 10 RANDOM PROGRAM 11 PLATEAU PROGRAM 12 FARTLEK PROGRAM 13 PRECIPICE USER SETTING PROGRAM PROGRAM 14 USER 1 PROGRAM 15 USER 2 PROGRAM 16 USER 3 PROGRAM 17 USER 4 14
HEART RATE PROGRAM PROFILES: PROGRAM 18 55% H.R.C. PROGRAM 19 65% H.R.C. PROGRAM 20 75% H.R.C. PROGRAM 21 85% H.R.C. PROGRAM 22 TARGET H.R.C.
BODY FAT TEST PROGRAMS: PROGRAM 24 BODY FAT (STOP MODE) BODY FAT (START MODE) One of the Following Six Profiles Will Display Automatically after Measuring Your BODY FAT: Workout Time: 40 minutes Workout Time: 40 minutes Workout Time: 40 minutes Workout Time: 40 minutes Workout time: 20 minutes Workout time: 20 minutes 16
COMPLETE PARTS LIST NO. DESCRIPTION QTY NO.
COMPLETE PARTS LIST NO. DESCRIPTION QTY NO.
EXPLODED DIAGRAM 1 * MANY OF THE PARTS SHOWN HERE HAVE BEEN PRE-ASSEMBLED.
EXPLODED DIAGRAM 2 * ALL THE PARTS SHOWN HERE HAVE BEEN PRE-ASSEMBLED.
EXPLODED DIAGRAM 3 * ALL THE PARTS SHOWN HERE HAVE BEEN PRE-ASSEMBLED.
22