OWNER’S MANUAL SM9.3P, SM9.3HR, SM9.3AB, SM9.3HRAB, SM9.3ST, SM9.3HRST treadmillbynet.com advancedfitness.com And other Internet Web sites authorized By internetfitness.com The Fitness Superstores SALES: (888) 9TREADS (888) 987-3237 SERVICE: (888) 340-0482 SMOOTH is a registered trademark of Internetfitness.com Mt.
TABLE OF CONTENTS Table of Contents 2 Model Name Descriptions 3 Model Specifications 4 Important Safety Information 5 Before You Start 6 Warm Up Exercises 7 Assembly Instructions 8 Assembly Instructions Diagram 9 Power Requirements 10 Console Functions and Descriptions 9.3P, 9.3ST 11 Console Functions and Descriptions 9.3HR, 9.3HRAB, and 9.3HRST Console Functions and Descriptions SM9.
MODEL NAME DESCRIPTIONS Product Name Definitions Each Smooth treadmill has a model name and unique serial number. The serial number label is located on the front of the treadmill frame below the motor hood cover. Model name sample: SM9.3HRAB This model name is a Smooth 9.3 treadmill with Heart Rate Interactive programming and an AeroBelt. SM—Smooth 9.
MODEL SPECIFICATIONS MODEL SM9.3P SM9.3HR SM9.3AB SM9.3HRAB SM9.3ST SM9.3HRST Horsepower Continuous 3.0HP Baldor 3.0HP Baldor 3.0HP Baldor 3.0HP Baldor 3.0HP Baldor 3.
Important Safety Information NING! 1) WARNING: Before using this treadmill or starting any exercise program, consult your physician. This is especially important for persons over the age of 35 and/or persons with pre-existing health problems. The manufacturer or distributor assumes no responsibility for personal injury or property damage sustained by or through the use of this product.
Before You Start Thank you for purchasing a SMOOTH treadmill! The premium quality treadmill you have chosen was designed to meets your needs for cardiovascular exercise. • Before you start, please read the Owner’s Manual and become familiar with the operation of your new treadmill. • Remember to take the time to perform the stretching exercises prior to using treadmill to avoid injury. Do not stand on the walking belt while pressing the Power button or Start/Stop button.
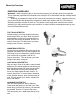
Warm Up Exercises EXERCISE GUIDELINES WARNING! Before beginning this or any exercise program, you should consult your physician. This is especially important for individuals over the age of 35 or individuals with pre-existing health problems. Warming up prepares the body for the exercise by increasing circulation, supplying more oxygen to the muscles and raising body temperature. Begin each workout with 5 to 10 minutes of stretching and light exercise to warm up.
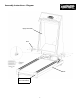
Assembly Instructions The 9.3 treadmill is shipped in one box with two pieces, the base frame and the upright/console assembly. The following steps should be followed for assembling the treadmill: Remove any packing materials from the treadmill. Do not throw away any packing materials until assembly is completed. You should find the following: 1. Base Frame 2. Double triangular upright assembly with console 3. Two plastic boots to cover gap between upright assembly and base (see Diagram next page).
Assembly Instructions—Diagram Upright Assembly Boot Base Roller End Caps (to be assembled) 9
Power Requirements WARNING! IMPROPER CONNECTION OF THE EQUIPMENT GROUNDING CONNECTOR CAN RESULT IN A RISK OF AN ELECTRIC SHOCK. CHECK WITH A QUALIFIED ELECTRICIAN OR SERVICE MAN IF YOU ARE IN DOUBT AS TO WHETHER THE PRODUCT IS PROPERLY GROUNDED. DO NOT MODIFY THE PLUG PROVIDED WITH THE PRODUCT, IF IT WILL NOT FIT THE OUTLET, HAVE A PROPER OUTLET INSTALLED BY A QUALIFIED ELECTRICIAN. This treadmill can be seriously damaged by sudden voltage changes in your home’s electrical power.
START/RESET: Starts the treadmill belt in motion after a 3-second delay. For the Reset function, hold the button down for 3 seconds to reset Time, Distance, and Calories. 11 MPH, use the Speed + button. SPEED + (plus/minus): Adjusts the speed in .1 MPH increments during programming or during use. Also used to enter Weight, to set Time to countdown, and PACE: Indicates amount of time required to complete 1 mile at current speed. SPEED: Indicates miles per hour starting at .6 MPH up to 12.0 MPH in .
START/RESET: Starts the treadmill belt in motion after a 3-second delay. For the Reset function, hold the button down for 3 seconds to reset Time, Distance, and Calories. MPH, use the Speed + button. SPEED 2-10: One touch speed buttons to change MPH in 1 MPH increments from 2 MPH to 10 MPH. For speed greater than 10 ENTER/MODE: Used to enter Weight, and to enter Time and Distance countdown parameters. During operation, Mode will toggle between Speed and Pace.
START/RESET: Starts the treadmill belt in motion after a 3-second delay. For the Reset function, hold the button down for 3 seconds to reset Time, Distance, and Calories. MPH, use the Speed + button. SPEED + (plus/minus): Adjusts the speed in .1 MPH increments during programming or during use. Also used to enter Weight, to set Time to countdown, and PACE: Indicates amount of time required to complete 1 mile at current speed. SPEED: Indicates miles per hour starting at .6 MPH up to 12.0 MPH in .
Quick Reference Operating Instructions The following Quick Reference is a simple overview of basic operating instructions in MANUAL and PROGRAMMING modes of your Smooth treadmill. For more detailed information and operating instructions, see topics later in this manual for MANUAL, PRE-SET, USER, and HEART RATE INTERACTIVE programming options.
Manual Operating Instructions MANUAL MODE The Information window will now read: MANUAL EDIT - MODE NEXT UP/DOWN PRESS START Press the START/RESET button to start the treadmill belt moving. • Hold the handlebar and carefully step onto the treadmill belt and begin walking. Warning: It is not recommended to exceed 2.0 mph when getting started on your workout.
Pre-set Program Operating Instructions BASIC START-UP • Plug treadmill into a grounded 110 VAC outlet. Be sure the power cord does not interfere with the incline mechanism rollers below the motor housing. • Step onto the treadmill and Straddle the treadmill belt. • Insert the Safety Key into the center of the console behind the handlebar. ADJUST LEVEL + NEXT UP/DOWN PRESS START Select the Level (shown in the Calorie window) of the program by using the Program Level “+ -” buttons.
Pre-set Program Profiles and Descriptions HILL INTERVAL PROGRAM The Hill Interval Program is designed to have a constant speed throughout the entire program while incrementally increasing the incline grade through half of the program, then decreasing the incline grade through the second half of the program. The Shaded Area is the Speed, and the Solid Line is the Incline Grade.
Pre-set Program Levels: Default Values HILL INTERVAL PROGRAM WEIGHT LOSS PROGRAM SPEED MPH INCLINE SPEED MPH INCLINE LEVEL MAX MAX 1 2.4 4.0 LEVEL MAX MAX 1 2.6 2.0 2 2.8 5.0 2 2.8 3.0 3 3.2 6.0 3 3.0 4.0 4 3.6 7.0 4 3.2 5.0 5 4.2 8.0 5 3.4 6.0 6 4.6 9.0 6 3.6 7.0 7 5.0 10.0 7 3.8 8.0 8 5.4 11.0 8 4.0 9.0 9 6.0 12.0 9 4.2 10.0 CARDIOVASCULAR WORKOUT PROGRAM SPEED MPH INCLINE LEVEL MAX MAX 1 2.
User Program Operating Instructions USER PROGRAM MODE The User Program allows up to 50 changes to be made to speed and/or incline. The treadmill is equipped with 3 User programs. One speed and grade change can be made for every :30 second time block i.e.: (0—:30, :30—1:00, 1:00—1:30, etc.). If you wish your program to end a zero speed, your last :30 second entry should be zero speed when you stop the treadmill.
Heart Rate Interactive Programming Introduction and Overview (HR models only) INTRODUCTION The Smooth Heart Rate Interactive system is designed to maximize your workout by monitoring and adjusting the treadmill incline grade to maintain your target heart rate. Once you enter your individual parameters for target heart rate, time, distance, or maximum incline, the treadmill’s computer takes over and automatically changes the incline grade to keep you near your target heart rate.
Smooth Heart Rate Interactive Programming: How it Works (HR models only) The Smooth Heart Rate Interactive System is safe and simple and easy to understand. The user first sets the maximum for grade. This allows the user to customize and create a variety of workouts in a safe way. Once the data is entered, along with workout time and target heart rate, the user is ready to start their Heart Rate Interactive workout.
Target Heart Rate Programs Operating Instructions Group 1 and Group 2 (HR models only) Operating Instructions • Attach the Heart Rate Chest Strap Transmitter following the directions on page 20. • Plug treadmill into a grounded 110 VAC outlet. Be sure the power cord does not interfere with the incline mechanism rollers below the motor housing. • Step onto the treadmill and Straddle the treadmill belt. • Insert the Safety Key into the center of the console behind the handlebar.
Target Heart Rate Programs Operating Instructions Group 1 and Group 2 (Continued) (HR models only) You may use the One Touch Speed and/or Incline buttons to perform the gradual increase. HEART RATE MODE button and change your target with the HEART RATE TARGET buttons. Note: Warming up too fast may cause you to overshoot your target. If this occurs, it may take several minutes for the computer to start interactivity.
Interval Target Heart Rate Programming (HR models only) PRESS START (only when your ready to begin) TO USE INTERVAL TARGET HEART RATE PROGRAMMING Interval Workouts offer variety and help you attain higher levels of conditioning in a shorter period of time. It is recommended that you do not do an interval workout until you have used your treadmill on a regular basis and have a working knowledge of your target heart rate and condition level.
Interval Target Heart Rate Programming continued (HR models only) grade. You are now ready to begin your workout. Press START to begin workout. Note: If you accidentally pressed ENTER again, the Pulse Window will flash. Press START to begin workout. get, the information window will read BEGINNING INTERVAL HR HANDS FREE The computer takes over the treadmill at this point for grade. The time window will reset and begin descending from the time you programmed earlier.
Interval Target Heart Rate Programming continued (HR models only) tervals. Your grade may increase or decrease while you are in work interval. This averaging allows you to return to a work level which will bring you back near your heart rate target. To end your workout, press STOP.
WARNING! DO NOT USE THE HEART RATE INTERACTIVE PROGRAM PRIOR TO AUTHORIZATION FROM YOUR PHYSICIAN. • • • Consult your physician for advise before starting any exercise program. The chart shown above is only given as a reference for an average person in good health that exercises regularly. Please consult with your physician to determine your target heart rate.
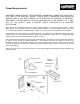
Belt Adjustment and Tension WARNING! Do not overtighten rollers! This will cause premature roller bearing failure! Belt adjustment and tension performs two functions: adjustment for tension and centering. Your new treadmill comes pre-adjusted from the factory for tension and centering. Please follow the procedures below if the belt shifts to the left or right or while walking: WALKING BELT IS SHIFTING TO THE LEFT (Diagram 1) First, turn treadmill on to run at 1 mph.
Maintenance Instructions WARNING! Before performing any maintenance to your treadmill, always unplug the power cord from the surge protector. CLEANING Routine cleaning of your Smooth treadmill will extend the life of your treadmill. WARNING! To prevent electrical shock, be sure the power to the treadmill is OFF and the unit unplugged from the wall electrical outlet before attempting any cleaning or maintenance.
Troubleshooting Guide Treadmill will not start. 1) Make sure the power cord is plugged into a surge protector, the surge protector is plugged into a properly grounded outlet, and the surge protector is turned on. (Refer to “Power Requirements”) 2) Check the circuit breaker located on the front of the treadmill. If the switch protrudes, it has tripped. Wait five minutes and then press the switch back in.
SMOOTH Treadmills – LIMITED WARRANTY CONSULT YOUR PHYSICIAN BEFORE USING THIS PRODUCT. This Limited Warranty applies in the United States to products manufactured or distributed by Smooth Fitness (“Smooth”) under the SMOOTH brand name. The RESIDENTIAL warranty period to the original purchaser is (lifetime) on the frame, (10) years on the motor, (3) years on parts, and (1) year labor. This warranty does not cover wear and tear, only manufacturer defects for the periods specified.