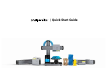
| Quick Start Guide
3-in-1 3D Printer Quick Start Guide Content A Before You Start B Assemble the 3D Printer C Use the 3D Printer Load Filament Level the Heated Bed Start Printing Support 2
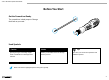
-in-1 3D Printer Quick Start Guide Before You Start Get the Screwdriver Ready The screwdriver is dual-purpose. Change the blade as you need. Used Symbols ! Caution Notice Ignoring this type of message might result in malfunction or damage of the machine. Details you should be aware of throughout the process. Tips Tips offer you convenient operations and additional options. Make sure that the highlighted part is facing the right way.
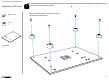
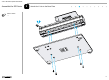
3-in-1 3D Printer Quick Start Guide Assemble the 3D Printer M4 x 8 Screw x4 1 Attach the Feet to the Base Plate Place the Base Plate so that you can read the sentence on the label.
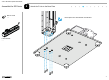
3-in-1 3D Printer Quick Start Guide Assemble the 3D Printer 2 Attach the Heated Bed to One of the Linear Modules (Y Axis) Screw for Platform x4 Heated Bed x1 Linear Module x1 Notice The installation position of the screws must be the same as illustrated.
3-in-1 3D Printer Quick Start Guide Assemble the 3D Printer 3 Attach the Y Axis to the Base Plate M4 x 8 Screw x4 6
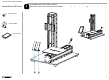
3-in-1 3D Printer Quick Start Guide Assemble the 3D Printer M4 x 8 Screw x4 4 Attach the Z Axis to the Base Plate Please place the Linear Module as illustrated.
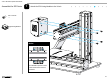
3-in-1 3D Printer Quick Start Guide Assemble the 3D Printer 5 Assemble the Screen Holder and then Slide the Touch Screen into the Screen Holder M4 x 8 Screw x2 Screen Holder x1 Touch Screen x1 8
3-in-1 3D Printer Quick Start Guide Assemble the 3D Printer 6 Attach the X Axis to the Z Axis M4 x 8 Screw x4 Linear Module x1 Notice The installation position of the screws must be the same as illustrated.
3-in-1 3D Printer Quick Start Guide Assemble the 3D Printer 7 Attach the 3D Printing Module to the X Axis M4 x 8 Screw x4 3D Printing Module x1 Notice The installation position of the screws must be the same as illustrated.
3-in-1 3D Printer Quick Start Guide Assemble the 3D Printer M4 x 28 Screw x4 Controller x1 8 Attach the Controller to the Z Axis ! Caution Make sure the On/Off button is switched to Off (away from the Power Jack).
3-in-1 3D Printer Quick Start Guide Assemble the 3D Printer 9 Attach Filament Holder to the Z Axis M4 x 28 Screw x2 Filament Holder x1 12
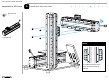
3-in-1 3D Printer Quick Start Guide Assemble the 3D Printer 10 Connect the Modules to the Controller and Power On Notice RJ45 Cable x1 1 (RJ 45) RJ25 Cable x1 1 Power 2 3 2 You can also connect the cables according to the provided card. ! 5 Power Adapter x1 6 The RJ25 Cable (Heated Bed Cable) is comparatively smaller than the RJ45 Cable (Module Cable). 3 Screen Caution Make sure all the cables are correctly and properly connected as illustrated before you power on the machine.
3-in-1 3D Printer Quick Start Guide Use the 3D Printer 2 1 Level the Heated Bed >> Load Filament >> Start Printing 14
3-in-1 3D Printer Quick Start Guide Level the Heated Bed 1 This Section Makes Sure the Heated Bed and X Axis are Level If the print cannot stick to the heated bed, it is recommended to go through this section again.
3-in-1 3D Printer Quick Start Guide Level the Heated Bed 2 Level the Four Corners in Order 1 2 Notice 4 3 The sequence must be strictly followed, or the leveling will fail. If there is any mistake during this process, please level the heated bed again starting from the first corner. To level the heated bed, please level the four corners in order. These corners correspond to the numbers on the Touch Screen as shown in the next step.
3-in-1 3D Printer Quick Start Guide Level the Heated Bed 3 Level the First Corner On the Touch Screen, go to Settings > Calibration. It may take a few seconds after you tap Calibration. Tap 1 and the 3D Printing Module will move to the first corner.
3-in-1 3D Printer Quick Start Guide Level the Heated Bed 4 Get an A4 Paper Tips You can also use the Calibration Card to calibrate. Put one half of a sheet of A4 paper between the Heated Bed and the nozzle.
3-in-1 3D Printer Quick Start Guide Level the Heated Bed 5 Adjust the Distance Between the Heated Bed and the Nozzle 0.1mm Adjust the distance between the Heated Bed and the nozzle using the Up and Down buttons. Keep adjusting until there is slight resistance on the paper from the nozzle. Use the Move 0.05 mm/0.2 mm/0.5 mm buttons to decide how far the nozzle moves every time you tap the Up or Down button.
3-in-1 3D Printer Quick Start Guide Level the Heated Bed 6 Use the Paper to Adjust the Distance Pull the paper and feel the resistance while you adjust the distance.
3-in-1 3D Printer Quick Start Guide Level the Heated Bed 7 Level the Second to Fourth Corner Tap 2 and follow steps 5-6 to level the second corner. Use the same method to level the third and fourth corners.
3-in-1 3D Printer Quick Start Guide Level the Heated Bed 8 Save the Settings Tips If you have any question, find your answers at manual.snapmaker.com/3d_printing When all the corners are leveled, tap Save. Remember to pull out the paper when you finish leveling.
3-in-1 3D Printer Quick Start Guide Reset the Calibration to Factory Settings After you detach and reattach the heated bed to the Y axis, use the Reset button to reset the calibration to factory default settings. It avoids the nozzle from digging into the heated bed during calibration by moving the nozzle about 3 mm above the heated bed.
3-in-1 3D Printer Quick Start Guide Load Filament 1 Reposition the 3D Printing Module On the Touch Screen, go to Controls > Jog Mode > X+/Z+. Keep tapping X+/Z+ until the 3D Printing Module is moved to the illustrated position.
3-in-1 3D Printer Quick Start Guide Load Filament 2 Get the Nozzle Ready On the Touch Screen, go to Controls > Change Filament > Confirm.
3-in-1 3D Printer Quick Start Guide Load Filament 3 Change the Target Temperature Based on the Filament You Use Tap Temp -10°C/Temp +10°C to change the target temperature to the value you need. For example, if you want to print ABS, you need to change Target Temp to 240°C. Then wait for the current temperature to gradually increase to the target temperature.
3-in-1 3D Printer Quick Start Guide Load Filament 4 Hang the Filament over the Filament Holder When you are waiting, hang the filament over the Filament Holder. For smoother printing, the end of the filament should be placed as shown above.
3-in-1 3D Printer Quick Start Guide Load Filament 5 Insert the Filament Tips Use a pair of scissors or diagonal cutter to cut the end of the filament at a 45° angle. 2 Try to straighten the filament as much as you can. 1 When the Current Temp reaches the Target Temp, press the button on the front of the 3D Printing Module and at the same time insert the filament into the hole on the top. Press down the button to the illustrated level.
3-in-1 3D Printer Quick Start Guide Load Filament 6 Keep Inserting the Filament Keep inserting the filament until you see some filament coming out of the nozzle.
3-in-1 3D Printer Quick Start Guide Load Filament 7 Clean the Filament Use the provided Tweezer to clean the filament on the nozzle and tap Back.
3-in-1 3D Printer Quick Start Guide Start Printing We only provide a general description of the setup procedure in this guide. Please refer to the online manual for details: manual.snapmaker.
3-in-1 3D Printer Quick Start Guide Start Printing 1 Download the Software Tips Other compatible software includes: Cura, Simplify 3D, Slic3r. Download Snapmaker3D from our official website: snapmaker.
3-in-1 3D Printer Quick Start Guide Start Printing 2 Generate G-code Tips Follow our Thingiverse official account to find some useful models to print: www.thingiverse.com/SnapmakerInc/designs Generate G-code of the file you want to print.
3-in-1 3D Printer Quick Start Guide Start Printing 3 Choose a Way to Print Option 1 Using the Computer Option 2 Using the USB Disk (The computer must be connected to the machine throughout the process.) (No need to connect your computer to the machine.
3-in-1 3D Printer Quick Start Guide Support Besides this guide, there is also a User Manual available on our website: snapmaker.com/document Find the answers in our FAQ page if you run into any problem during assembly: faq.snapmaker.com Share anything you want with other Snapmaker users at our forum: forum.snapmaker.com Any news from you is good news for us. If you have any questions, don’t hesitate to contact us.
Thomas Edison once said, “A minor invention every ten days, and a big one every six months or so.” What is your first invention with the Snapmaker? To use the laser engraver and CNC carver, please read the corresponding guide. Part No.: FA001 V1.0.