Modelscovered: Actual product may differ from product pictured above Blower Kit Manual No. 7100056 (I.R.
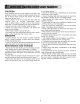
CllnutlnJllflln$! You have just purchased one of the finest pieces of outdoor power equipment on the market today. If properly cared for, your new Z-Vac Grass Catcher Kit will provide years of dependable service. Please read and follow this instruction manual carefully in order to get the most out of your new equipment.
ImPS#TMTI7 ## CBgJl! Y J$$EmB£1N8 8R8PELq77N8 TRAINING -- Read, understand, and follow all instructions in the manual and on the unit before starting. If the operator(s) or mechanic(s) can not read English it is the owner's responsibility to explain this material to them. -- Become familiar with the safe operation of the equipment, operator controls, and safety signs. --All operators and mechanics should be trained. The owner is responsible for training the users.
CHILDREN Tragic accidents can occur if the operator is not alert to the presence of children. Children are often attracted to the unit and its activity. Never assume that children will remain where you last saw them. -- Keep children out of the mowing area and under the watchful care of another responsible adult. -- Do not allow children or others to ride on the machine, attachment, or towed equipment (even with the blades off). -- Be alert and turn unit off if children enter the area.
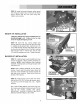
BLOWER KIT INSTALLATION STEP 1 : Remove pin, rod and spring securing discharge deflector to mower deck, and remove deflector. Store deflector for future use. IMPORTANT: Never operate any mower without a discharge deflector or grass catcher securely in place. STEP 2: Remove two bolts securing right deck pulley guard to mower deck and remove guard. Set bolts aside for future assembly step. Store guard for future use. IMPORTANT: Never operate any mower without a pulley guard securely in place.
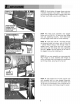
STEP 6a: Remove bolts securing impeller pulley cover to blower, and remove cover. REMOVE BOLTS, HEN REMOVE OVER STEP 6b: Check to see that blower belt is routed around impeller pulley and idler pulleys after belt is installed onto deck pulley. Then replace cover. Tighten bolts securely. IMPORTANT: Never operate any mower without a pulley guard securely in place.
STEP9: Installbeltguardbetweenpulleyguard andbeltguardsupportclipon frontpartof blower mount.Securewith two 5/16 nylon wing nuts. Tightennutssecurely. WEIGHT KIT INSTALLATION !! Warning: Weight kit must be installed prior to installing bagger unit. Failure to do so may result in Iongitudal tipping of unit. STEP 10: Insert the four narrow weight bars through opening in side of foot rest. Be sure holes in weights are all aligned.
INSERT PIN INTO ROD STEP 13: Hook bottom of bagger frame onto pins in bottom of bumper mount plate. Then slide locking rod through aligned holes in bagger flame and bumper mount plate, securing with bridge pin. HOOK BAGGER FRAME ONTO BUMPER MOUNT PLATE PINS CROSS ASSEMBLY STEP 14: Install cross assembly onto bagger frame with four 3/8-16 x 3/4 bolts and hex flange lock nuts, tightening securely. Insert bolts back through bagger frame and into cross assembly.
STEP18: Installbagsonto cross assemblyby hookingslot in baghangerontotabs in channel assembly. STEP19:Closecoverandlockin placeby hookinglockknobintoslotin coverlatcharm. STEP20: Sliponehoseclampontoeachendof hose(usethe clampwiththe blackquick-release knobatthe blowerend),andinstallhosebetween blowerandbagger.Makesureto fit hosesfirmly ontoadapters.Tightenclampssecurely.
INTRODUCTION WARNING Follow operation and maintenance instructions in the Operator's Manual provided with the Snapper CZT/HZT. DO NOT attempt to remove any clogs from deck, blower, or hose with engine or blade running. STOP engine. STOP blades. Set brake. Remove key. Make sure blades and all rotating components have come to a complete stop before removing any catcher or unclogging any catcher component. GRASS CATCHER OPERATION 1. Select desired cutting height.
IF THEGRASSCATCHER BECOMES CLOGGED (ContinuedFromPreviousPage) 2. 3. To Clear A Plugged Hose 1. Stop blades. Stop engine. Remove key. 2. After all rotating components (engine, blower, blades) have come to a complete stop, loosen hose clamp at outlet of blower, and remove hose from blower. 3. Clear any obstructions from hose. If necessary, use a stick to reach into the hose. 4. Reinstall clamp. hose to blower and securely tighten 4. Using a stick or similar object, clear all obstructions from blower.
30 18 22 :\ 25 27 _25 24 24 BLOP_ERUNIT GROUP 25 25 CZT / HZT Models 28 26 * Grease Fitting Orientation 12
SntlllllKl-l/tlc lloilr llnl! SrOUll- CJT/ETmedel$ Item Part No.
6 S BLOWER_ CZT 1 _T G,_JP Mo,de_s 14 4
apBer l-mc We r mun! 8 #p - ClT/l medels Item Part No. aty Description 1 2 3 4 5 6 7 8 9 10 11 12 13 14 15 16 17 18 19 2O 3036323 3037161 1 1 91537 3037162 3046806 78298 3027505 3027507 91541 3027508 91304 90613 3032118 91527 91601 90951 3020807 12315 91617 2 1 1 1 1 1 4 1 2 4 1 1 1 2 1 1 1 BELT, A Section, 91.
t 2 42 \ 3 / / / / 26 'Z-VAC' 25 CATCHERGROUP CZT/HZT 16 Models
apper l- ac Catcher8mm- CH/ medel$ Item Part No. Qty.
1 2 See Catcher Group 5 Fastensto Rear BumperAssemblyof Mower SNAPPER 'Z-VAC' CATCHERMOUNTGROUP CZT /HZT Models 11 18
aplmr l-mc CK er mum S lp - CH/ medel$ Item Part No. Qty.
Place Against Front of Footrest Slide Through Opening in Footrest 2 WEIGHT BAR GROUP CZT 1 HZT ModeJs 20
SnappKZ-I/acWelUMBarSNm- CH/ medel$ Item Part No. Qty.
2 \ 5 NOTE: Decals are not to scale.
_apmr Z-I/atJeu! 8nip- CH/_medel$ Item Part No. Qty.
2 YEAR LIMITED WARRANTY For two (2) years from purchase date for the original purchaser's residential, non-commercial use, SNAPPER, through any authorized SNAPPER dealer will replace, free of charge (except for taxes where applicable), any part or parts found upon examination by the factory at McDonough, Georgia, to be defective in material or workmanship or both.
GrassCatcherKit forCZT/IlZT Series0 McDonough, GA 30253 U.S.A. Manual No. 7100056 (I.R.