Table of Contents ENG Please read the cautions carefully before using this product 2 Product features 3 Installation of the product 4 Names and operation of control buttons 6 Selection and operation of the OSD menu 7 Menu 8 Timing guide 11 Product specifications 12 Before asking for repair service, please check below 13 1
ENG Please read the cautions carefully before using this product Do not scratch the screen of the LCD monitor with sharp materials such as nails and pens. The interior part of the monitor is composed of electric elements. If the monitor is broken, do not try to disassemble it, because it is necessary to contact appropriate technical services in order to have the product repaired. Take care of the LCD monitor so that it is not damaged by the external impact.
Product features ENG Introduction Thank you for buying our TFT LCD monitor. Our monitor is a high-resolution monitor that has features of electromagnetic wave blocking, reduction in electricity consumption, and efficient use of space. In view of the fact that this user's manual is prepared for helping you to adequately use the product, it is recommendable to read the user's manual before using the product.
ENG Installation of the product Checking the product Please check if the product contains the following items. If there are some items missing, please contact the technical services. 1. TFT LCD monitor 2. User's manual (including product warranty). 3. AC to DC adapter. 4. Power cable (the power cable can be different according to use environment). 5. Signal Cable ( Monitor Connection Cable ) 6. Monitor Base 7. Audio cable 8.
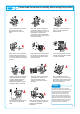
Installation of the product ENG USB installation (option) 1. Connect the monitor to the PC with signal cable and turn on the PC. 2. Connect USB-compatible PC or other hub to the upstream port on the left of the monitor with USB cable. 3. When the USB cable is connected, the USB function is automatically set. 4. After setting, you can connect USB-compatible accessories to the downstream port on the monitor's USB hub. Note - USB hub function may not work correctly according to PC, OS or accessories.
Names and operation of control buttons ENG Names and operation of control buttons This monitor has several control buttons. They can be used according to the user preference. Function of the buttons Ȧ Power button ( ) If you press the power button, the indicator lamp is turned on, and the operation of the monitor is initiated. If you do not want to start the operation of the monitor, press the power button again.
ENG Selection and operation of the OSD menu You can select the OSD menu in the OSD window using all the control buttons at the bottom of the screen. To change the current settings or adjust them for the desired settings, follow the following steps. MENU / SELECT / (Select the menu item) MENU SELECT (Exit the OSD menu window) (Select the main item) / SELECT (Select the main item) 1. Press the Menu button to open the OSD menu window. 2. Press the / button to move the item of desired main menu. 3.
Menu ENG 1. Color menu 2. Image menu If you press the menu button, the following screen appears. Main menu screen Menu selection screen Submenu screen ï\é¶Window Current screen status Contrast Adjusts contrast. (0 ~ 100) Brightness Adjusts brightness. (0 ~ 100) Color template Adjusts the color desired by the user. (19300. 6500. 5000. User) Color adjustment Adjusts colors (red, green and blue). Red: Adjusts color saturation. (0 ~ 100) Green: Adjusts color saturation.
ENG Menu 3. Function menu Auto-Adjust Configures Auto-Position, AutoPhase, Auto-Clock and AutoColor at the same time. Auto-Position Adjusts the position of the screen automatically. Auto-Phase Adjusts the center of the screen automatically. Auto-Clock Adjusts the pixel size of the screen automatically. Auto-Color Adjusts the colors of the screen automatically. Exit Exits the current menu. 4. OSD menu Language Configures the language used in the OSD menu.
Menu 5. Miscellaneous ENG Ȧ Description of operation messages Cable not connected Cable not connected It appears when there is no input signal from the computer. If the message disappears, the monitor status is changed to energy-saving mode. Signal out of range Signal out of range It appears when the input signal is out of range. Mode selection - 640 x 400: Optimizes the screen status for the status of 640 x 240. - 720 x 400: Optimizes the screen status for the status of 720 x 400.
Change Pin :To change the Pin number, select Change Pin and enter New Pin.
Timing guide ENG Timing guide This product is a multi-frequency monitor. It functions in horizontal frequencies from 30 kHz to 80 kHz and vertical frequencies from 56 Hz to 75 Hz. Due to its design based on microprocessor, it offers the functions of automatic synchronization and automatic size. This monitor is equipped with 10 programmed configurations that are shown in the timing table. The followings are the ten configurations. Resolution Frequency Clock [MHz] Polarity (H/V) 70Hz 28.
Product specifications ENG Product specifications Type LCD pixel pitch 19'' diagonal viewable screen TFT (Thin Film Transistor). Active Matrix Panel 0.294 mm (H) x 0.294 (V). R. G. B. vertical stripe. Surface Color 16,194.277 colors. Display Condition anti-glare coating.
ENG Before asking for repair service, please check below Before asking for repair service, please check below You can contact our technical services or selling agency if you want to ask for repair service. Check the following before you ask for repair service. Screen shows no image. - Check if the power cable is correctly connected. - Check if the power of the monitor is turned off. - Check if the system power is turned off. - Check if the signal cable of the monitor is connected.
FCC NOTE :This equipment has been tested and found to comply with the limits for a Class B digital device, pursuant to Part 15 of the FCC Rules. These limits are designed to provide reasonable protection against harmful interference in a residential installation. This equipment generates, uses and can radiate radio frequency energy and, if not installed and used in accordance with the instructions, may cause harmful interference to radio communications.