
User Manual


You can select the OSD menu in the OSD window using all the control buttons at
the bottom of the screen. To change the current settings or adjust them for the
desired settings, follow the following steps.
1. Press the Menu button to open the OSD menu window.
2. Press the / button to move the item of desired main menu.
3. If you highlight the desired menu item, press the Select button.
4. Press the / button to move the desired submenu item.
5. If you highlight the submenu item, press the Select button.
6. Press the / button to modify the current value.
7. Press the Select button to save the modified value.
8. To close the OSD menu window, press the Menu button or choose
'Exit (Salir) in the submenu window.
The menu that can be configured by the user in this product uses the pull-down
menu. The main menus are as follows.
7
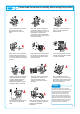
Selection and operation of the OSD menu
MENU
SELECT
MENU
SELECT SELECT
(Select the
menu item)
(Exit the OSD
menu window)
(Select the
main item)
(Select the
main item)
The OSD window will disappear within a few seconds if there is no input in
the OSD window. It does not appear when there is no input signal.
Note
1. Color
Adjusts brightness, contrast, sharpness and
saturation.
2. Image
Adjusts the position and sharpness of the
screen.
3. Function
Adjusts the position, sharpness and saturation
of the screen.
4. OSD menu
Adjusts the language used, the position of the
menu screen, the display time of the menu
screen and the saturation of the menu screen.
5. Miscellaneous
Configures a certain screen status and
initializes the menu value.
Each menu has its corresponding
items.
You can modify the value after
selecting the desired item
according to the selection method
and OSD menu operation in the
previous chapter.
If you choose the menu, the icon
corresponding to the chosen
menu blinks, and the selected
menu appears in the menu
selection screen.
Note
/
/
/
ENG