WWW SNOM COM %.',)3( $%5 43#( 5SERÖ'UIDE "EDIENUNGSANLEITUNG ÖÖÖ3(/24Ö6%23)/.Ö ÖÖÖ+52:6%23)/.
User Guide short version Bedienungsanleitung kurzversion Version 1.31 © 2007 snom technology AG All rights reserved. Alle Rechte vorbehalten. For questions regarding the product, please contact your snom Value Added Reseller (VAR). Bei Fragen bezüglich des Produkts kontaktieren Sie bitte Ihren snom Fachhändler. Also visit us at www.snom.com Besuchen Sie uns auf www.snom.
english Welcome Thank you for purchasing the . This user guide describes how to install, configure, and use the , enabling you to make SIP calls. About this User Manual This user guide consists of a number of sections to guide you through the process of installing, configuring, and setting up your phone for first use. These sections are best read from beginning to end. The remaining sections of this user guide serve as a reference guide for all features of the .
english Have your serial number and MAC address ready when contacting support. You find the numbers on the bottom of the gateway. For inquiries concerning your network connection contact your network administrator. For the EU: The telephone’s conformity with EU directives is confirmed by the CE symbol. We hereby declare that the snom m3 and the snom m3 handset are in compliance with the essential requirements and other relevant provisions of Directive 1999/5/EC.
Charging and discharging Your device is powered by a rechargeable battery. The full performance of a new battery is achieved only after two or three complete charge and discharge cycles. The battery can be charged and discharged hundreds of times, but it will eventually wear out. Use only snom technology AG approved batteries. If left unused, a fully charged battery will lose its charge over time.
english switch off your device when its use is prohibited or when it may cause interference or danger. Use the device only in its normal operating positions. Do not place credit cards or other magnetic storage media near the device, because information stored on them may be erased. Medical devices Operation of any radio transmitting equipment, may interfere with the functionality of inadequately protected medical devices.
For countries outside the European Union: Disposal of electrical and electronic products in countries outside the European Union should be done in line with the local regulations. Please contact the local authorities for further information. Battery disposal information: Defect or exhausted batteries should never be disposed of as municipal waste. Return old batteries to the battery supplier, a licensed battery dealer or a designated collection facility. Do not incinerate batteries.
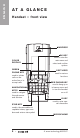
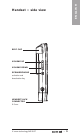
english At a G l a n c e Handset – front view earpiece Color display green phone key used to initiate calls on the active line or to accept calls Navigational keys used to navigate through menus and services Star key used in the name editor to capitalize letters, type numbers and enter a star symbol 8 • OK key used to enter the main menu and select and confirm options Soft keys used for various functions red phone key used to hang up or to leave a menu and to turn the handset on or off R key used to
english Handset – side view Belt Clip Volume UP Volume Down Speakerphone activation and deactivation key Headset Jack Connector 2.
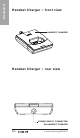
english Handset Charger – front view Handset charger Handset Charger – rear view Power Supply Connector On Handset Charger 10 • © snom technology AG 2007
Connection Status IndiCators 1) Handset Name Battery Status and charging indicator Time and Date Call Log for incoming, outgoing and missed calls (activated with soft key) Options for redial and active calls (activated with soft key) OK Key Indicator signifies that the OK key is active 1) black / black – out of range of the gateway yellow / black – within range of the gateway, but not ready for SIP calls yellow / yellow – within range of the gateway and ready for SIP calls on primary line Main menu
english Gateway – rear view Power Connection RESET DC 9-20V NET Net Connection port Reset Button for Ethernet cable for activating configuration changes and enabling handset registration Gateway – frontview netWORK Indicator Network indicator is flashing during boot. It indicates that the gateway has received an IP address Registered Indicator indicates that the gateway is registered (at least one line) CALL Indicator is flashing during firmware update.
english I n s ta l l i n g t h e Phone This section guides you through the process of installing your .
english Installing the gateway and registering the handset How to install the gateway 1) To prepare the gateway for SIP telephony, connect the Ethernet cable to the NET port on the gateway and then to a LAN port on your network.
english How to install and register the handset 1) Open the battery cover. 2) Insert the battery in the handset, making sure that contacts of battery are correct.
english 3) Connect the power adapter to the charger and the other end to an active power outlet (preferably a continuous outlet without a switch to interrupt its power).
NOTE : After registration of the first handset, there is a 5-minute period during which you can register additional handsets. If you want to register additional handsets after the 5-minute period has expired, press the Reset button on the back of the gateway to start a new 5-minute registration period. © snom technology AG 2007 • 17 english 4) Place the handset in the charger, and charge the battery. We recommend that you charge the batteries fully before first use. This takes approximately 10 hours.
english GETTING ST A RTED Using the Menus and Typing Text and Numbers The has 5 menus all of which you access from the Main menu. How to enter the Main menu 1) In Idle mode, press the OK key. The Main menu opens. Typing text and numbers When you are in a number editor or text editor use the Erase soft key to erase text that is already in the editor, or to erase text that you have just typed.
When you are in a text editor, the upper right corner of the display shows which text input mode is currently active. You can change the input mode of the text editor at any time during editing. 1) In a text editor, press the Options soft key, choose Input mode, and then press the OK key. 2) Choose the preferred input mode, and then press the OK key. The following options are available: Option What it does ABC Types upper case letters.
english 1) In Idle mode, press the Star key, and then press the Lock soft key. 2) To unlock, press the Star key, and then press the Unlock soft key. NOTE : The keypad unlocks automatically when you answer an incoming call or when you make an emergency call. Configuring the The following sections describe how to configure and set up your for first use. You have to configure your phone before it is ready for first use.
Press the Save button. You will be redirected to the main page. Choose the Identity 1...8 again and press Reboot button to apply the settings. Please wait for the reboot of the Gateway. After a few seconds, both status indicators in the upper left corner of the display will turn yellow, indicating that you have successfully configured your . How to configure the handset You can configure your set. using the using the hand- 1) In Idle mode, press the OK key, choose Settings, and then press the OK key.
english 2) Choose VoIP settings, and then press the OK key. 3) When prompted for a PIN code, type the default PIN code 0000, and then press the OK key. 3) Choose Accounts. You then enter the data for the SIP account. 1) Choose the appropriate SIP account and fill in the user data. 2) If you have more than one SIP account, then you need to enter the account settings for each account. 3) Choose the listed parameters one by one, press the OK key.
How to change the PIN code Make sure to change the PIN code after first login to prevent unauthorized access to your VoIP settings. 1) In Idle mode, press the OK key, choose Settings, and then press the OK key. 2) Choose VoIP settings, and then press the OK key. 3) When prompted for a PIN code, enter the default PIN code 0000, and then press the OK key. 4) Choose Change PIN code and then press the OK key. 5) Enter a new PIN code, and then press the OK key.
english How to change access code The access code is used for calculating encryption keys during the intitial pairing of handsets to the gateway. To ensure privacy, the access code must be changed. Handset and gateway access codes must be the same. When registering a new handset, ensure that its access code is modified to the same value as the access code of the gateway. 1) Enter Settings, System settings. 2) When prompted for a PIN code, type the PIN code (default: 0000), and then press the OK.
Before you start using your phone, we strongly recommend that you set handset language, country selection, time zone, and routing of emergency numbers to ensure that your functions properly. How to set the handset language The individual handset language setting determines in which language the text on the display is presented. 1) In the Main menu, choose Settings, and then press the OK key. 2) Choose System settings.
english for a PIN code, type the PIN code (default: 0000). Choose Time and date. Press the OK key. 3) Choose Time zone, press the OK key, and then select the appropriate time zone. Press the OK key. You should also verify that the time format and the daylight saving settings are correct. Date and time are automatically synchronized with a time server on the Internet to ensure that the time and date displayed on the is always correct.
If you have more than one handset, you must specify from which account or accounts you want each handset to receive calls. To do this you use Call Groups. 1) In the Main menu, choose Settings, and then press the OK key. 2) Choose Telephony settings, press the OK key, then choose Call Groups and then enter your PIN Code (the default PIN code is 0000). Press the OK key. All account names for the VoIP accounts you subscribe to are listed.
english 1) Press the OK key. The Firmware update menu appears. 2) To update to the latest version, choose the update listed on the Simple tab, press the OK key, and then press the Yes soft key when prompted wether you want to update the system. If you press the View soft key before you start the installation, you can find out about the software version number and the date and time it was released. 3) Select (if available) language and press OK.
english M A KING A ND A NS W ERING C A LLS The following sections describe how to make calls with the . When you make and receive Internet calls, the following icons are displayed: • Calling • Ongoing call How to make a call In Idle mode, type the number you want to dial and then press the Green phone key How to end a call Press the Red phone key or place the handset in the charger. How to make a call using contacts 1) In the Main menu, choose Contacts, and then press the OK key.
english 2) Choose the contact you want to call and then press the Green phone key. The default number is dialed. If you want to call a contact and use another number than the default number, do the following: 1) In the Main menu, choose Contacts and then press the OK key. 2) Choose the contact you want to call and then press the OK key. 3) Choose a number from the list and then press the Green phone key.
Enter the emergency number and then press the Green phone key. You cannot make emergency calls in the following situations: • Firmware update is in progress • Handset batteries are drained • Power failure • Handset is out of range of the gatewa How to answer a call Pick up the handset and then press the Green phone key. You can also set the to auto answer so that when you pick up the handset from the charger, you have automatically answered the call.
english Multiple Call handling To make another call you have to put the first party on hold, and then just dial the number of the second party as you would normally dial a number. By pressing the Options key you then can • Swap the calls, • Initiate a 3-way conference, • Or transfer the two active calls (join those two, see transferring calls for more details).
When receiving a call and you want to transfer the call unattended to a third party press the Hold key then the Options key, then select Transfer and press the OK key. Enter the third party extension number and press the OK key. The call is transferred to the third party extension. You will find the detailed User Guide on the Internet at www.snom.com.