WWW SNOM COM %.',)3( $%5 43#( 5SERÖ'UIDE "EDIENUNGSANLEITUNG ÖÖÖ3(/24Ö6%23)/.Ö ÖÖÖ+52:6%23)/.
User Guide short version Bedienungsanleitung kurzversion Version 1.31 © 2007 snom technology AG All rights reserved. Alle Rechte vorbehalten. For questions regarding the product, please contact your snom Value Added Reseller (VAR). Bei Fragen bezüglich des Produkts kontaktieren Sie bitte Ihren snom Fachhändler. Also visit us at www.snom.com Besuchen Sie uns auf www.snom.
english Welcome Thank you for purchasing the . This user guide describes how to install, configure, and use the , enabling you to make SIP calls. About this User Manual This user guide consists of a number of sections to guide you through the process of installing, configuring, and setting up your phone for first use. These sections are best read from beginning to end. The remaining sections of this user guide serve as a reference guide for all features of the .
english Have your serial number and MAC address ready when contacting support. You find the numbers on the bottom of the gateway. For inquiries concerning your network connection contact your network administrator. For the EU: The telephone’s conformity with EU directives is confirmed by the CE symbol. We hereby declare that the snom m3 and the snom m3 handset are in compliance with the essential requirements and other relevant provisions of Directive 1999/5/EC.
Charging and discharging Your device is powered by a rechargeable battery. The full performance of a new battery is achieved only after two or three complete charge and discharge cycles. The battery can be charged and discharged hundreds of times, but it will eventually wear out. Use only snom technology AG approved batteries. If left unused, a fully charged battery will lose its charge over time.
english switch off your device when its use is prohibited or when it may cause interference or danger. Use the device only in its normal operating positions. Do not place credit cards or other magnetic storage media near the device, because information stored on them may be erased. Medical devices Operation of any radio transmitting equipment, may interfere with the functionality of inadequately protected medical devices.
For countries outside the European Union: Disposal of electrical and electronic products in countries outside the European Union should be done in line with the local regulations. Please contact the local authorities for further information. Battery disposal information: Defect or exhausted batteries should never be disposed of as municipal waste. Return old batteries to the battery supplier, a licensed battery dealer or a designated collection facility. Do not incinerate batteries.
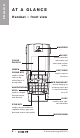
english At a G l a n c e Handset – front view earpiece Color display green phone key used to initiate calls on the active line or to accept calls Navigational keys used to navigate through menus and services Star key used in the name editor to capitalize letters, type numbers and enter a star symbol 8 • OK key used to enter the main menu and select and confirm options Soft keys used for various functions red phone key used to hang up or to leave a menu and to turn the handset on or off R key used to
english Handset – side view Belt Clip Volume UP Volume Down Speakerphone activation and deactivation key Headset Jack Connector 2.
english Handset Charger – front view Handset charger Handset Charger – rear view Power Supply Connector On Handset Charger 10 • © snom technology AG 2007
Connection Status IndiCators 1) Handset Name Battery Status and charging indicator Time and Date Call Log for incoming, outgoing and missed calls (activated with soft key) Options for redial and active calls (activated with soft key) OK Key Indicator signifies that the OK key is active 1) black / black – out of range of the gateway yellow / black – within range of the gateway, but not ready for SIP calls yellow / yellow – within range of the gateway and ready for SIP calls on primary line Main menu
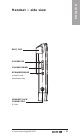
english Gateway – rear view Power Connection RESET DC 9-20V NET Net Connection port Reset Button for Ethernet cable for activating configuration changes and enabling handset registration Gateway – frontview netWORK Indicator Network indicator is flashing during boot. It indicates that the gateway has received an IP address Registered Indicator indicates that the gateway is registered (at least one line) CALL Indicator is flashing during firmware update.
english I n s ta l l i n g t h e Phone This section guides you through the process of installing your .
english Installing the gateway and registering the handset How to install the gateway 1) To prepare the gateway for SIP telephony, connect the Ethernet cable to the NET port on the gateway and then to a LAN port on your network.
english How to install and register the handset 1) Open the battery cover. 2) Insert the battery in the handset, making sure that contacts of battery are correct.
english 3) Connect the power adapter to the charger and the other end to an active power outlet (preferably a continuous outlet without a switch to interrupt its power).
NOTE : After registration of the first handset, there is a 5-minute period during which you can register additional handsets. If you want to register additional handsets after the 5-minute period has expired, press the Reset button on the back of the gateway to start a new 5-minute registration period. © snom technology AG 2007 • 17 english 4) Place the handset in the charger, and charge the battery. We recommend that you charge the batteries fully before first use. This takes approximately 10 hours.
english GETTING ST A RTED Using the Menus and Typing Text and Numbers The has 5 menus all of which you access from the Main menu. How to enter the Main menu 1) In Idle mode, press the OK key. The Main menu opens. Typing text and numbers When you are in a number editor or text editor use the Erase soft key to erase text that is already in the editor, or to erase text that you have just typed.
When you are in a text editor, the upper right corner of the display shows which text input mode is currently active. You can change the input mode of the text editor at any time during editing. 1) In a text editor, press the Options soft key, choose Input mode, and then press the OK key. 2) Choose the preferred input mode, and then press the OK key. The following options are available: Option What it does ABC Types upper case letters.
english 1) In Idle mode, press the Star key, and then press the Lock soft key. 2) To unlock, press the Star key, and then press the Unlock soft key. NOTE : The keypad unlocks automatically when you answer an incoming call or when you make an emergency call. Configuring the The following sections describe how to configure and set up your for first use. You have to configure your phone before it is ready for first use.
Press the Save button. You will be redirected to the main page. Choose the Identity 1...8 again and press Reboot button to apply the settings. Please wait for the reboot of the Gateway. After a few seconds, both status indicators in the upper left corner of the display will turn yellow, indicating that you have successfully configured your . How to configure the handset You can configure your set. using the using the hand- 1) In Idle mode, press the OK key, choose Settings, and then press the OK key.
english 2) Choose VoIP settings, and then press the OK key. 3) When prompted for a PIN code, type the default PIN code 0000, and then press the OK key. 3) Choose Accounts. You then enter the data for the SIP account. 1) Choose the appropriate SIP account and fill in the user data. 2) If you have more than one SIP account, then you need to enter the account settings for each account. 3) Choose the listed parameters one by one, press the OK key.
How to change the PIN code Make sure to change the PIN code after first login to prevent unauthorized access to your VoIP settings. 1) In Idle mode, press the OK key, choose Settings, and then press the OK key. 2) Choose VoIP settings, and then press the OK key. 3) When prompted for a PIN code, enter the default PIN code 0000, and then press the OK key. 4) Choose Change PIN code and then press the OK key. 5) Enter a new PIN code, and then press the OK key.
english How to change access code The access code is used for calculating encryption keys during the intitial pairing of handsets to the gateway. To ensure privacy, the access code must be changed. Handset and gateway access codes must be the same. When registering a new handset, ensure that its access code is modified to the same value as the access code of the gateway. 1) Enter Settings, System settings. 2) When prompted for a PIN code, type the PIN code (default: 0000), and then press the OK.
Before you start using your phone, we strongly recommend that you set handset language, country selection, time zone, and routing of emergency numbers to ensure that your functions properly. How to set the handset language The individual handset language setting determines in which language the text on the display is presented. 1) In the Main menu, choose Settings, and then press the OK key. 2) Choose System settings.
english for a PIN code, type the PIN code (default: 0000). Choose Time and date. Press the OK key. 3) Choose Time zone, press the OK key, and then select the appropriate time zone. Press the OK key. You should also verify that the time format and the daylight saving settings are correct. Date and time are automatically synchronized with a time server on the Internet to ensure that the time and date displayed on the is always correct.
If you have more than one handset, you must specify from which account or accounts you want each handset to receive calls. To do this you use Call Groups. 1) In the Main menu, choose Settings, and then press the OK key. 2) Choose Telephony settings, press the OK key, then choose Call Groups and then enter your PIN Code (the default PIN code is 0000). Press the OK key. All account names for the VoIP accounts you subscribe to are listed.
english 1) Press the OK key. The Firmware update menu appears. 2) To update to the latest version, choose the update listed on the Simple tab, press the OK key, and then press the Yes soft key when prompted wether you want to update the system. If you press the View soft key before you start the installation, you can find out about the software version number and the date and time it was released. 3) Select (if available) language and press OK.
english M A KING A ND A NS W ERING C A LLS The following sections describe how to make calls with the . When you make and receive Internet calls, the following icons are displayed: • Calling • Ongoing call How to make a call In Idle mode, type the number you want to dial and then press the Green phone key How to end a call Press the Red phone key or place the handset in the charger. How to make a call using contacts 1) In the Main menu, choose Contacts, and then press the OK key.
english 2) Choose the contact you want to call and then press the Green phone key. The default number is dialed. If you want to call a contact and use another number than the default number, do the following: 1) In the Main menu, choose Contacts and then press the OK key. 2) Choose the contact you want to call and then press the OK key. 3) Choose a number from the list and then press the Green phone key.
Enter the emergency number and then press the Green phone key. You cannot make emergency calls in the following situations: • Firmware update is in progress • Handset batteries are drained • Power failure • Handset is out of range of the gatewa How to answer a call Pick up the handset and then press the Green phone key. You can also set the to auto answer so that when you pick up the handset from the charger, you have automatically answered the call.
english Multiple Call handling To make another call you have to put the first party on hold, and then just dial the number of the second party as you would normally dial a number. By pressing the Options key you then can • Swap the calls, • Initiate a 3-way conference, • Or transfer the two active calls (join those two, see transferring calls for more details).
When receiving a call and you want to transfer the call unattended to a third party press the Hold key then the Options key, then select Transfer and press the OK key. Enter the third party extension number and press the OK key. The call is transferred to the third party extension. You will find the detailed User Guide on the Internet at www.snom.com.
DE U TSCH Willkommen Vielen Dank für den Erwerb des . Diese Bedienungsanleitung beschreibt die Installation, Konfiguration sowie die Benutzung des , um Gespräche über das SIP (Session Initiation Protocol) führen zu können. Über diese Bedienungsanleitung Diese Bedienungsanleitung besteht aus einer eine Reihe von Abschnitten, die Sie durch die Installation und Konfiguration führen bis zur ersten Inbetriebnahme. Es wird empfohlen vom Anfang bis zum Ende zu lesen.
Auf unserer Internetseite finden Sie weiterhin Hilfestellungen sowie häufig gestellte Fragen in der Wissensdatenbank. Bitte halten Sie die MAC-Adresse des Gerätes bereit, wenn Sie Ihren Support kontaktieren. Diese Nummer finden Sie auf der Unterseite der Basisstation (Gateway). Für Anfragen bezüglich Ihrer Netzwerkverbindung kontaktieren Sie bitte Ihren Netzwerkadministrator. Für die EU: Die Konformität des Gerätes entspricht den EG-Richtlinien und wird durch das CE-Zeichen bestätigt.
DE U TSCH Bei Nichtgebrauch entlädt sich ein voll aufgeladener Akku mit der Zeit. Ist der Akku vollständig entladen, dauert es möglicherweise einige Minuten, bis die Ladeanzeige im Handgerät (Display) eingeblendet wird oder Sie Anrufe tätigen können. Benutzen Sie den Akku nur für den vorgesehenen Zweck. Benutzen Sie keine beschädigten Ladegeräte oder Akkus. Schließen Sie den Akku nicht kurz. Durch Kurzschließen der Pole können der Akku oder der verbindende Gegenstand beschädigt werden.
Implantierte medizinische Geräte: Hersteller medizinsicher Geräte empfehlen einen Mindestabstand von 15,3 Zentimeter zwischen Funkgeräten und implantierten medizinischen Geräten wie z. B. Herzschrittmachern oder implantierten Cardiovertern/Defibrillatoren, um eine mögliche Störung des medizinischen Geräts zu vermeiden.
A U F EINEM B LICK DE U TSCH Mobilteil – Vorderansicht Hörlautsprecher Farbdisplay AbhebenTaste Gespräch annehmen oder einleiten Steuertasten Navigation durch Menüs und Services Stern-Taste Wechsel zwischen Groß-, Kleinbuchstaben und Zifferneingabe sowie Einfügen des Stern-Symbols 38 • OK-Taste Öffnen des Hauptmenüs und auswählen/bestätigen von Optionen DisplayTasten Diverse Funktionen, die im Display angezeigt werden Auflegen-, Ein-/Aus-Taste Gespräche beenden, eine Menü-Ebene zurück und Mobilteil
DE U TSCH Mobilteil – Seitenansicht Gürtelclip Sprachlautstärke für Hörer-/Freisprechmodus erhöhen/verringern Freisprech-Taste Aktivierung und Deaktivierung der Freisprechfunktion Anschluss für Headset 2,5 mm © snom technology AG 2007 • 39
DE U TSCH Mobilteil–Ladeschale – Vorderansicht MobilteilLadeschale Mobilteil–Ladeschale – Rückansicht Anschluss für das SteckernetzTeil der Mobilteil-Ladeschale 40 • © snom technology AG 2007
Display – Ruhezustand Ladezustand des Akkus und Ladeanzeige Zeit und Datum Anrufliste für eingehende,aus gehende und verpasste Anrufe (Aktivierung mit linker Display-Taste) Optionen für Wahlwiederholung und aktive Gespräche (Aktivierung mit rechter Display-Taste) OK-Taste-Anzeige Kennzeichnet die Betätigung der OK-Taste 1) Schwarz / schwarz – Das Mobilteil befindet sich außerhalb der Reichweite der Basisstation Gelb / schwarz – Das Mobilteil befindet sich in Reichweite der Basisstation, ist aber nicht
Basisstation – Rückansicht DE U TSCH Anschluss für das Steckernetzteil der Basisstation RESET DC 9-20V Reset-Taste Aktivierung von Konfigurationsänderungen und Anmeldung von Mobilteilen NET Netzwerkanschluss (LAN) für Netzwerkkabel Basisstation – Vorderansicht NETWORKAnzeige blinkt während des Startvorgangs und leuchtet bei Empfang einer IP-Adresse POWERAnzeige der eingeschalteten Energieversorgung 42 • REGISTERED-Anzeige signalisiert die erfolgreiche Anmeldung von mindestens einem SIP-Konto CALL
INST A LL A TION Voraussetzungen • Zugang zu einem geeigneten Netzwerk (LAN), kabelgebunden • Steckdosen zur Versorgung mit elektrischer Energie (Basisstation und MobilteilLadeschale) • SIP-Konto Daten Hin w e i s : Die Basisstation kann sowohl auf den Tisch gestellt als auch an die Wand montiert werden. Falls längere Kabel benötigt werden, können gebräuchliche Verlängerungen eingesetzt werden. Das Mobilteil hat in Gebäuden eine Reichweite von ungefähr 50 Metern (150 feet) zur Basisstation.
Installation der Basisstation und Registrierung des Mobilteils DE U TSCH INSTALLATION DER BASISSTATION 1) Zur Vorbereitung von Telefonaten via SIP verbinden Sie mittels eines geeigneten Kabel den mit NET gekennzeichneten Anschluss mit einem LAN Anschluss Ihres Netzwerkes.
Mobilteil Installieren und registrieren DE U TSCH 1) Falls montiert, den Gürtelclip abnehmen und den Deckel des Akkufachs gemäß Zeichnung nach oben ziehen. 2) Den Akku in das Fach einsetzen und dabei auf die richtige Polarität achten. Anschließend den Deckel schließen.
DE U TSCH 3) Verbinden Sie das Steckernetzteil sowohl mit der Mobilteil-Ladeschale als auch mit der Steckdose (bevorzugt mit Überspannungsschutz.
Hin w e i s : Nach der Anmeldung des ersten Mobilteils gibt es einen 5-minütigen Zeitraum, um weitere Geräte zu registrieren. Wenn Sie weitere Mobilteile nach diesen 5 Minuten an der Basisstation anmelden möchten, drücken Sie bitte die Reset-Taste auf der Rückseite der Basisstation, um einen neuen 5-minütigen Zeitraum für die Registrierung zu starten. © snom technology AG 2007 • 47 DE U TSCH 4) Stellen Sie das Mobilteil in die Ladeschale und laden Sie den Akku.
ERSTE SCHRITTE DE U TSCH Benutzen des Menüs und Eingabe von Zahlen und Buchstaben Eingeschaltet wird das Mobilteil durch längeres Drücken der Auflege-Taste. Im Auslieferungszustand ist die Menüsprache Englisch. Mit den nachfolgenden Schritten können Sie die Sprache auf Deutsch umstellen. 1) Drücken Sie die OK-Taste, wählen Sie Settings und drücken Sie anschließend erneut die OK-Taste. 2) Wählen Sie nun System settings aus und drücken Sie wieder die OK-Taste.
Hauptmenü Drücken Sie im Ruhezustand die OK-Taste, um in das Hauptmenü zu gelangen. Wenn Sie sich im Eingabemodus für Zahlen oder Buchstaben befinden, können Sie mit der linken Display-Taste (Löschen) die Eingabe löschen. Mit der rechten Display-Taste (Optionen) können Sie im Textmodus den Eingabemodus ändern oder ein Symbol einfügen.
DE U TSCH 1) Drücken Sie die rechte Display-Taste (Optionen), wählen Sie Eingabemodus und drücken Sie dann die OK-Taste. 2) Wählen Sie den gewünschten Eingabemodus aus und drücken Sie anschließend die OK-Taste. Sie können unter den nachfolgend beschriebenen Optionen auswählen: Option Funktion ABC Alle Buchstaben werden großgeschrieben. Abc Erster Buchstabe eines Wortes großgeschrieben, alle weiteren klein. abc Alle Buchstaben werden kleingeschrieben. 123 Eingabe von Ziffern.
Hin w e i s : Die Tastatursperre schaltet sich bei einem ankommenden Anruf oder bei Betätigung eines Notrufs automatisch aus und anschließend wieder ein. DE U TSCH Konfigurieren Der nachfolgende Abschnitt beschreibt die Konfiguration und die Einrichtung des für den ersten Gebrauch. Das Gerät muss unbedingt konfiguriert werden, damit es betriebsbereit ist. Sie benötigen die SIP-Kontoeinstellungen Ihres Anbieters, um die Einrichtung des abzuschließen. Konfiguration über den Webbrowser 1.
DE U TSCH 4.
Jetzt können die Eingaben für die SIP-Konten vorgenommen werden. 1) Wählen Sie das zu konfigurierende Konto aus und tragen Sie Ihre SIP-Anmeldedaten in die entsprechenden Felder ein. 2) Wenn Sie weitere Konten registrieren möchten, müssen Sie die Daten für jedes Konto einzeln eingeben.
DE U TSCH • Registrar: IP oder DNS-Adresse des SIPServer • Outbound Proxy: (optional): IP oder DNSAdresse des Proxy, über den die Daten geschickt werden 4) Jede Eingabe wird mit der OK-Taste beendet. Sie werden anschließend gefragt, ob Sie die Änderung Speichern möchten. Zur Übernahme der Änderung drücken Sie die linke Display-Taste für Ja. 5) Drücken Sie die Reset-Taste auf der Rückseite der Basisstation, wenn Sie alle Änderungen vorgenommen haben.
DE U TSCH 6) Drücken Sie die linke Display-Taste für Ja, um die Änderung zu übernehmen. 7) Zum späteren Nachschlagen können Sie den neuen PIN-Code hier notieren: Hin w e i s : Der PIN-Code des Mobilteils und der Zugang für die Webbrowser Einstellungen sind unabhängig voneinander. Die Änderung der Mobilteil-PIN hat keinen Einfluss auf das Passwort für den Webbrowser-Zugriff. Zugangscode ändern Der Zugangscode wird für die Berechnung der Codierungsschlüssel zwischen Basisstation und Mobilteil verwendet.
DE U TSCH 5) Drücken Sie nochmals die OK-Taste, um die Basisstation auszuwählen. 6) Geben Sie den neuen Zugangscode ein und bestätigen Sie mit der OK-Taste. 7) Drücken Sie die linke Display-Taste für Ja, um die Änderung zu übernehmen. 8) Anschließend wählen Sie Mobilteil aus und drücken wieder die OK-Taste. 9) Es folgt der Hinweis im Display: „Bitte auch PIN der Basis einstellen“. Drücken Sie erneut die OK-Taste, um nun den Zugangscode für das Mobilteil einzugeben.
Änderung der Zeitzone 1) Drücken Sie im Ruhezustand die OK-Taste, wählen Sie Einstellungen und drücken Sie anschließend die OK-Taste. 2) Wählen Sie nun Systemeinstellungen aus und drücken Sie wieder die OK-Taste. 3) Sie werden aufgefordert, den PIN-Code einzugeben. Die Werkseinstellung ist 0000. Drücken Sie die OK-Taste. 4) Wählen Sie nun Uhrzeit und Datum aus und drücken Sie wieder die OK-Taste. 5) Gehen Sie mit den Steuer-Tasten zu dem Menüpunkt Zeitzone und drücken Sie erneut die OK-Taste.
DE U TSCH Auswahl des SIP-Kontos für abgehende Gespräche Sie müssen das SIP-Konto auswählen, welches Sie für abgehende Gespräche verwenden möchten. Sie können aus bis zu 8 SIP-Konten auswählen. 1) Drücken Sie im Ruhezustand die OK-Taste, wählen Sie Einstellungen und drücken anschließend die OK-Taste. 2) Wählen Sie nun Telefonieeinstell. aus und drücken wieder die OK-Taste. 3) Wählen Sie nun VoIP-Verbindungen aus und drücken Sie wieder die OK-Taste. 4) Sie werden aufgefordert, den PIN-Code einzugeben.
Sie können für das betroffene Mobilteil die jeweiligen Konten aktivieren bzw. deaktivieren. Der jeweilige Status wird durch eine grüne Kontrollmarkierung im Display angezeigt. Aktualisierung der Firmware Um sicherzustellen, dass die Firmware Ihres Gerätes auf dem neuesten Stand ist, wird die Durchführung einer Aktualisierung empfohlen. Wie wird die Firmware aktualisiert Wenn ein Update erhältlich ist, erscheint im Display eine entsprechende Nachricht.
DE U TSCH drücken Sie erneut die OK-Taste. Alternativ können Sie mit der rechten Display-Taste für Ansicht weitere Informationen abrufen. 3) Wählen Sie – falls vorhanden – die Sprache aus. 4) Anschließend müssen Sie den Vorgang nochmals bestätigen, indem Sie die linke DisplayTaste für Ja betätigen. Die benötigte Zeit für die Aktualisierung der Firmware ist abhängig von der Größe der Aktualisierungsdatei und der InternetGeschwindigkeit.
Telefonieren DE U TSCH In diesem Abschnitt finden Sie die Beschreibung zur Durchführung von Telefongesprächen. Bei ein-/ ausgehenden Anrufen bzw. wenn das Gerät verbunden ist, sehen Sie die folgenden Symbole im Display: • Anruf • Verbundenes Gerät Ein Gespräch einleiten Um einen Anruf zu tätigen, führen Sie die nachfolgenden Schritte durch. • Geben Sie im Ruhezustand des Mobilteils die gewünschte Rufnummer ein und drücken anschließend die grüne Abheben-Taste.
DE U TSCH Anrufe über das Telefonbuch 1) Drücken Sie im Ruhezustand die OK-Taste, wählen Sie Telefonbuch und drücken Sie anschließend erneut die OK-Taste. 2) Wählen Sie mit den Steuertasten den gewünschten Kontakt aus 3) Drücken Sie nun die grüne Abheben-Taste, um mit der Standard-Rufnummer des Kontaktes verbunden zu werden.
Wahlwiederholung DE U TSCH 1) Drücken Sie im Ruhezustand die rechte Display-Taste für Optionen. 2) Wählen Sie nun Wahlwiederholung aus, indem Sie die OK-Taste drücken. 3) Nun wird die zuletzt gewählte Rufnummer angezeigt. 4) Drücken Sie nun die grüne Abheben-Taste, um den Anruf zu starten. Notruf Geben Sie die lokale Notrufnummer ein und drücken Sie anschließend die grüne Abheben-Taste. In den nachfolgenden Situationen kann kein Notruf durchgeführt werden: • Während der Aktualisierung der Firmware.
DE U TSCH Sie können im Menü einstellen, dass das den Anruf automatisch entgegennimmt, wenn das Mobilteil aus der Mobilteil-Ladeschale entnommen wird. Makeln (Halten / Wiederaufnahme) Um zwischen zwei Gesprächen zu makeln müssen Sie den ersten Anruf halten. Drücken Sie dazu die Halten Taste. Um den Anruf zurückzuholen drücken Sie Optionen Taste, wählen Sie Ruf wiederaufnehmen, drücken Sie die OK Taste, alternativ können Sie auch die Rote Telefontaste drücken.
Wenn Sie einen Anruf für jemand dritten Empfangen, und vor dem Weiterleiten Rückfragen wollen. Legen die den Anrufer auf Halten (siehe Makeln), wählen sie die Rufnummer des dritten den der Anrufer sprechen möchte. Falls dieser den Anruf entgegennehmen möchte drücken Sie die Optionen Taste, wählen Sie Weiterleiten aus und drücken Sie OK. Die zwei aktiven Gespräche werden miteinander verbunden und das kehrt in den Ruhezustand zurück.
SAFETY INFORMATION & WARRANTY USA Intended Use This telephone is designed for telephoning within the Internet. Any other use is considered unintended use. Any modification or reconstruction not described in the user manual is considered unintended use. IMPORTANT SAFETY INFORMATION Follow all instructions and warnings in the user manual, and on the equipment to prevent accidents. • Unplug from wall outlet before cleaning.
equipment is subsequently used. • Do not overload wall outlets and extension cords. • Unplug equipment and contact qualified service if any of the following has occurred: 1. Power supply cord or plug has been damaged or frayed. 2. Liquid has been spilled on or in the equipment. 3. Equipment has been exposed to rain or water. 4. Equipment does not work normally even when the operating instructions are followed. Adjust only those controls referred to in the operating instructions.
650mAh) specified in the owner’s manual. • Do not use other batteries or conventional alkaline batteries. • To avoid explosion, do not dispose of battery pack in a fire. • Review battery package insert for disposal instructions. Li-ion battery must be disposed of properly and may need to be recycled. Contact your local recycling center for proper disposal methods. • Do not open or mutilate battery pack. Released electrolyte is corrosive and may damage eyes and skin and may be toxic if swallowed.
or near a television, VCR, or microwave oven. 5. Do not expose the equipment to direct sunlight. 6. Do not place equipment on an unstable cart, stand, or table. 7. Adjust only those controls referred to in the operating instructions. Improper adjustment of other controls may result in damage and may require extensive work to restore equipment to normal operation. 8. The equipment may get warm when batteries are being charged.
FCC RF exposure warning To insure the safety of users, the FCC has established criteria for the amount of radio frequency energy various products may produce depending on their intended usage. This product has been tested and found to comply with the FCC’s exposure criteria. For body worn operation, the FCC RF exposure guidelines were also met when used with the accessories supplied or designed for this product.
stantial margin of safety to give additional protection for the public and to account for any variations in. RF exposure FCC Tests for SAR are conducted using standard operating positions specified by the FCC with the phone transmitting at its highest certified power level in all tested frequency bands. Although the SAR is determined at the highest certified power level, the actual SAR level of the phone while operation can be well below the maximum value.
telephone numbers in these locations. If you do, please keep three things in mind: 1. It is recommend that you also write the telephone number on the directory card, so that you can still dial the emergency number manually if the memory dialing feature doesn’t work. 2. This feature is provided only as a convenience, and the manufacturer assumes no responsibility for customer reliance upon the memory feature. 3. Testing the emergency telephone numbers you have stored is not recommended.
product. snom’s warranty obligations are limited tothe specific terms set forth below: One Year Limited Warranty. snom warrants to the original retail purchaser (“you”) that the snom m3 product will be free from defects in materials and workmanship for a period of one (1) year from the date of your original purchase (the “Warranty Period”), subject to specific exclusions, identified below.
the exception of damage or defects in (i) the product’s battery, (ii) the product’s antenna, (iii) data stored on the product that may be lost or corrupted, or (iv) cosmetic damage to the product, that does not affect the product’s functionality (the “Excluded Items”). snom will not provide warranty service for Excluded Items.
2. Disconnect the battery from the product. 3. Pack the product carefully (preferably in its original packaging), and separately secure the battery in its own separate packaging within the shipping carton. 4. Include in your shipping carton all parts, accessories, manuals, and other materials originally packaged with the product. 5. Include in the shipping carton a copy of the original sales receipt or other evidence of the date of original purchase. 6.
rights, and you may also have other rights which vary from State to State. No Modifications. No snom reseller, agent, or employee is authorized to make any modification, extension, or addition to this Limited Warranty. If you receive retailer advertising, statements, or other information that conflicts with this Limited Warranty, whether oral or written, you should not rely on such statements. Connection between Product Pricing and Limited Warranty.
and should not be used by people with pacemakers. • Do not install the base in bathrooms or shower rooms. The handset and base are not watertight. • Do not use the telephone in environments subject to explosion hazard (e.g. auto paint shops). Cleaning • Simply clean the handset and base station with a damp (not wet) cloth, or an anti-static wipe. • Never use household polish, as this will damage the product. • Never use a dry cloth as this may cause a static shock.
12 months from the day on which the Customer originally purchased the Product from a retailer. Subsequent changes of ownership do not extend the warranty period. • The Warranty is valid solely on the condition that the Product is taken to a retailer within the warranty period. In the event of a fault or defect in the Product, it must be taken to a retailer in the country in which the Product was purchased. Products are repaired or exchanged at the retailer’s own discretion.
SAFETY INFORMATION & WARRANTY NEW ZEALAND Intended Use This telephone is designed for telephoning within the Internet. Any other use is considered unintended use. Unauthorised modifications or reconstruction not described in this manual are not permitted. Safety information General • Only use the power supply included with the product. Using an unauthorised power supply will invalidate the product guarantee and may damage the telephone.
your product could be damaged by a thunder storm. We recommend that you unplug the power and telephone line cord and switch off your computer during a thunder storm. Limited Warranty This limited warranty (hereinafter the Warranty) is valid for the products snom m3 and snom m3 handset and original accessories thereof (hereinafter the Product). The Warranty is valid only in the country in which the product was originally purchased.
use of accessories or other peripheral units which are not original accessories intended for use with the Product, • if the fault is due to a break in the network or power supply, • if the fault is due to the fact that the battery has short circuited or has been forced open or an attempt made to modify it, or the battery has been used in equipment other than for which it is intended, • if the software in the Product needs to be upgraded due to changes in the network.
WWW SNOM COM